德森印刷机说明书之操作手册-4d1321fc284ac850ac024234.pdf - 第49页
深圳德森精密设备有限公司 Shenzhen Desen Pre cision Machine Co., Ltd. - 49 - T o e nter the d ialog b o x, click E dit Prog ram. 说明: Notes: Notes: Notes: Notes: 只要将 PCB 参数设置好后, 图中的 “ 印刷起点 ” 、 “ 印刷长度 ” “ 清洗起点 ” “ 清洗 长 度 ” 数值自动生成, 用户…
深圳德森精密设备有限公司
Shenzhen Desen Precision Machine Co., Ltd.
- 48 -
4.5
4.5
4.5
4.5
Use
Use
Use
Use
direction
direction
direction
direction
for
for
for
for
the
the
the
the
main
main
main
main
tool
tool
tool
tool
bar
bar
bar
bar
4.5.1
4.5.1
4.5.1
4.5.1
[
[
[
[
资料录入 ]
]
]
]
4.5.1
4.5.1
4.5.1
4.5.1
Data
Data
Data
Data
Input
Input
Input
Input
其作用是设定或修改 PCB 参数设置及刮刀压力、运输、印刷、清洗等参数,操作如下:
It
is used to set or amend the parameter settings of PCB board and squeegee pressure, transport,
printing, cleaning and other parameters. T he operating steps are as follows:
1.
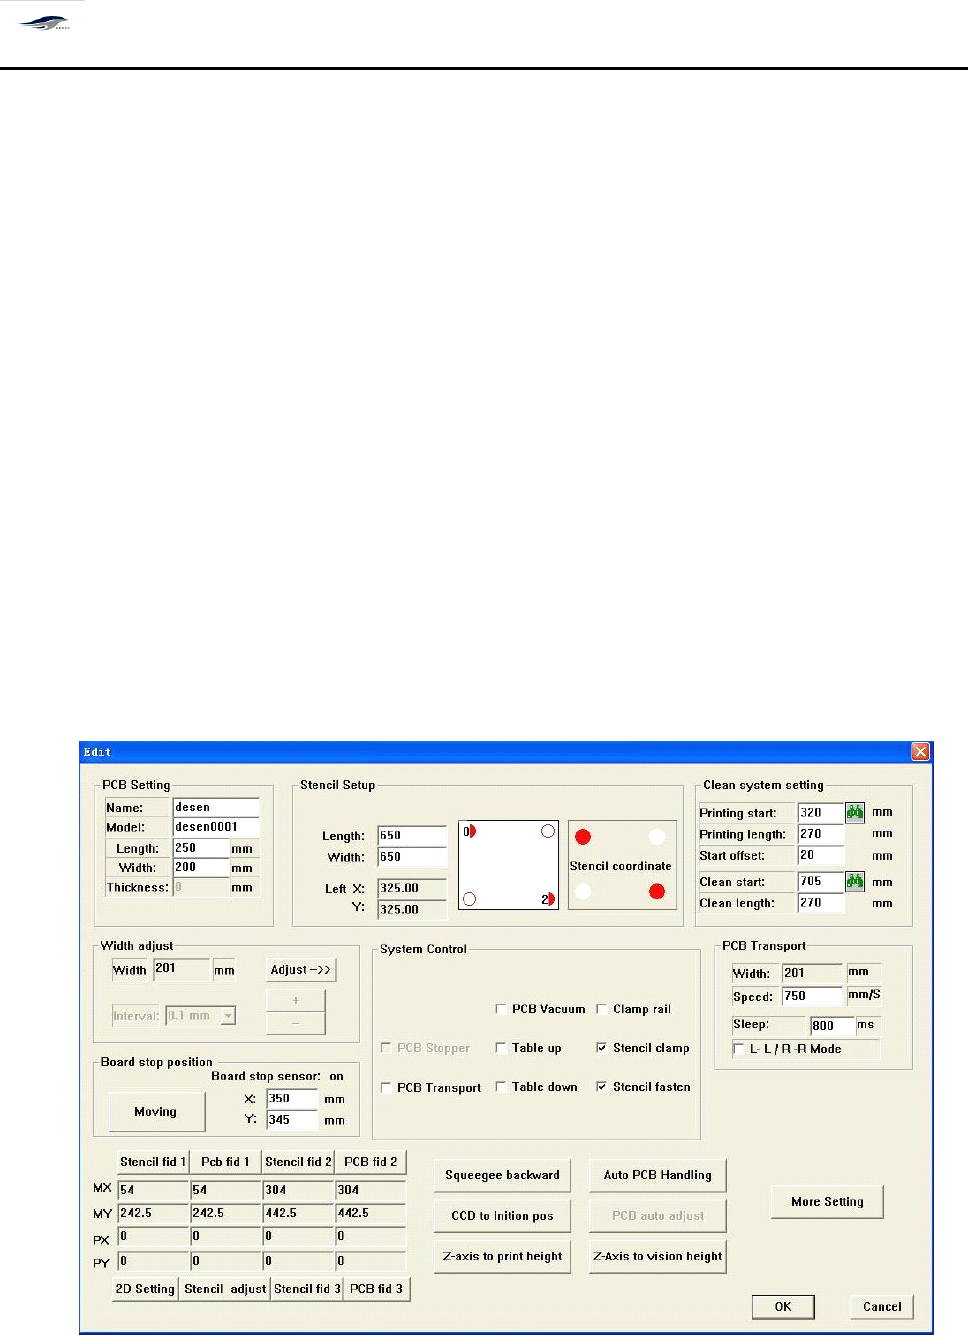
单击工具栏中 [ 程序编辑 ] 按钮或 [ 设置 / 印刷参数设置 ] ,即可进入 [ 生产编辑 ] 对话框,如图
4 – 25 所示:在 [ 生产编辑 ] 对话框中可进行 “ PCB 设置
”
、
“ 控制方式
”
(系统默认为自动)
、
“ 运输设定与宽度调节
” 、
“ 清洗与印刷设置 ” 、 PCB 定位等参数的设定。
1. Clicking Edit Program button or Printing Parameter Setting under Setting option will enter
Production Edit dialog box as shown in Figure 4-25. In the Production Edit dialog box, settings of
parameters such as PCB Setting, Control Manner
(it
is defaulted as automatic mode by the system),
Transport Setting and Width Adjustment, Cleaning and Printing Setting, and PCB Locating can be
practiced.
图 4- 25 〈生产编辑〉
Figure 4-25 Production Edit
对话框进入方式: [ 程序编辑 ]
深圳德森精密设备有限公司
Shenzhen Desen Precision Machine Co., Ltd.
- 49 -
To
enter the dialog box, click Edit Program.
说明:
Notes:
Notes:
Notes:
Notes:
只要将 PCB 参数设置好后,图中的 “ 印刷起点
”
、
“ 印刷长度
” “
清洗起点
” “
清洗 长
度
”
数值自动生成, 用户也可以根据生产的实际情况进行修改; 输入数值应大于 P CB
板的宽度。
As long as the PCB parameters are well set, the values of Printing Start Point, Printing
Length, Cleaning Starting Point and Cleaning Length will be created automatically. T hese
values can be amended in compliance with the actual conditions of production. T he input
values shall be larger than PCB board width;
在 [ 生产编辑 ] 中输入 PCB 板的长、宽、厚参数后,则运输宽度无需设定,自动显 示
为 “ PCB 板宽 +1
”
。
After the length, width and thickness parameters of PCB board are inputted in Production
Edit, the transport width is unnecessary to set and will be displayed as “ PCB board
’
s
width
+ 1 ” automatically;
在进行参数设置时,如所输入的数值超出机器设置范围,屏幕会显示 “ 输入超出 范
围 ” 的错误提示,并告诉你所输入参数的机器设置范围。
When in the parameter setting, if the inputted value goes beyond the setting scope of
printing machine, the screen will display an error prompt of “ Input exceeds scope ” and
give the correct setting scope of the inputted parameter; and
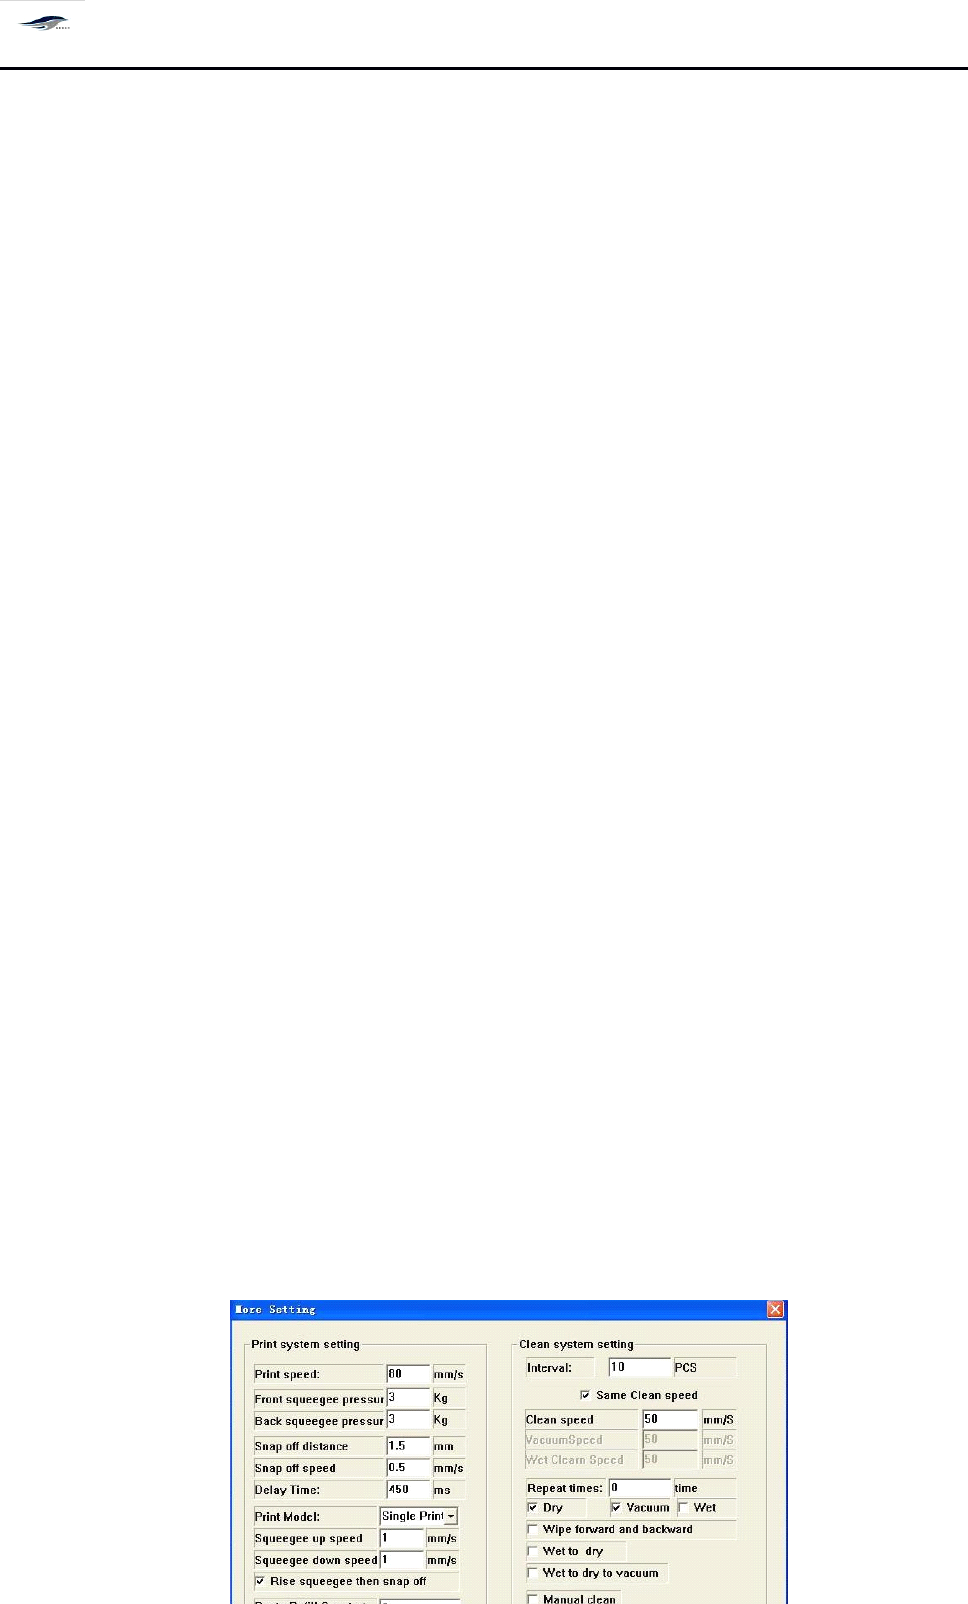
设置刮刀压力、刮刀速度、选择单刮或双刮及刮刀的运行方向;可选择 “
干、湿、
吸真空
”
自动清洗方式及清洗的速度和时间间隔, 也可选择行动的 “ 人工清洗方 式
” ;
可设置标志点图标类型;如图 4 – 26 所示:
Set the squeegee pressure, scrapper speed, single/double squeegees, and the moving
direction of squeegee. C hoose the “ dry/wet/vacuumized ” automatic cleaning manner and
the rate and time interval of cleaning or choose “ Manual cleaning manner ”
.
I
t
can set
signalized point icon type. S ee Figure 4-26.
深圳德森精密设备有限公司
Shenzhen Desen Precision Machine Co., Ltd.
- 50 -
图 4- 26 〈详细数据〉
Figure 4-26 Detailed Data
进入方式:主工具中 [ 程序编辑 ]+[ 详细数据 ]
To
enter the dialog box, click Edit Program and Detailed Data in the main tool bar respectively.
可设置视觉校正的取象方式 —— 双照或只第一次双照;还可对印刷精度进行设置。
It
can set the image taking manner, double-image-taking or the double-image-taking of the
first time, of visual calibration. I
t
can also set the printing precision.
注意:
Cautions:
Cautions:
Cautions:
Cautions:
a)
在设置视觉校正的取象方式时,如选择只第一次双照,则开始生产时只首次双照,
以后每次进板只对 PCB 板进行单照。
a) If the double-image-taking of the first time is chosen when setting the image taking manner
of visual calibration, only double-image-taking of the first time is taken in earlier stage of
production. A nd only single-image-taking is practiced for PCB boards in the board incoming of
each time;
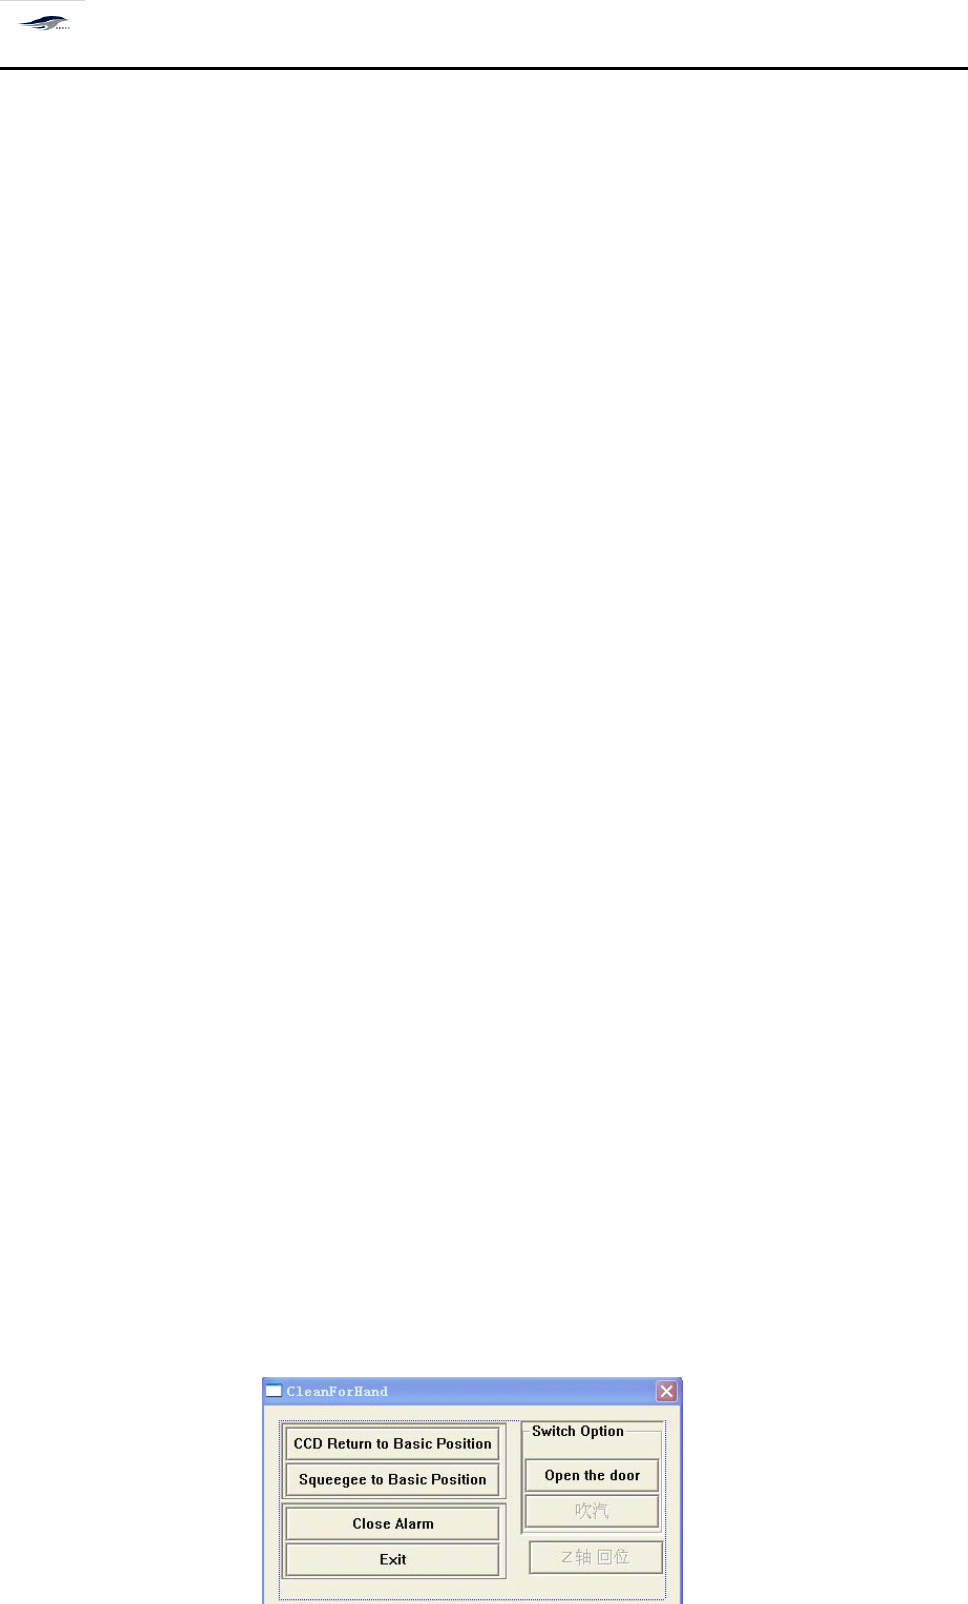
b)
如在此对话框中选择手动的 “ 人工清洗方式
”
,在正常生产过程中,机器会按此
对话框中所输入的 “ 清洗间隔 ” 参数生产完一定数量的产品后自动停下,并出现 “ 人 工
清洗 ” 对话框,如图 4 – 27 所示,等待人工清洗网板,步骤如下:
b) If “ Manual cleaning manner ” is chosen in the dialog box, in normal production, the
printing machine will stop automatically after producing some products based on the
“ Cleaning interval ” parameter inputted in the dialog box, meanwhile, “ Manual cleaning ”
dialog box as shown in Figure 4-27 will emerge, waiting for the manual cleaning of screen.
T he steps are as follows: