00198536-02_AI_Mixed-Mode_TX2iV1_TX2V2_de_en.pdf - 第88页
3 Installation 3.2 Adapting the hose connections at the pneumatics block 88 Assembly Instructions / Montageanleitung SIPLACE TX2i V1 SIPLACE TX2 V2 Option Mixed-Mode 01/2019 3.2.1 Removing the cover of the trailing inter…

3 Installation
3.1 Sealing the Pneumatic Screwed Connections
Assembly Instructions / Montageanleitung SIPLACE TX2i V1 SIPLACE TX2 V2 Option Mixed-Mode 01/2019 87
3 Installation
Please observe the following steps:
●
Modifying the hose connections for the mixed mode
●
Installing the vacuum pump
●
Installing the vacuum control valve
●
Replacing the side sections of the NC (CPP)
●
Replacing the holder for the nozzle reject station
NOTICE
Assembly instructions for the vacuum pump
► Please also observe the assembly instructions for the "Option Vacuum Pump
SIPLACE TX V1/V2-Series" [DE+EN: 00198147‑xx]
3.1 Sealing the Pneumatic Screwed Connections
NOTICE
Sealing the pneumatic screwed connections
If pneumatic screwed connections are loosened, these will need to be sealed again after-
wards. Always use the same sealing technique as was used before they were removed.
The following sealing techniques are available:
► Sealing ring (rubber or plastic)
These are either supplied or you can use the ones used before. Check the condition of
used sealing rings for damage.
► Sealant
There are several variants of this:
Loctite 567 [03097172-xx] and Loctite 55 [03092492-xx]
After loosening the pneumatic screwed connection, clean the screwed thread and seal
it with Loctite. The sealing thread for Loctite 55 must be wound on in the direction of
the screwed thread.
There may also already be a sealant on the screwed thread.
3.2 Adapting the hose connections at the pneumatics block
The pneumatics block is located underneath the trailing interfaces. For this reason, you have to
partially dismantle the interfaces as described in the following sections.
For details about the trailing interface on the SIPLACE TX V1, please refer to section 4.1.2.1 "Re-
placing the Trailing Cable Interface" [}105] (excerpt of the service manual).
For details about the trailing interface on the SIPLACE TX V2, please refer to section 4.1.3.1 "Re-
placing the Trailing Cable Interface" [}118] (excerpt of the service manual).
See also
2 3.2.2.1 "Gantry without vacuum hoses (gantry with CPP)" [}92]
2 3.2.2.2 "Gantry with vacuum hoses(gantry with C&P20x)" [}94]

3 Installation
3.2 Adapting the hose connections at the pneumatics block
88 Assembly Instructions / Montageanleitung SIPLACE TX2i V1 SIPLACE TX2 V2 Option Mixed-Mode 01/2019
3.2.1 Removing the cover of the trailing interface
SIPLACE TX V1:
Fig.13: Cover over the trailing interface 1 and2
► Remove the five screws(1) of the
cover(2) over trailing interface1 and2.
► Lift off the cover.
SIPLACE TX V2:
Fig.14: Cover
► Loosen the four fastening screws(1)
(Allen key2.5).
► Pull the cover (2) slightly forwards and
then take it up and off.
3 Installation
3.2 Adapting the hose connections at the pneumatics block
Assembly Instructions / Montageanleitung SIPLACE TX2i V1 SIPLACE TX2 V2 Option Mixed-Mode 01/2019 89
3.2.2 Creating access to the pneumatics block and modifying the hose
connections
NOTICE
The following description shows the conversion for configuration of gantry1 with C&P20x
head (vacuum pump) and gantry2 with CPP head.
The procedure for configuration of gantry2 with C&P20x head (vacuum pump) and gantry1
with CPP head is the same.
NOTICE
Do not loosen the screws of both trailing interfaces at the same time.
► Begin with the trailing interface for the gantry without vacuum hoses (gantry with
CPP).
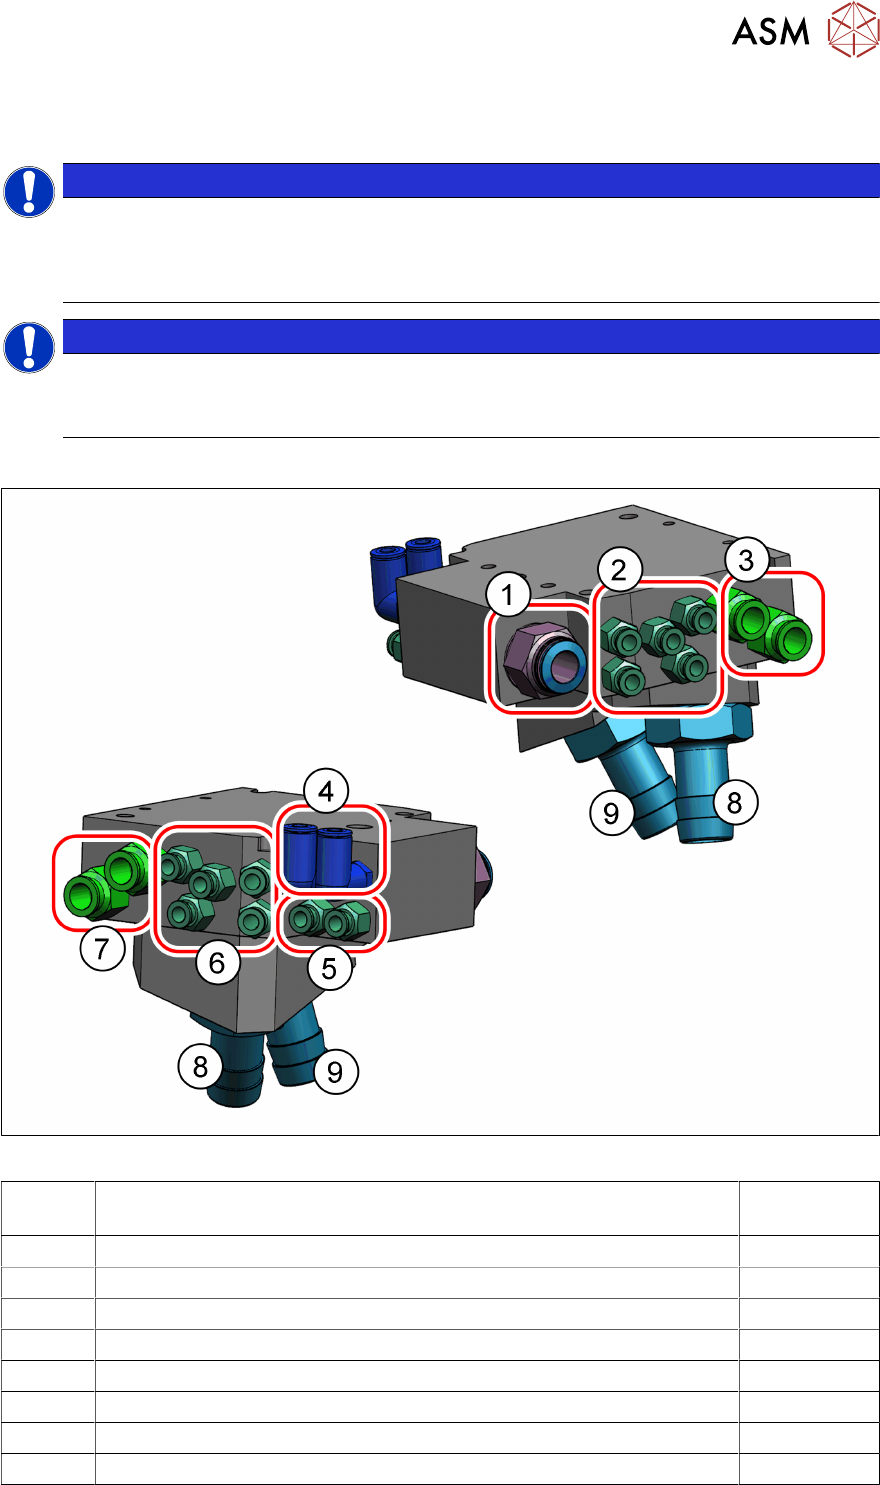
Overview - pneumatics block
Fig.15: Connections on the pneumatics block (using a SIPLACETXV2 as example)
1 Pneumatic hose PUN12 from proportional valve (compressed air place-
ment circuit inlet)
2 5x connections for the 7-fold hose in the trailing cable Gantry 1
3 2x vacuum hoses (Camozzi) Gantry 1
4 2x connections 7-fold hose (placement circuit outlet) Gantry 1
5 2x connections 7-fold hose (placement circuit outlet) Gantry 2
6 5x connections for 7-fold hose Gantry 2
7 2x vacuum hoses (Camozzi) Gantry 2
8 Fabric hose vacuum
9 Fabric hose compressed air or vacuum