JO-116-001_w.pdf - 第59页
3-10 JO-1 16 1 105-001 4. "T ype Setting" Window 4. "T ype Setting" Window Displayed is the type data. When you press the [Setting] button at each window , the "T ype Setting" window opens. …
3-9
JO-116
1105-001
3. "Type Listup" Window
Type Editing
The authority "Power User" or higher is required to edit the types.
Change the authority level to "Power User" or "Administrator".
Reference
Refer to "1. Administrative Authority Change" in "Section 3" for details.
(1) Type Copy
It is possible to make a copy of the currently selected type and allocate
it to another type No.
Move the subcursor ("No." Cell in Blue) to the destination type No.
area for copying.
The [Copy] button appears. Press it.
The message box of the conrmation opens. Press the [OK] button.
The data is copied.
(2) Type Deletion
It is possible to delete a type other than the currently selected one.
Move the subcursor ("No." Cell in Blue) to the destination type No.
area of the type to be deleted.
The [Delete] button appears. Press it.
The message box of the conrmation opens. Press the [OK] button.
Notice
Once the data is deleted, it cannot be recovered.
3-10
JO-116
1105-001
4. "Type Setting" Window
4. "Type Setting" Window
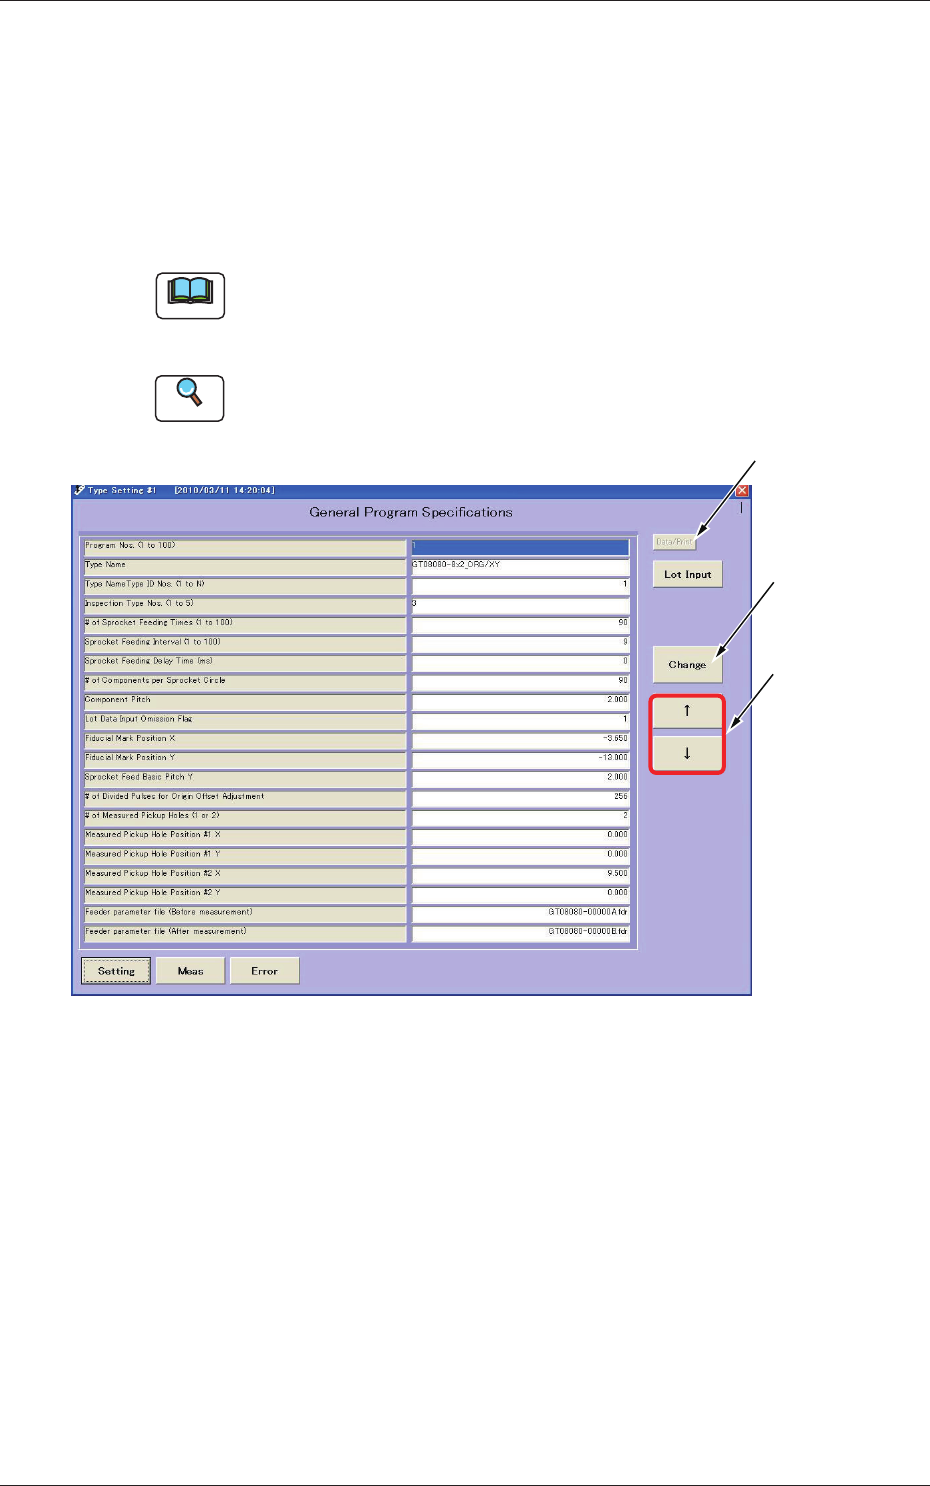
Displayed is the type data.
When you press the [Setting] button at each window, the "Type Setting"
window opens.
Pressing the [Setting] button again opens the "Type Listup" or the "Type
Setting" window or vice versa.
Note
Only "Administrator" or "Power User" can change each executable data in
this window.
"User" can execute only the selection of types.
Reference
Refer to "1. Administrative Authority Change" in "Section 3" for details.
Used to print
the type data.
Used to change
the set value.
Used to move
the cursor.
Fig. C12 "Type Setting" Window

3-11
JO-116
1105-001
4. "Type Setting" Window
(1) Outline of Each Type
Data Program Nos. (1 to 100)
These Nos. represent the type Nos. of the type data and are used to
change the type data.
Up to 100 types (from 1 to 100) can be registered.
Type Name
It is advisable that a name starting with the feeder type No. should be
entered and the type (contents) can be identied easily.
A type can be selected according to the type name in the "Type Listup"
window.
Up to 40 alphanumeric characters can be used as an ID.
As the former string of characters (feeder type name) is searched during
automatic type selection, it is recommended that a title name should be
entered starting with the type name.
Type Name Type ID Nos. (1 to N)
This represents the regulated ID No. for type display regulation.
A value "1 to N" is used to specify the type.
"N" is separately specied by setting the type-based classication list.
Inspection Type Nos. (1 to 5)
Specify the number which represents the contents of inspection.
A number "1 to 5" can be set.
1:
Inspection of Lane Origin Offset Adjustment
2:
Inspection of Fiducial Mark Positioning
3:
Simultaneous Inspections (above-described "1" and "2")
In the case of the following tape feeder models for SIGMA-G4/G5 and
GXH Series inspection type No. 4 or 5 is to be designated.
GT/GD-2808 / 28083
4:
Simultaneous and complicated lane origin offset adjustment and
recognition mark position adjustment and sprocket offset adjustment
operations.
5:
For the lane origin offset adjustment, recognition mark position
adjustment and sprocket offset adjustment, the already set values are
reected.
# of Sprocket Feeding Times (1 to 100)
Specify the maximum value that represents the number of sprocket
feeding times for inspection.
A value "1 to 100" can be set.
Sprocket Feeding Interval (1 to 100)
Specify the number of sprocket feeding times required after the
inspection is executed.
A value "1 to 100" can be set.