JO-116-001_w.pdf - 第65页
3-16 JO-1 16 1 105-001 4. "T ype Setting" Window • 5: Lane Origin Offset Adjustment and Recognition Mark Position Adjustment Note This inspection type No. is used only for the GT/GD-28081 or 28083. This complic…
3-15
JO-116
1105-001
4. "Type Setting" Window
•
3: Simultaneous Inspections "1" and "2"
The lane origin offset and ducial mark position adjustments are
inspected at the same time.
The origin offset value for the Y axis is calculated according to the
shifted distance of the pickup hole based on the design value and
the shifted distances of the X and Y axes from the ducial mark are
recalculated and displayed after being inspected.
Each value displayed during the inspection represents the result of
image processing based on the position moved to the rst pickup
hole.
After all specied pickup holes have been inspected, the origin
offsets are gured out and the distances shifted from the ducial
mark are also calculated based on the result of origin offset correction
and redisplayed.
The results of judgment are based on the values obtained after this
recalculation.
•
4: Lane Origin Offset Adjustment, Recognition Mark Position
Adjustment and Sprocket Offset Adjustment
Note
This inspection type No. is used only for the GT/GD-28081 or
28083.
This complicated processing is used to perform the lane origin offset
adjustment, recognition mark position adjustment and sprocket offset
adjustment in a single inspection.
The same adjustment before the shipping from the factory is
performed in the case that the feeder feeding section is disassembled
or reassembled, or when it is disassembled to replace the part.
Because in the automatic type change, [Measurement Type 5] in the
next item is selected preferentially, so the measurement type should
be set in advance in the manual type change, when this adjustment is
to be performed.
Because the applicable GT/GD-28081 or 28083 feeder is for ne
components, the sprocket offset function is included to absorb the
sprocket peculiarity that affects the tape feeder position accuracy.
Therefore, the values including this sprocket offset value are
calculated.
The adjustment and inspection procedure after the master tape setup
is the same as for [Measurement Type 2] or [Measurement Type
3]. However, the measurement times are increased to calculate the
sprocket offset. In this case, any measurement can not be omitted.
Before the master tape is setup, the sprocket reference positioning
operation is performed.
Reference
Refer to the Item of "2.1 Operation Procedure for [Measurement
Type 4]" in "Section 4", for details.
3-16
JO-116
1105-001
4. "Type Setting" Window
•
5: Lane Origin Offset Adjustment and Recognition Mark
Position Adjustment
Note
This inspection type No. is used only for the GT/GD-28081 or
28083.
This complicated processing is used to perform the lane origin offset
adjustment and recognition mark position adjustment in a single
inspection using the sprocket offset value set in the feeder.
This [Measurement Type 5] is selected preferentially in the automatic
type change. The adjustment and inspection procedure after the
master tape setup is the same as for [Measurement Type 2] or
[Measurement Type 3]. Before the master tape setup, the sprocket
reference positioning operation is to be performed.
Reference
Refer to the Item of "2.2 Operation Procedure for [Measurement
Type 5]" in "Section 4", for details.
(3) Type Change
The type change method can be divided roughly into "Automatic Type
Change" and "Manual Type Change".
Automatic Type Change
After a certain type and serial No. are read, the corresponding type is
selected automatically.
In the type retrieval process, it is checked if the read type exists or not
by using the type name of the type data.
Note
When the specied type data is the same as the read one, no type
retrieval is made.
When the required type cannot be retrieved automatically, it is
required to create it.
3-17
JO-116
1105-001
4. "Type Setting" Window
Manual Type Change
•
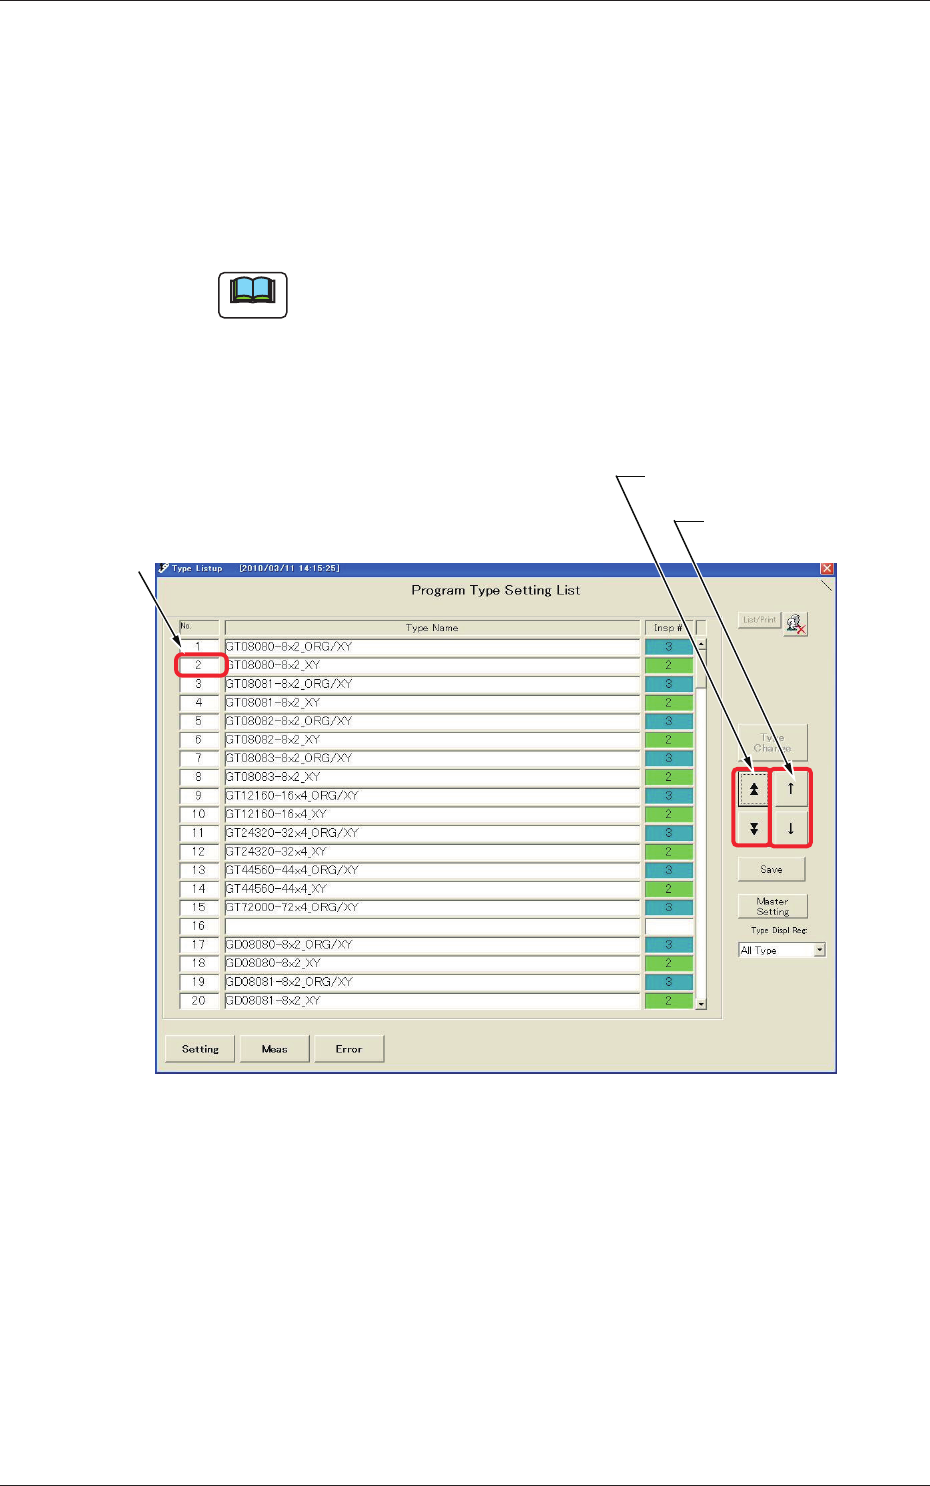
Specication in "Type Listup"
Window When the "Type Setting" window is active, press the [Setting]
button.
The "Type Listup" window opens.
Use the [Page Selection] or [Cursor Movement] button to move the
subcursor to the target type No.
Note
The subcursor can also be moved by clicking the scroll bar, directly
the No. of the pertinent line in the list, or the type name area.
Press the [Type Change] button.
The type data corresponding to the No. specied by the subcursor is
called and displayed.
Subcursor
[Page Selection] Button
[Cursor Movement]
Button
Fig. C13 "Type Listup" Window