00198268-02_GS_SIPLACE-Pro-14.1-R17-1_EN.pdf - 第27页
Getting S tarted SIPLACE Pro 14.1 (R17-1) 3 T utorial 05/2017 Edition 3.2 Exercise 1: Importing ASCII Centroid Data 27 Define the following settings in the St ep 3 o f 6 dialog box: Click on <Skip> in the heade…
3 Tutorial Getting Started SIPLACE Pro 14.1 (R17-1)
3.2 Exercise 1: Importing ASCII Centroid Data 05/2017 Edition
26
3
3
3.2 Exercise 1: Importing ASCII Centroid Data
3.2.1 Importing ASCII Centroid Data
Aim of exercise 3
To create a placement list from existing ASCII centroid data. 3
How to create a placement list 3
Open the Wizard with Tools => Import => ASCII Centroid Import Wizard... or click on the
icon.
Open the SingleBoard.cad file in the SIPLACE Pro target directory C:\Program Files\
SIPLACE\SIPLACE Pro\Stammdaten.
In the Step 1 of 6 dialog box at Import filter, select the option New.
Click on Next.
Define these delimiters in the Step 2 of 6 dialog box:
Click on Next.
Caution
At first import the GFs (with help of the shape library!
Note
These examples have been kept relatively simple to help new users familiarize them-
selves with the SIPLACE Pro user interface and functions.
Edit field Option
Choose a record delimiter <End of line>
Treat consectuive delimiters as one Enable
Field delimiters Tab

Getting Started SIPLACE Pro 14.1 (R17-1) 3 Tutorial
05/2017 Edition 3.2 Exercise 1: Importing ASCII Centroid Data
27
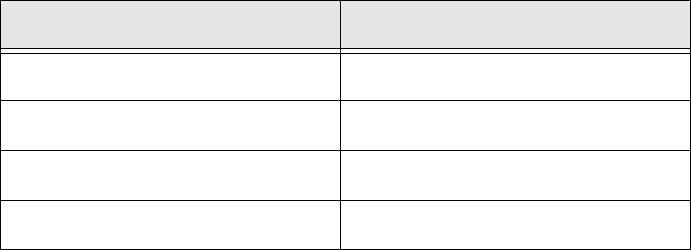
Define the following settings in the Step 3 of 6 dialog box:
Click on <Skip> in the header cell and select the designators for the individual columns from
the context menu:
The checkboxes in the Import column will be automatically enabled.
Disable the first line in the Import column if not already disabled - this includes column infor-
mation and not placements (should be automatically disabled).
Click on Next.
In the Step 4 of 6 dialog box, specify that you want to create a new placement list. Select Cre-
ate new from the list box.
Click on Next.
Edit field Option
Import unit mm
Radix Comma
Factor 1.000
Board side designators <None>
Column Column designator
Import <is automatically enabled
Column No. 1 Component
Column No. 2 X
Column No. 3 Y
Column No. 4 Angle
Column No. 5 Reference designator
Column No. 6 <Skip>
3 Tutorial Getting Started SIPLACE Pro 14.1 (R17-1)
3.2 Exercise 1: Importing ASCII Centroid Data 05/2017 Edition
28
Create a directory for this exercise My Components\Getting Started.
Select the following directories in the Step 5 of 6 dialog box:
3
Click on Next.
The Step 6 of 6 dialog box will appear. The placement list structure will be shown as a preview.
Click on Finish.
the placement list will be generated.
Dialog box/ Option Contents
Components folder (Read from) \Import
Components folder (Write to) \Getting Started (create)
Component Shape folder (Read from) <None>
Component Shape folder (Write to) <None>