00196376-0102_UM S-Feeder_EN.pdf - 第87页
Dip Module Activating the DIP Module Option Software Version 4xx (Platform 1) User Manual SIPLACE S-Feeder 87 5.9.5 Activating th e DIP Module Option The DIP flux option is activated by an entry in th e konfig.m a f ile …

Dip Module
Software Version 4xx (Platform 1) Configuring the DIP Module
86 User Manual SIPLACE S-Feeder
5.9.4.2 Recording the Z Position
►Determine the Z position by measuring the height difference from the input conveyor upper edge to
the plate base with the axis test box e.g. with a C&P 6 or C&P 12 head:
Determining the Z axis position
►Open the SITEST menu C&P - Head Axes.
►Position the gantry manually over the DIP module.
►Release the Z axis.
►Move Z axis onto DIP plate.
►Read out axis position with axis test box or SITEST software and note.
►Switch Z axis on again.
►Position gantry manually over the conveyor (height measurement position).
►Release the Z axis.
►Move Z axis to conveyor edge.
►Read out axis position with axis test box or SITEST software and note.
►Switch Z axis on again.
Calculating the DIP module height
CP 6 / 12 placement head
(conveyor upper edge [digits] – plate base [digits])/ 44.42 = Z position [mm].
CAUTION
The following task may only be performed by persons who have been thoroughly trained to use
the
axis test box. Incorrect, negative Z values can cause damage to the components.
NOTICE
If the surface of the DIP plate is lower than the conveyor surface, you need to specify a negative
DIP height!
Dip Module
Activating the DIP Module Option Software Version 4xx (Platform 1)
User Manual SIPLACE S-Feeder 87
5.9.5 Activating the DIP Module Option
The DIP flux option is activated by an entry in the konfig.ma file (SRDaten\srcma\konfig.ma) on the
station computer.
▪ The value for the DIP flux switch needs to be set to 1 to activate the DIP flux function.
A value of 0 deactivates the DIP flux function.
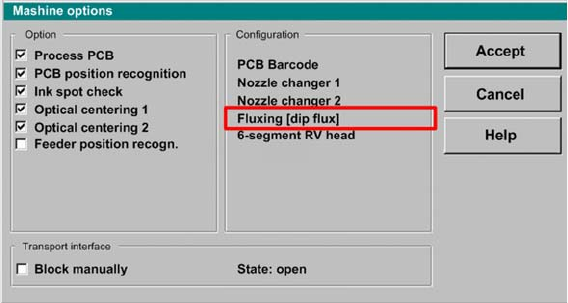
▪ After rebooting, you will see the entry:
"Fluxing[Dipflux]" and the corresponding pull down menus in the machine options.
User interface - machine options
Dip Module
Software Version 4xx (Platform 1) Data Input at Station Computer
88 User Manual SIPLACE S-Feeder
5.9.6 Data Input at Station Computer
5.9.6.1 Editing the Component Shape List
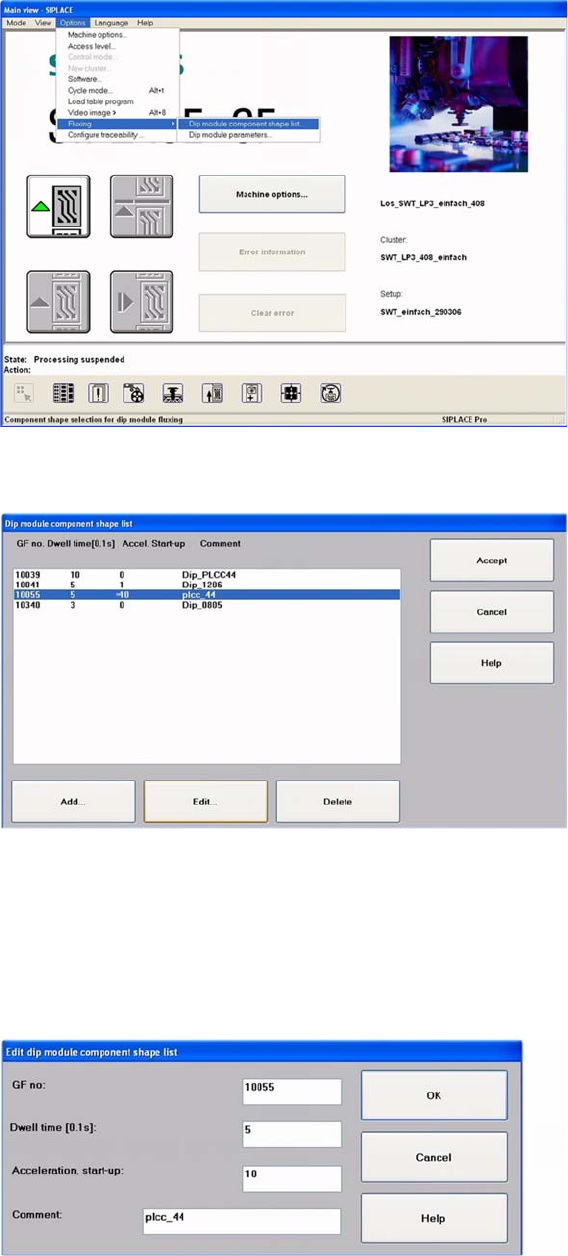
►Select:
"Options" -> "Fluxing" -> "Dip module CS list" from the menu.
User interface - selecting the component shape list for the DIP procedure
The DIP module component shape list will be shown.
DIP module - component shape list
►To add a new component, click on the "Add" button.
The following screen will be shown.
►To edit an existing or new component, mark the line concerned.
►Click on the Edit button, to edit an existing component shape.
The following dialog box will be shown.
DIP module component shape list: entering the "DIP module parameters"