00196376-0102_UM S-Feeder_EN.pdf - 第95页
Accessories Safety Instructions Tape Splice Tool for SMD Tape Connections User Manual SIPLACE S-Feeder 95 6.1.2 Safety Instructions 6.1.3 Tools Required Tools ▪ Tape splicin g tool ▪ Tape splicing tool, Item No. 021 0298…
Accessories
Tape Splice Tool for SMD Tape Connections Area of Use
94 User Manual SIPLACE S-Feeder
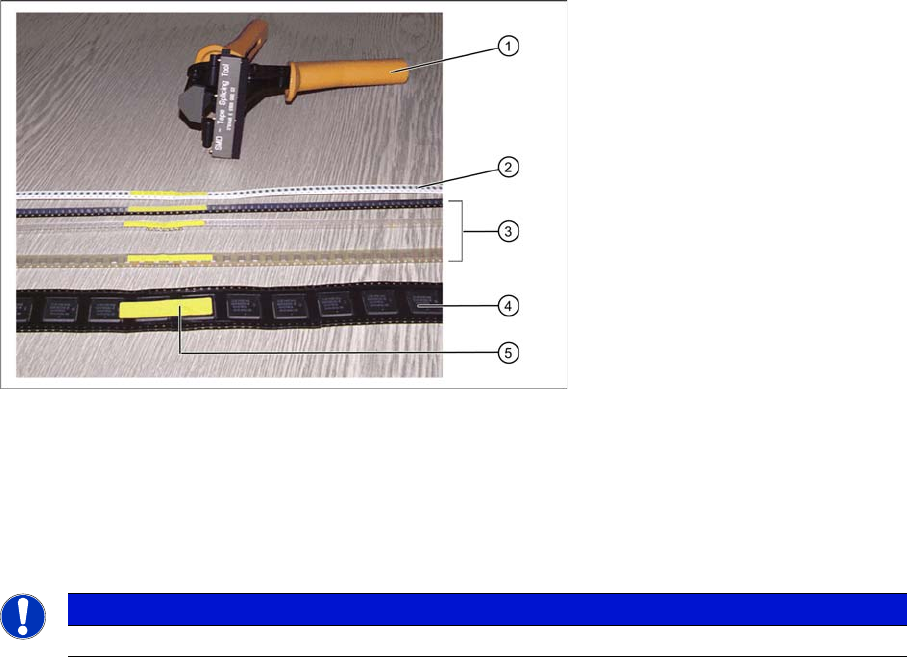
6.1.1 Area of Use
The tape splice tool enables you to splice on a new tape for refilling components on tapes without
causing a machine standstill.
The splicing procedure takes place outside the working area of the SIPLACE placement machine which
is secured with protective switches.
When splicing components on tapes, you connect the virtually finished paper or blister tape in the feeder
with the beginning of a new tape.
The tape splice tool functions like a crimping tool. It enables you to "rivet" the underside of the tape,
thereby connecting the "old" and "new" tapes with one another. A special adhesive strip on the upper
side of the tape connects the cover tape.
When correctly connected, the tape ends are joined together precisely along the perforations. The tape
- with its transition point - can then be seamlessly transported into the feeder and the foil can be stripped
off as usual.
The tape splice tool can be used to splice all blister or paper tapes.
Tapes WITHOUT cover tape (surf tapes) are NOT spliced together.
and complete splicing of paper and blister tapes (with single-sided and double-sided perforations
Legend:
1 Tape splicing tool 4 Blister tape with perforations on both sides
2 8 mm paper tape 5 Complete SMD tape splicing
3 Blister tapes with perforations on one side
NOTICE
The tape splice tool can be used easily by both right and left-handed persons.

Accessories
Safety Instructions Tape Splice Tool for SMD Tape Connections
User Manual SIPLACE S-Feeder 95
6.1.2 Safety Instructions
6.1.3 Tools Required
Tools
▪ Tape splicing tool
▪ Tape splicing tool, Item No. 02102987-xx (optional, without consumable materials package)
▪ Scissors for paper, sharp but not too long or pointed
▪ Pointed tweezers
▪ You may need a brush with shirt, firm bristles to clean the contact surface of the feeder on the
changeover table.
6.1.4 Consumable Materials Required
The following consumable materials are contained in the "Consumables package for tape splice tool",
Item No. 02102988-03:
▪ Special adhesive tape, width 8 mm
(Item No. for separate orders 00356343-xx)
▪ Splicing plates, suitable for all tapes used with SIPLACE placement machines, which can be
"refilled" by splicing!
(Item No. for separate orders 00318671-xx)
Not included in the above mentioned consumable materials package:
▪ Special adhesive tape, width 16 mm, Item No. 00356344-xx
WARNING
When closing the Zange, hold it away from your body and make sure that you do not get your
fingers near the closing apparatus.
CAUTION
The tape splice tool is only used outside the placement machine.
Make sure that no parts, such as the riveted strips or pieces of adhesive tape, can fall into the
feeder or the working area of the placement machine, as this could interrupt operation and
cause malfunctions.
NOTICE
To splice tapes, you require the
SIPLACE Operator Kit
,
Item No. 00349303-xx.
This Operator Kit contains 1 leather case, 1 pair SMD tweezers, 1 small slotted screwdriver,
1 small Phillips screwdriver, 1 pair scissors and 1 brush.
CAUTION
Make sure that you ONLY use the special adhesive tapes specified here for splicing.
NEVER use other adhesive tapes, such as normal sellotape!

Accessories
Tape Splice Tool for SMD Tape Connections Preparations
96 User Manual SIPLACE S-Feeder
6.1.5 Preparations
►Place all required tools and consumable materials on a conveniently accessible work surface e.g. in
an open, shallow container which you can then fix to the tape container or to a trolley.
►CUT a number of pieces from the special adhesive tape (with the correct width for your component
tape) and place them within reach of your working area.
►Place the splicing plates within reach.
6.1.6 Connecting the Tapes
6.1.6.1 Splicing Time
Correct
Join the tapes when there is approx. 1.5 m left of the "old" tape. This gives you enough time to perform
the splicing properly.
Incorrect
Do NOT join the tapes if the "old" tape is still so long that the volume of the new tape reel would be too
great, after the old tape has been connected and wound onto the new reel.
▪ In this case, the tape could get twisted more easily and then block the feeder.
▪ Part of the tape could also fall off the reel and be damaged on the floor.
Legend:
1 Consumable material package 5 Special adhesive tape 8 mm
2 Tweezers 6 Splicing plates
3 Scissors 7 Special adhesive tape 16 mm
4 Tape splicing tool
NOTICE
Make sure that the tapes are connected in good time, so that you do NOT have empty pickup
positions. Each empty pickup position can lead to a vacuum pickup error (error no. 43). Unsuc-
cessful pickup runs (pickup errors) reduce the performance of the placement machine. The 3rd
pickup error on a particular track causes a machine standstill, unless there is a substitute track
available.
NOTICE
You can prepare the beginning of the new tape reels before you actually perform splicing. This
helps reduce the time taken for splicing at the placement machine.