User Manual - SIPLACE Glue Feedeer.pdf - 第23页
3 Initial Operation User Manual SIPLACE Glue Feeder 05/2020 23 3 Initial Operation NOTICE Preconditions Furthermore, the machine at which you want to use the Glue Feeder must already be fitted with a connection to the …

2 General
2.3 Glue Dot Inspection and Teaching with SIPLACE Vision
22 User Manual SIPLACE Glue Feeder 05/2020
2.2.10 EU Declaration of Conformity
The product/device described conforms to the regulations and standards listed in the EU Decla-
ration of Conformity provided.
Manufacturer:
ASM Assembly Systems GmbH & Co. KG
Rupert-Mayer-Str. 44
D-81379 Munich
2.3 Glue Dot Inspection and Teaching with SIPLACE Vision
During the glue dot inspection, the glue dot is dispensed and then visually checked using a cam-
era. In order for a glue dot to be recognized and evaluated by SIPLACE Vision, a reference image
of the component is made just before the glue is applied to the component. This image is then
compared to the current image in which the glue has already been applied.
During a measurement job with glue dot inspection, the following is checked for each glue dot:
●
Is the glue dot present?
●
Is the size of the glue dot within the prescribed tolerance i.e. is the measured diameter of the
glue dot between the minimum and maximum circular area in the model?
●
is the glue dot within the prescribed target area? A rectangular target area can be defined in
the model. The inspection then checks whether the glue dot is completely within this target
area. If the glue dot touches the edge of the target area, an error will be reported.
Separate illumination can be set for the glue dot inspection as an option.
The following glue dot parameters can be changed in the CS Editor, with the station software:
●
Inspection (yes/no)
●
Tolerance for diameter of glue dot
●
Coordination of target area (size)
3 Initial Operation
User Manual SIPLACE Glue Feeder 05/2020 23
3 Initial Operation
NOTICE
Preconditions
Furthermore, the machine at which you want to use the Glue Feeder must already be fitted
with a connection to the safety circuit and a connection to the compressed air supply
WARNING
Protective clothing
Wear your personal protective clothing (protective goggles and gloves) for all work using or
on the Glue Feeder.
NOTICE
Calibrating the temperature regulation at all Glue Feeders
When taking a new Glue Feeder into operation in a production environment which already
uses other Glue Feeders, we recommend calibrating the temperature regulation of all Glue
Feeders. Calibrate with the "Glue Feeder calibration device" (item no. 03214618-xx), see
4.3.3
"Calibrating the temperature regulation" [}64].
The following steps must be completed in the prescribed order for setting up the Glue Feeder for
operation:
●
Insert the glue cartridge into the Glue Feeder
●
Place the Glue Feeder onto the setup location
●
Connect the Glue Feeder to the machine safety circuit
●
Connect the Glue Feeder to the machine compressed air supply
●
Predose the Glue Feeder i.e. distribute the glue in the glue unit (feed pipe, jet block and dis-
penser nozzle)
3 Initial Operation
3.1 Inserting the Cartridge
24 User Manual SIPLACE Glue Feeder 05/2020
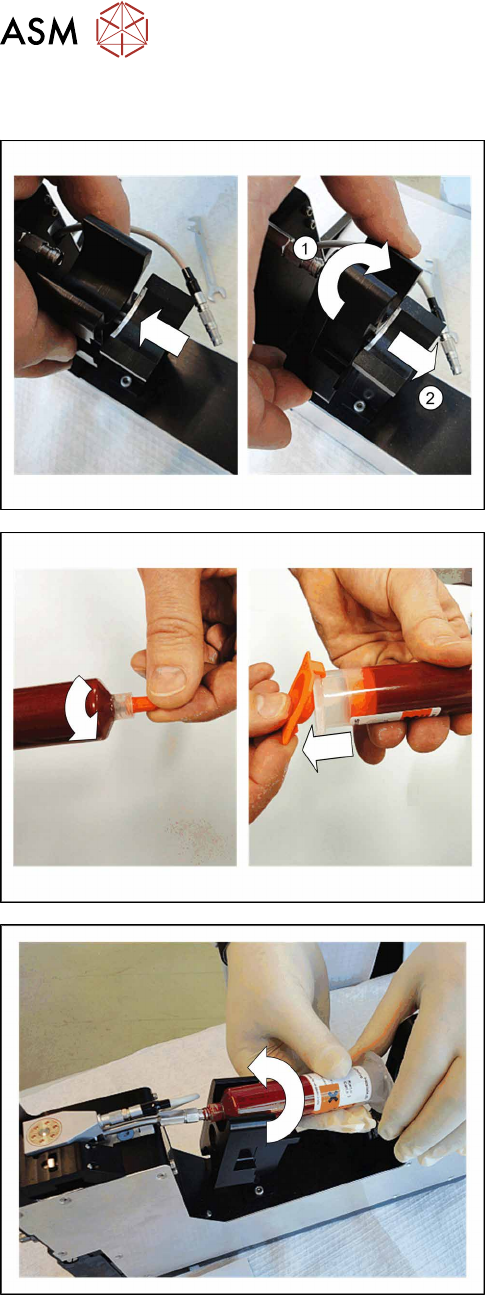
3.1 Inserting the Cartridge
Two sizes of cartridge can be used with the Glue
Feeder.
► Adjust the cartridge holder to the size of the cart-
ridge to be used (10 or 30 ml).
1. Then pull out the cartridge holder.
2. Turn the cartridge holder so that the required size
is at the top.
3. Let the cartridge holder engage audibly.
► Screw the front cap off the cartridge.
► Remove the back cap from the cartridge.
► Hold the cartridge against the feed pipe and
screw it on to the pipe straight.