PR8111、PR8112_user_manual_eng_20191015H.pdf - 第17页
2.2 Loading Recording Paper 14 Y ou can use either fanf old or rol l type recor ding p aper in the instrument. See: "Opt ions" (p. 2) 2.2 Loading Recording Pape r • Plea se use only the spe cified reco rding pa…

2.1 Pre-Operation Inspection
13
1
Measurement
Preparations Chapter 2
2.1 Pre-Operation Inspection
Do not use the instrument if you find any
damage, as doing so may result in an elec-
tric shock or short-circuit. Replace the pow-
er cord with an undamaged cord.
Yes
Is there any damage to the insulation on
the power cord, exposing metal wire?
1
No
Before using the instrument for the first time, verify that it operates normally to ensure that
no damage occurred during storage or shipping. If you find any damage, contact your dealer
or Hioki representative.
Peripheral Device Inspection
Is there any damage to the insulation on
the measurement cables, exposing metal
wire?
Yes
Do not use the instrument if you find any
damage, as doing so may result in an elec-
tric shock. Replace the measurement ca-
bles with undamaged cables.
No
If you find any damage, have the instrument
repaired.
Yes
Is there any visible damage to the instru-
ment?
Instrument Inspection
When turning on the instrument
Did the power supply LED (green) light up?
No
2
The power cord may be broken, or the in-
strument may be experiencing an internal
malfunction. Have the instrument repaired.
If using batteries to power the instrument,
the batteries may be dead, or there may be
no batteries in the instrument.
• If the orange LED is on: Have new bat-
teries ready to use.
• If the red LED is on: Replace the batter-
ies with new batteries.
No
Yes
End of inspection
Be sure to read "Operating Precautions" (p. 5) before using the instrument.
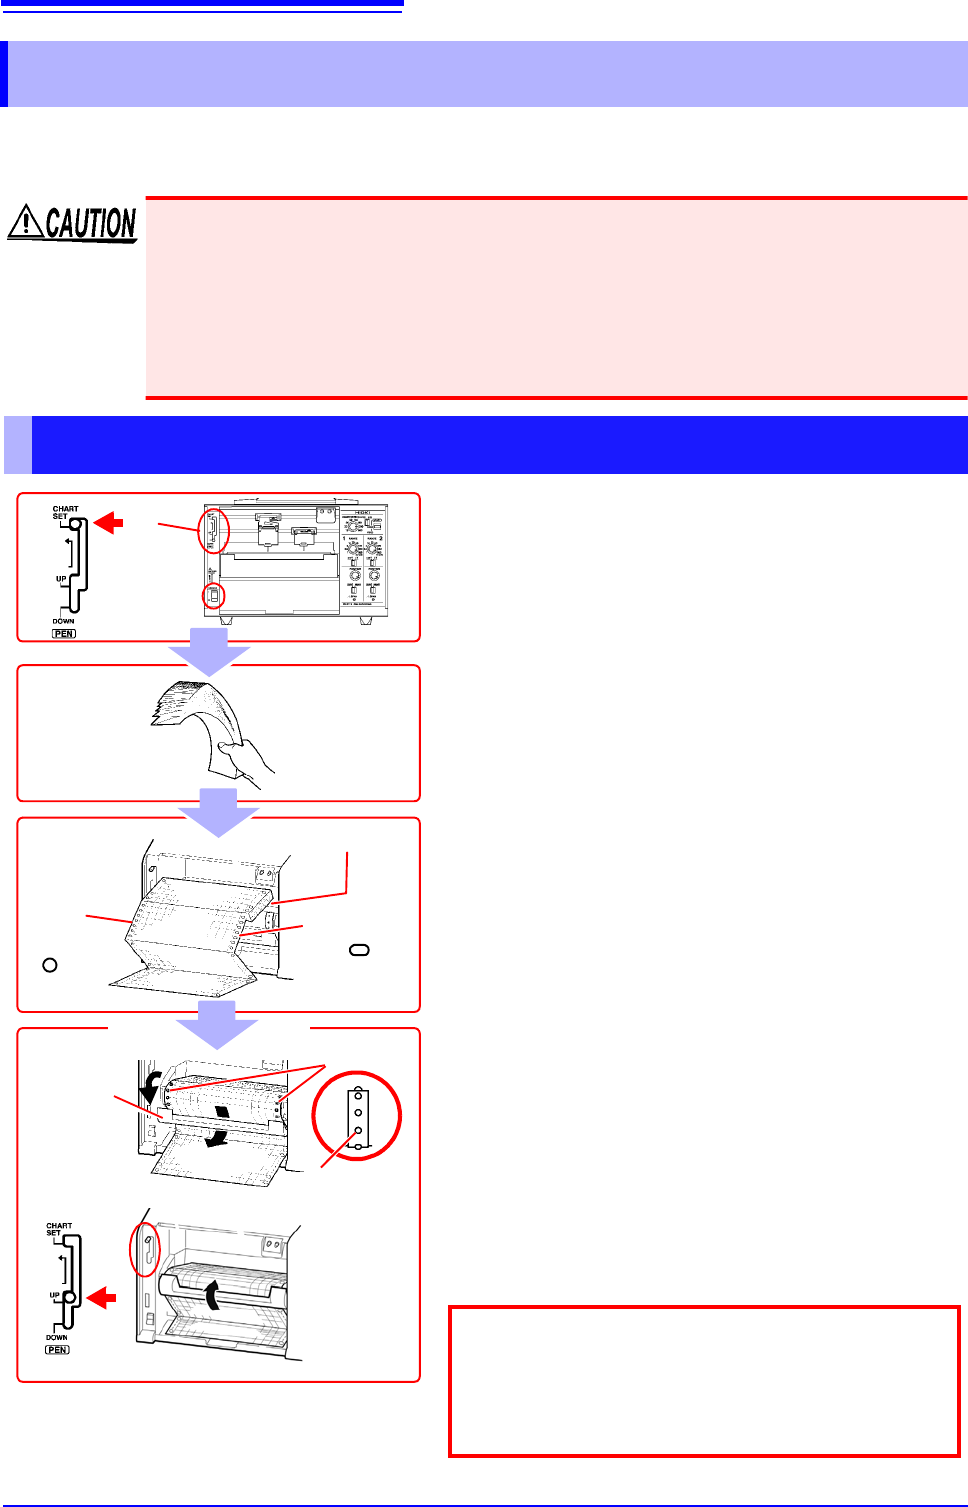
2.2 Loading Recording Paper
14
You can use either fanfold or roll type recording paper in the instrument.
See: "Options" (p. 2)
2.2 Loading Recording Paper
• Please use only the specified recording paper. Using non-specified paper may not only
result in faulty printing, but printing may become impossible.
• If not loaded properly, recording paper may jam.
• Do not use wet recording paper. Doing so may damage the instrument.
• Do not reuse recording paper. Doing so may prevent the paper from feeding properly.
• Store recording paper at room temperature, taking care to avoid high temperatures and
humidity. Avoid moisture (rain or condensation).
Loading Fanfold Recording Paper
1 Turn on the POWER switch.
2 Set the pen lever to the CHART SET (top)
position and lock the lever in place by moving
it to the left.
The platen will be raised, and the pens will automat-
ically move to the far right.
3 Hold and shake the recording paper by the
edge to separate the sheets.
4 Load the recording paper into the chart holder
with the round holes on the left and the oval
holes on the right.
(Load so that the side of the paper with the red
marks along the edge is on the bottom.)
5 Open the chart cover, pass the top of the
recording paper through the opening, and pull
the top edge through.
6 Align the paper so that the sprockets engage
the round holes on its left edge.
7 In the same way, align the paper so that the
sprockets engage the oval holes on its right edge.
8 Close the chart cover.
9 Set the pen lever to the UP (middle) position.
The platen will be lowered.
Round
holes
Chart holder
Chart cover
Oval holes
3
4
6,7
Sprockets
2
Pen lever
5
8
Lower the START/STOP/FEED switch to the FEED
position to feed the paper and verify that it has been
properly loaded. You can press and hold the switch in
the FEED position for at least 2 seconds to increase
the feed speed.
9
1
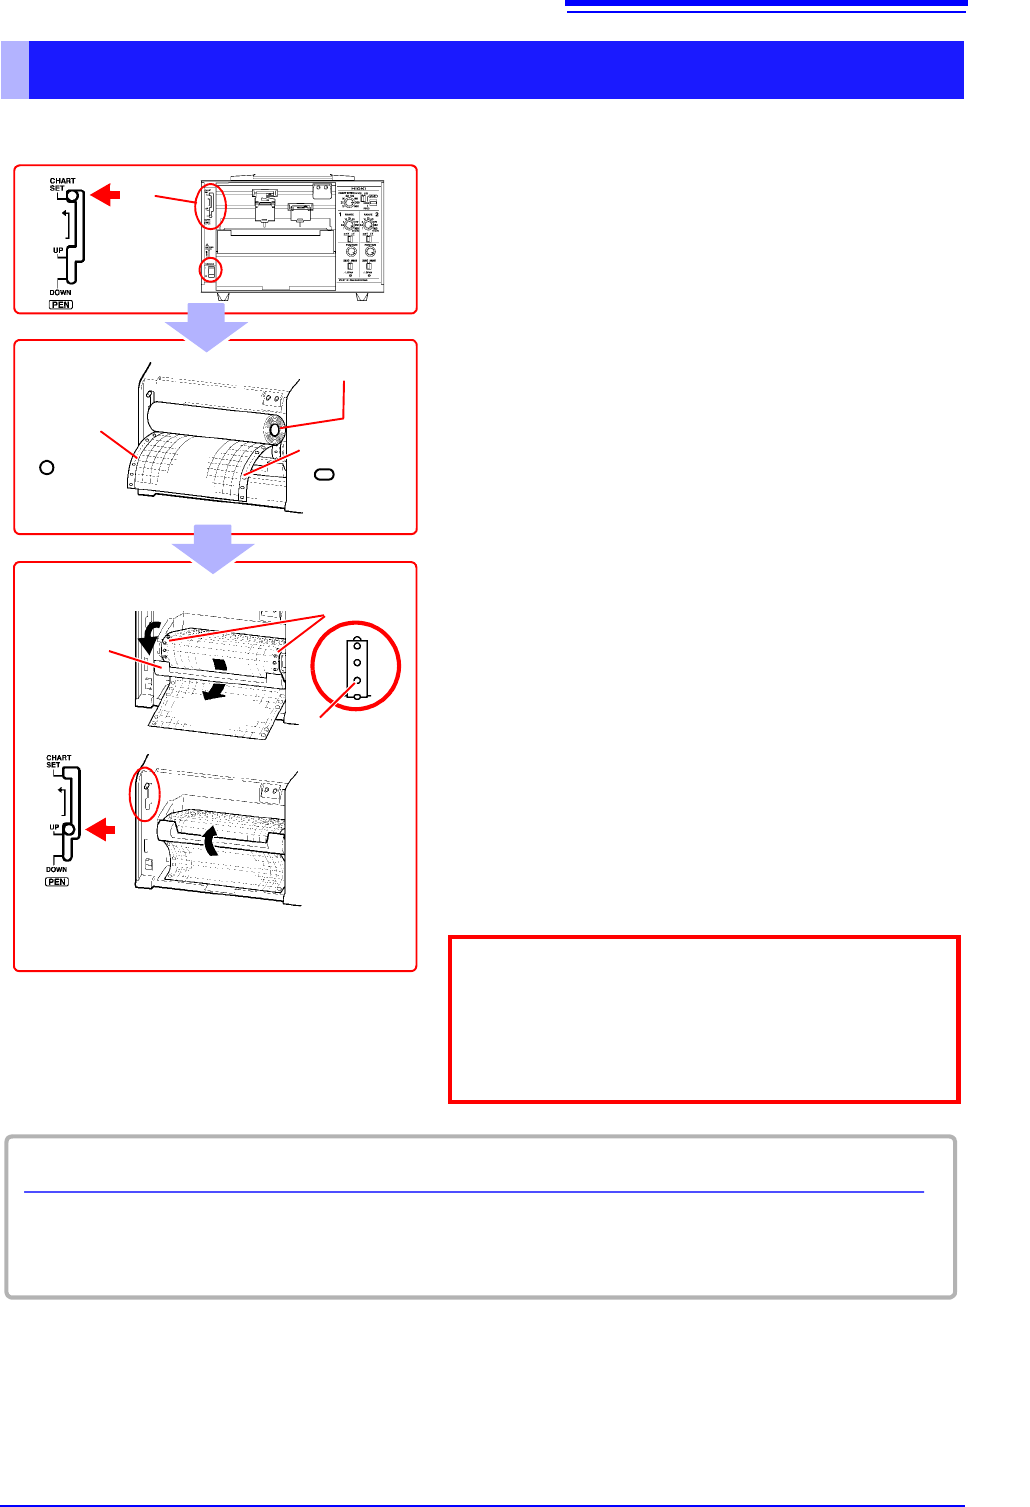
2.2 Loading Recording Paper
15
1
Loading Roll Recording Paper
2
Pen lever
1
Round
holes
Chart holder
Oval holes
3
1 Turn on the POWER switch.
2 Set the pen lever to the CHART SET (top)
position and lock the lever in place by moving
it to the left.
The platen will be raised, and the pens will auto-
matically move to the far right.
3 Load the recording paper into the chart holder
with the round holes on the left and the oval
holes on the right.
4 Open the chart cover, pass the top of the
recording paper through the opening, and pull
the top edge through.
5 Align the paper so that the sprockets engage
the round holes on its left edge.
6 In the same way, align the paper so that the
sprockets engage the oval holes on its right
edge.
7 Close the chart cover.
8 Set the pen lever to the UP (middle) position.
The platen will be lowered.
Chart cover
5,6
Sprockets
4
7
Lower the START/STOP/FEED switch to the FEED
position to feed the paper and verify that it has been
properly loaded. You can press and hold the switch in
the FEED position for at least 2 seconds to increase
the feed speed.
8
Remaining recording paper
The amount of recording paper remaining (in cm) is indicated on the left edge of the paper.
Red marks will appear on the right side of the paper when there is only about 100 cm of paper left.