00196591-04 UM S-Feeder Test Station EN.pdf - 第10页
Hardware Description Test Tapes for the Different Feeder Types 10 User Manual SIPLACE S-Feeder Test Station 1. Location surface for feeder modules 2. Calotte for positioning and fixing th e feeder modules or the calibrat…
Hardware Description
Overview of Devices
User Manual SIPLACE S-Feeder Test Station 9
2
2 Hardware Description
Hardware Description
2.1
2.1 Overview of Devices
Overview of Devices
2.2
2.2 Introduction - Location Surface
Introduction - Location Surface
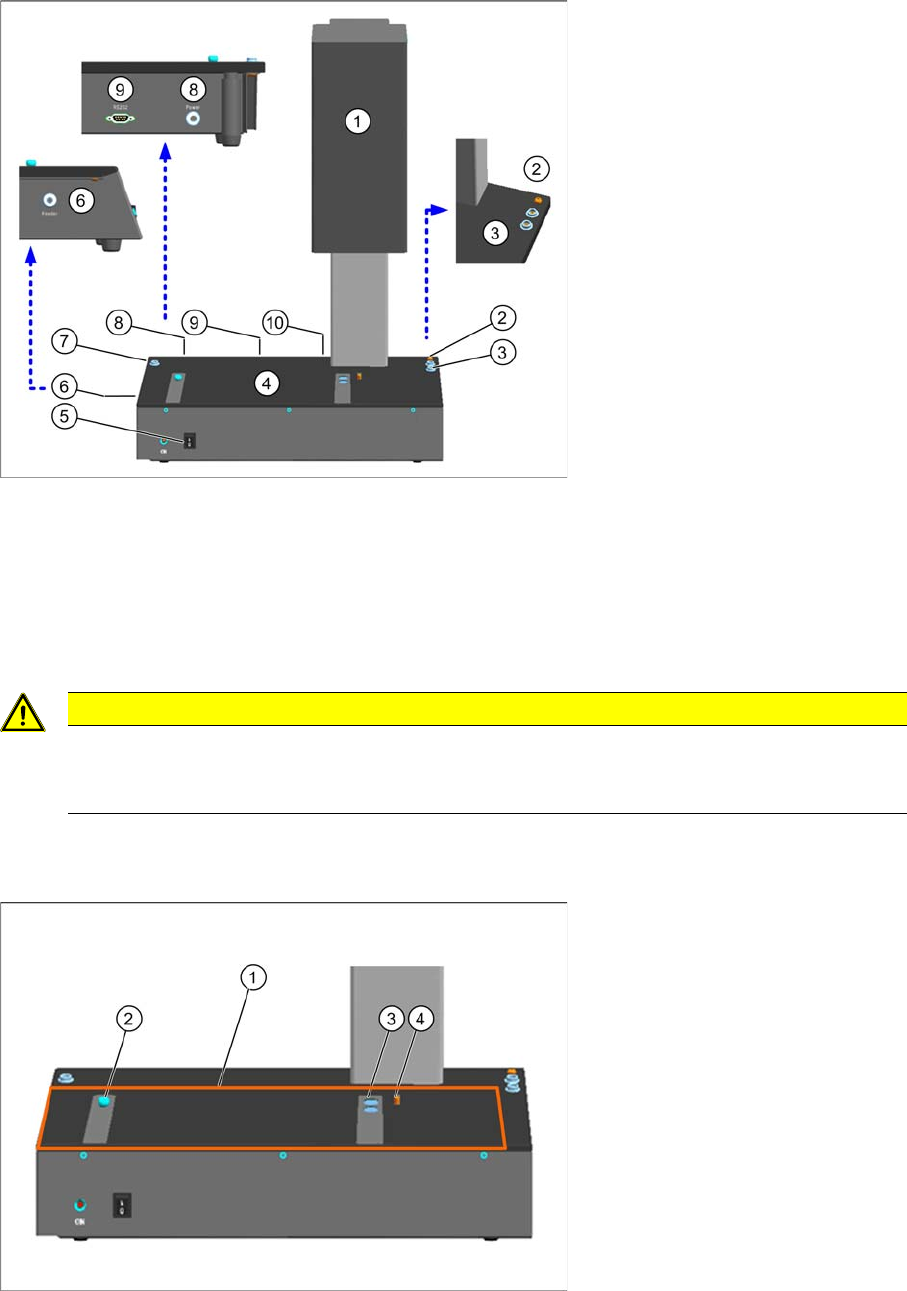
1 Camera tower 6 Connection for feeder modules
2 Connection for device ground 7 Connection for ESD wristband
3 Connection for ESD wristband 8 Connection for power supply
4 Contact surface for feeder modules 9 Serial port for communication
5 ON / OFF switch 10 USB camera cable
CAUTION
Damage of Camera
Always carry the checking device by holding on to it at the left and right of the housing! The
(camera tower) is sensitive and NOT suitable for carrying the checking device.

Hardware Description
Test Tapes for the Different Feeder Types
10 User Manual SIPLACE S-Feeder Test Station
1. Location surface for feeder modules
2. Calotte for positioning and fixing the feeder modules or the calibration standard
3. Magnets for fixing the feeder modules or the calibration standard
4. Centering pin for positioning the feeder modules or the calibration standard
2.3
2.3 Test Tapes for the Different Feeder Types
Test Tapes for the Different Feeder Types
Taste tape (master tape) For feeder type
Master Tape 8mm Feeder [03079307-xx]
without a second row of holes
3 x 8mm SL (shutterless)
3 x 8mm S 0201 / 0402 BE
Master Tape 8mm Feeder [03071549-xx] 2 x 8 mm S
3 x 8 mm S
3 x 8mm (others)
Master Tape 12mm Feeder [03071708-xx] 12/16mm with setting plate
Master Tape 16mm Feeder [03071725-xx] 12/16mm without setting plate
24/32mm
44mm … 88mm

Installation MTC 2
System requirements
User Manual SIPLACE S-Feeder Test Station 11
3
3 Installation MTC 2
Installation MTC 2
3.1
3.1 System requirements
System requirements
The PC, on which the
S-Feeder test software
is to be installed, must fulfill the following minimum require-
ments.
Operating system
▪ Windows XP SP2/SP3
▪ Windows 7 (32/64Bit)
Hardware requirements
▪ Pentium 4 / Athlon 2 GHz, minimum 750 MB RAM
▪ Graphics card or onboard graphics with minimum of 64 MB graphics memory
▪ 1 serial port (COM port RS232)
▪ 1 USB 2.0 port
▪ CD drive
Required free hard drive memory
▪ For the
S-Feeder test software
max. 380 MB
▪For
Microsoft .NET Framework
(if not yet available) 280 MB
Screen resolution
Minimum monitor resolution 1024x768
3.2
3.2 Installing the Software
Installing the Software
Installation of the S-Feeder test software takes approx. 10 minutes.
► Make sure that you are logged onto the computer as administrator.
► Insert the CD "S-Feeder test station software" into the CD drive of the PC that you use to
to check their feeder, and then close the CD drive.
► Start the
Setup.exe
program form the CD.
NOTICE
System Test
The S-Feeder Test Software has only been tested on SIPLACE Pro computer with the respec-
tive Windows XP version. This computer can be ordered incl. the Windows operating system
by part number 00116366-xx.
WARNING
Installation on a computer where SIPLACE Pro or the Vision Teach station is installed
The
S-Feeder test software
may currently NOT be installed on a PC on which the applications
SIPLACE Pro
or
Vision Teach Station
are already installed, as this could lead to version con-
flicts which cause malfunctions in these applications.
NOTICE
Installation in general
During the installation the USB camera must be unplugged.
Following the installation the SFT must be calibrated. Please ensure to have the calibration
standard available.