YesAX V3.1.2 - Software User Manual.pdf - 第173页
Other X-Ray Inspection Features 12 -7 12.3.2 Annotation Stamp c ommand The Annotation Stamp command provides the ability to stamp the image in the cur rent image window with your pre-defined information. This information…

12-6 Other X-Ray Inspection Features
12.2.3 Interacting with 3D Rendering Window
The 3D Rendering function allows you to interact with the rendered surface using the keyboard
and the mouse.
Rotate: To rotate the surface about the Z axis (the blue axis), press the left arrow key (rotate
clockwise) or the right arrow key (rotate counterclockwise). Press and hold the key to let the
surface rotate continuously. To rotate the surface about the horizontal axis, that is parallel to the
screen, use the up and down arrow keys.
You may also use the mouse to rotate the surface. To rotate about the Z axis, click the left button
in the 3D Rendering window and drag it to the left (rotate clockwise) or to the right (rotate
counterclockwise). To rotate about the horizontal axis, drag the mouse in the up or down
direction.
Zoom In/Out: To make the surface appear larger (zoom in), press the + key. To make the surface
appear smaller (zoom out), press the – key.
NOTE
Use the + and – keys on the number key pad located on the right side of the
keyboard.
12.3 Annotation & Notes
Components on the circuit board such as resistors, capacitors, and ICs are collectively called
parts. The inspection recipe organizes information based on the concept of parts. Because of the
one to one correspondence with the parts and the “parts” on the circuit board it is an easy concept
to understand. A part can have any number of the three types of inspection: Mark, Lead Bank
and Solder.
12.3.1 Annotation command
The Annotation command allows you to annotate the image in the current image window with
text. Upon entry, the Text Entry dialog box appears in the window. Type in any text within the
text entry field in the dialog box. Characters typed in the Test Entry dialog box are
simultaneously displayed at the upper left corner of the image window. The text can be edited
with any editing keys on the keyboard such as Backspace, Delete, Insert, Home, End, arrow keys,
etc.
Press the OK button to exit the Text Entry function and accept the text or press the Cancel
button to discard the text.
After entering the text and closing the dialog box, you can reposition the text to anywhere on the
image. To do this, place the mouse cursor on the text at the upper left corner. Click and drag the
mouse cursor to the desired position and release the left mouse button. While the mouse cursor is
moving, a rectangle of the size of the text will follow the moving cursor. When the left mouse
button is released, the text will be drawn at the new position of the rectangle.
Use the Edit or Delete function to change or delete the text at any time. Right click on the
annotation to open the Annotation pop-up. Select Font to customize the color, font and
background of the text.
Other X-Ray Inspection Features 12-7
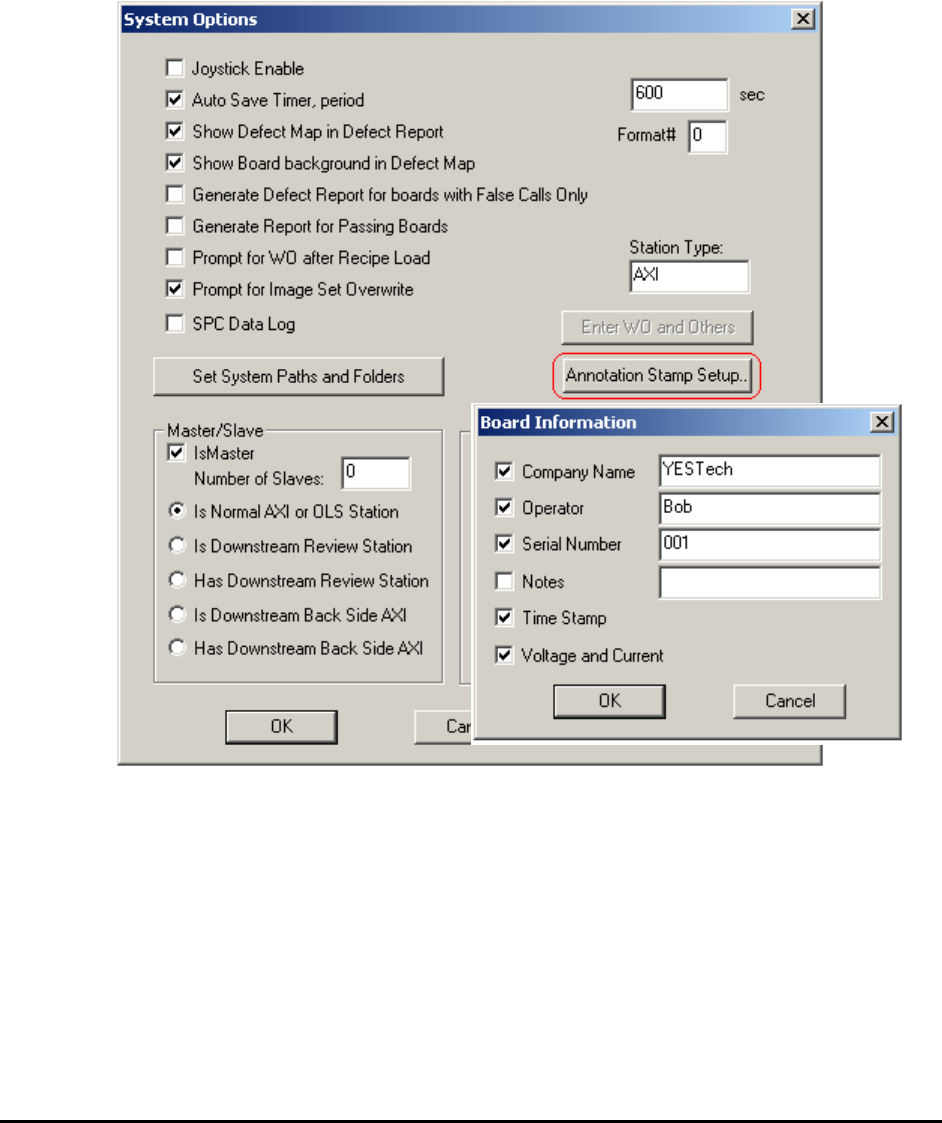
12.3.2 Annotation Stamp command
The Annotation Stamp command provides the ability to stamp the image in the current image
window with your pre-defined information. This information could include Company name,
Operator, Serial number, Notes, Time stamp, or X-ray voltage and current. This information is
overlaid on the upper left corner of the image. You can then reposition it using the mouse. See
the Annotation command (12.3.1) for details of repositioning.
Select Systems Options>Annotation Stamp Setup… The Board Information dialog opens.
Select any item to enable or disable and also edit the contents for each item, except for the Time
Stamp and Voltage and Current information. These two are assigned by the software
automatically, according to the current setup.
The stamp can be deleted using the Delete function in the pop-up menu. The text color, font and
style used in the stamp are the same as the text used in the Annotation command and can be
customized using the Font sub-menu. Please see those functions for details.
12-8 Other X-Ray Inspection Features
12.3.3 Marker command
The Marker command allows you to highlight areas of interest in the current image window by
selecting a directional arrow, positioning it and overlaying it on the image. Four directional
arrows, Marker1 - Marker 4, are provided. You can select any one under the Marker sub-menu of
the File menu. Once selected, the marker will appear at the upper left corner of the image.
As in the Annotation command, the marker can be repositioned in the image at any time. See the
Annotation command (see 12.3.1 Annotation command) for how to reposition the marker using
the mouse. The marker’s direction can be changed using the Change Marker function in the
Marker pop-up menu. Right click on the marker to open the Marker pop-up. The marker can be
deleted using the Delete function in the pop-up menu. The marker’s color can be configured
using the Change Color function.
12.3.4 Delete All command
The Delete All command allows the user to delete all the markers, annotations and annotation
stamps in the current image window. Upon entry, the user will first be prompted by a Yes/No
dialog to confirm the choice. This can prevent the user from deleting everything accidentally. If
you want to delete, select Yes. Then all the markers, annotations and annotation stamps are
removed from the current image window. Otherwise, select No and leave everything on.
This command is not available if there is no marker, annotation or annotation stamp in the
current image window.
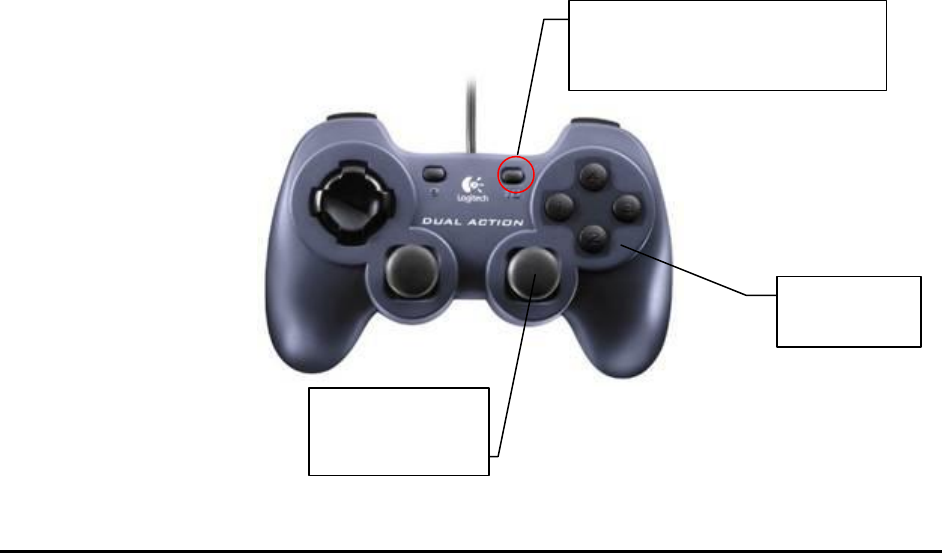
12.4 Joystick Motion
The joystick controller is an ergonomic hand control for Nordson YESTECH YTX-3000 and
X2/X3 AXI systems. For X2/X3 AXI systems, the joystick controls the X, Y, and Z axis motion.
The current joystick controller used by the X2/X3 AXI system is the Dual Action from Logitech.
The following picture illustrates the functionality for each control on the controller.
Z Axes
Control
XY Axes
coarse control
On some models, press the
button so the light is off.