00198365-03_UM_JTF-ML2_TX12_V1-V2_EN.pdf - 第78页
5 Tasks on the machine 5.3 Operating the JEDEC tray feeder in the station software 78 User Manual SIPLACE TX V1/V2 Series JEDEC Tray Feeder (JTF-ML2) 11/2019 5.3.5 JEDEC Tray Feeder Settings Fig.144: Track 11 highlighte…
5 Tasks on the machine
5.3 Operating the JEDEC tray feeder in the station software
User Manual SIPLACE TX V1/V2 Series JEDEC Tray Feeder (JTF-ML2) 11/2019 77
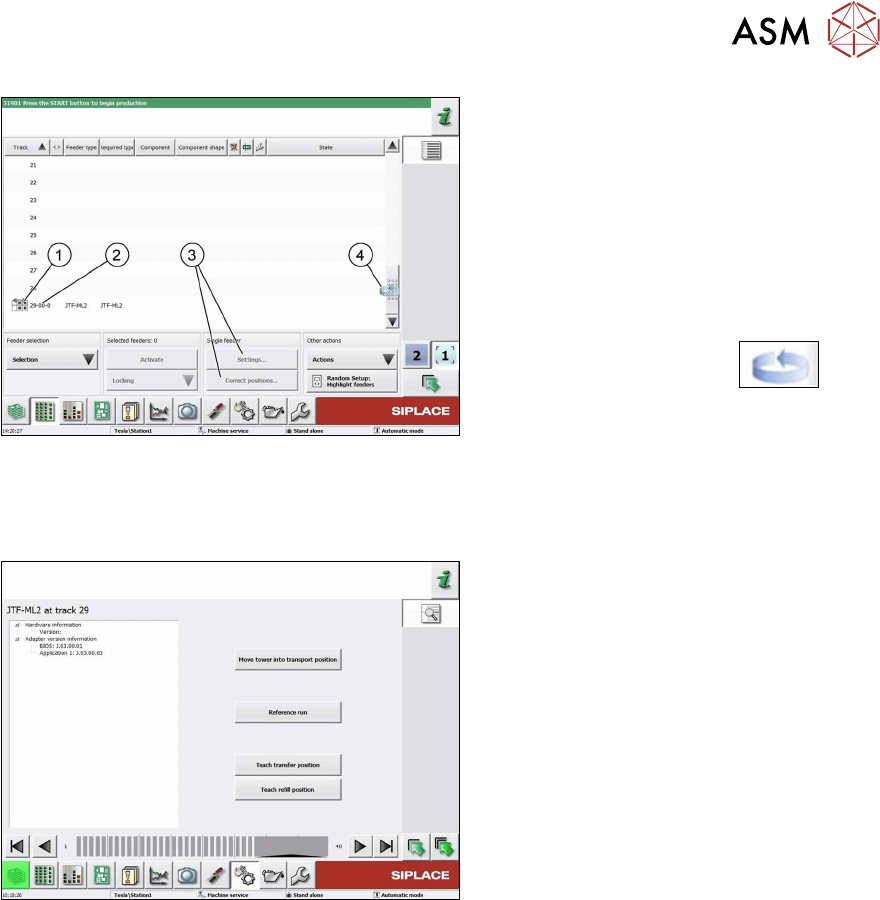
Fig.142: Track information - track 29 selected (example of
SIPLACETX2)
1. SIPLACEJTF‑ML2
2. Abbreviation for the SIPLACEJTF
feeder (visualization)
3. The settings menu is not active until the
relevant track has been selected (high-
lighted in blue color).
4. Change button to switch back to the
Current setup view
► Press the change button to
display the Current setup submenu.
5.3.4 SIPLACEJTF-ML2 – Additional Functions
Fig.143: SIPLACEJTF-ML2 – Additional Functions
●
Move tower into transport position
Move the tower into parking position
before removing tower from machine.
●
Reference Run
The module will be checked for general
readiness.
The cassettes are moving up and down
(control visually).
An error message is shown if any prob-
lems are encountered.
●
Teach transfer position
Whenever the tower or the conveyor of
the SIPLACE JTF-ML2 has been
mounted to the machine, the teach
transfer position has to be teached
again.
●
Teach refill position
Reteach the refill position if a cassette
does not slide easily into the tower.
5 Tasks on the machine
5.3 Operating the JEDEC tray feeder in the station software
78 User Manual SIPLACE TX V1/V2 Series JEDEC Tray Feeder (JTF-ML2) 11/2019
5.3.5 JEDEC Tray Feeder Settings
Fig.144: Track 11 highlighted (example of SIPLACETX2)
► Select the JEDEC tray feeder for the
relevant track (1).
ð The feeder is highlighted in blue
color and the Settings menu (2) is
enabled for this feeder.
Fig.145: JEDEC tray feeder settings
(example of SIPLACETX2)
This view is displayed by selecting the Set-
tings button in the Single Feeder menu:
1. The selected tray is framed and dis-
played as Level 5.
2. Tray occupancy of the JEDEC tray
feeder
If the component is set up, the tray will
be displayed in green.
3. Selection buttons for trays (selection
via cursor is possible as well)
4. Position 1 for orientation
5. Picture of the selected tray (tray 5)
visualizing the current occupancy.
In this example, this first row has
already been picked up. (Gray = occu-
pied, white = empty)
6. Information on the component that is
currently in the feeding position.
7. Feeder on location (arrow keys for se-
lecting the feeder)
5.3.6 JEDEC Tray Feeder Settings – Functions
Fig.146: JEDEC tray feeder settings - functions
(example of SIPLACETX2)
The Settings menu provides a rough dis-
tinction of the functions:
1. Operating functions of the trays (see
below)
2. Cassette overview
3.
Filling level functions for selected tray
(see below)
4. Change button to switch to the level
view of the JEDEC tray feeder
5.
Position correction... for trays
5 Tasks on the machine
5.3 Operating the JEDEC tray feeder in the station software
User Manual SIPLACE TX V1/V2 Series JEDEC Tray Feeder (JTF-ML2) 11/2019 79
(1) Operating functions of the trays
Button
Refill position -
Move to refill posi-
tion, cassette1/2
●
The JEDEC tray feeder switches into the refill state.
●
If the active tray is part of the cassette to be changed, this tray is
moved back into the cassette.
●
If necessary, the "Stop production" function must be performed.
●
The cassette is moved into the refill position.
●
The door is unlocked.
●
The cassette can be removed from the JEDEC tray feeder.
Refill position -
Quit refill position
●
The door is locked.
●
The JEDEC tray feeder switches into the ready for operation state.
Provide Level
●
Selection of the level / tray in the cassette overview (directly by using
the cursor or the arrow keys).
●
The tray is then displayed in a frame.
●
The tray is moved into the pickup / transfer position (tray at position1).
●
If you select a different tray in the cassette overview, this tray is auto-
matically moved into the pickup/transfer position (tray at position1).
Confirm exchange
of cassette
●
All trays in the cassette are set to full and the exchange is confirmed.
Confirm exchange
of tray carrier
●
Only the selected tray in the cassette overview is set to full and the
exchange is confirmed.
(3) Filling Level Functions for Selected Tray (see below)
Button
Activate
●
Currently without information or function.
Set full
●
Sets the selected tray to full (every component in the tray is displayed
in gray color).
Set empty
●
Sets the selected tray to empty (every component in the tray is dis-
played in white color)
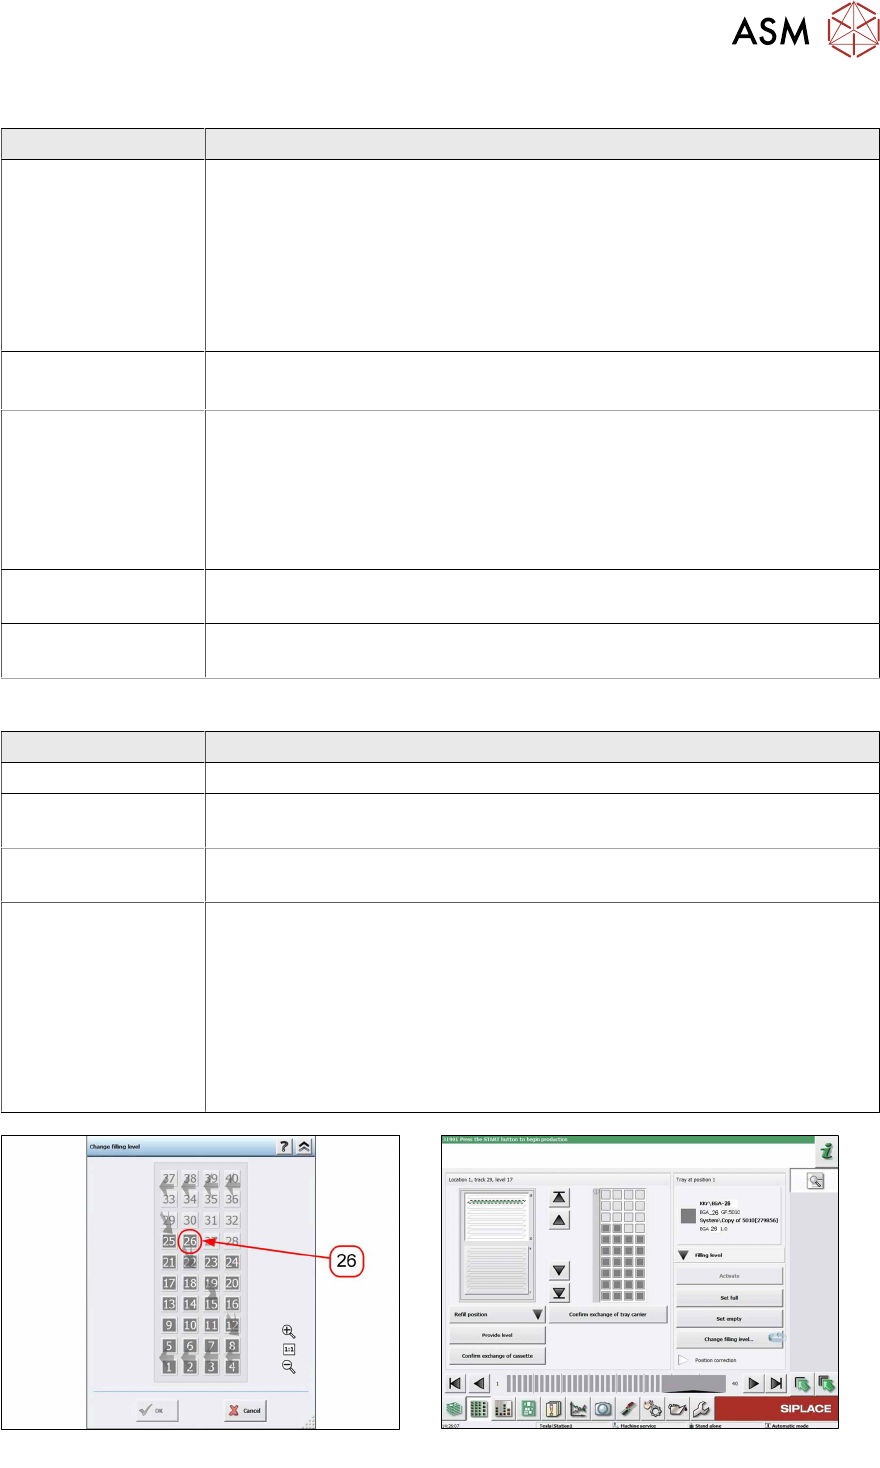
Change filling
level...
●
Opens a virtual tray. You can directly select the last occupied pocket
of the tray that contains a component.
●
An arrow represents the numbering direction that also corresponds to
the pickup direction.
●
The transfer position is always at the top.
●
In the following example, pocket 134 is selected as the pocket that
contains the last component. Pockets 135 to 160 shall be empty.
●
Please note that the selected pocket is difficult to recognize.
Fig.147: Change Filling Level - Pocket 26
Fig.148: Filling Level (Example of SIPLACETX2)
The current filling level displays pockets 1 to 26 as occupied. Pockets 27 to 40 are displayed as empty.