00196478-08_MM_SX12DX12_en.pdf - 第27页
Minor Maintenance Maintenance Intervals for Minor Main tenance Maintenance Manual SIPLACE SX1/SX2/DX1/DX2 27 4 4 M in o r M a in t e n a n c e Minor Maintenance 4.1 4 . 1 M a in t e n a n c e I n t e r v a ls f o r M in …
Tools, Consumables, Spare and Wear Parts
26 Maintenance Manual SIPLACE SX1/SX2/DX1/DX2

Minor Maintenance
Maintenance Intervals for Minor Maintenance
Maintenance Manual SIPLACE SX1/SX2/DX1/DX2 27
4
4 Minor Maintenance
Minor Maintenance
4.1
4.1 Maintenance Intervals for Minor Maintenance
Maintenance Intervals for Minor Maintenance
1000 - Minor – [EMPTY] – SXDX12 V1 V2
2000 - Minor - Basic Machine – SXDX12 V1 V2
2100 - Minor - Component F eed-In - SXDX12 V1 V2 - [ EMPTY]
2200 - Minor - Optical Systems – SXDX12 V1 V2
2300 - Minor - Gantry – SXDX12 V1 V2
2400 - Minor - Conveyor - SXDX12 V1 V2
3000 - Minor - Nozzles/Nozzle Magazines
See also
1.3.2 Calculation of Maintenance Intervals [ ➙ 15]
Maintenance tasks
Base machine
Duration
[min]
Each
week
Every 3
months
Every 6
months
Every 12
months
Checking/Cleaning the Cover Fans 3 X
Checking the Fans on the GCUs 2 X
Maintenance tasks
Gantry
Duration
[min]
Each
week
Every 3
months
Every 6
months
Every 12
months
Checking and Cleaning the Magnetic Surfaces of
the X and Y Axes
2X
Cleaning the X Axis Loose Bearing and Contact
Surface
2X
Cleaning the Y Axis Loose Bearing and Contact
Surface
2X
Maintenance tasks
Conveyor
Duration
[min]
Each
week
Every 3
months
Every 6
months
Every 12
months
Vacuuming the Transport, Nozzle Changer and
Insert
1X
Maintenance tasks
Nozzles
Duration
[min]
Each
week
Every 3
months
Every 6
months
Every 12
months
Cleaning/Replacing the Ceramic Nozzles 2 X
Replacing the Plastic Nozzles 2 X
Minor Maintenance
Maintenance Tasks for Base Machine 4.2.1 Tools, Consumables, Spare and Wear Parts
28 Maintenance Manual SIPLACE SX1/SX2/DX1/DX2
4.2
4.2 Maintenance Tasks for Base Machine
Maintenance Tasks for Base Machine
4.2.1
4.2.1 Tools, Consumables, Spare and Wear Parts
Tools, Consumables, Spare and Wear Parts
▪ ESD wristband [00320279-xx]
▪ Sheet of paper
▪ If necessary, cover fan 1 part [03094598-xx]
▪ Fan for GCU, if required [03060954-xx]
▪ Vacuum cleaner
▪ Service manual for your machine
4.2.2
4.2.2 Performing Maintenance Tasks
Performing Maintenance Tasks
4.2.2.1
4.2.2.1 Checking/Cleaning the Cover Fans
Checking/Cleaning the Cover Fans
Checking the cover fans
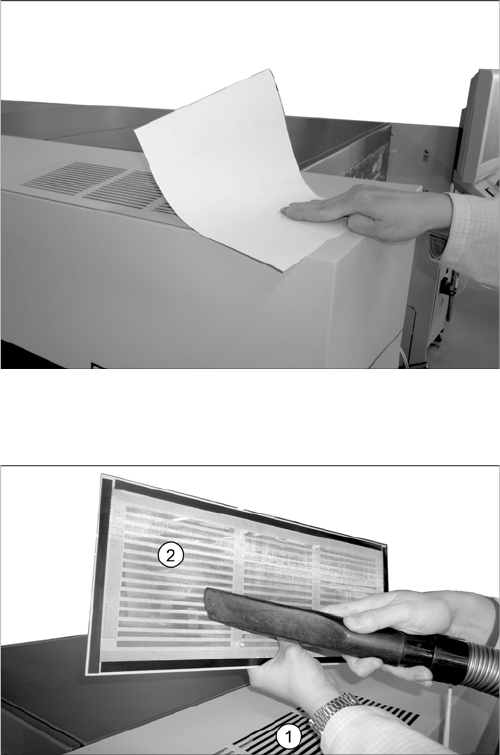
Cleaning the Protective Grids on the Cover Fans
The machine needs to be switched on for this check.
► Close the protective covers and press the Start but-
ton.
► Check the function of the fans. You should be able to
feel a noticeable flow of air. Place a sheet of paper on
the fan openings, if required.
► If the fan does not work, authorized personnel has to
check the corresponding fuse for the power supply. If
the fuse is okay, the fan must be replaced (Fan hood
1-piece [03094598-xx]).
For removal and installation details, refer to the Ser-
vice manual for your machine.
► Repeat this check for all cover fans.
► Take the protective grid (2) off the air vent (1).
► Use a vacuum cleaner to clean the protective grid.
► Place the protective grid back on the air vent.
► Repeat these steps at all four air vents.