TSR2000-Series-Hardware-User-Guide-V1.pdf - 第4页
4 1. SAFETY INS TRUCT ION Caution about the main unit ⚫ Only use this robot with corre ct rated voltage and frequency (refe r to the marking s on the back of equ ipment). ⚫ Do not move the XY moving plate and the top hea…

3
Table of Contents
1. Safety Instruction……………………………………………………………………..…….
2. Summary………………………………………………………………………………..…..
2.1 Features………………………………………………………………………………
2.2 Specifications…………………………………………………………………………
2.3 Unpacking and Inspection………………………………………………………………………….
2.4 Instructions about the Keypad………………………………………………….…….
2.5 Course of the File Processing…………………………………………………….………
3. Setup and Connection………………………………………………………………………
3.1 Setup…………………………………………………………………………………
3.1.1 How to Connect a Syringe Dispenser with Interface Cable…………………….
3.1.2 How to Connect a Valve Controller with Interface Cable……………………
3.1.3 How to Connect a Jet Valve Controller with Interface Cable ……..…………………
3.1.4 Testing the Interface Connections …………………………..………………..
3.2 I/O Socket Instruction…………………………………………………………………
3.2.1 Circuit Diagram of I/O Socket…………………………………………………
3.2.2 Four Pin Socket “Pin Out”……………………………….………………….…
3.2.3 Five Pin Socket “Pin Out”…………………………………………………….
3.2.4 Seven Pin Socket “Pin Out”……………………….…………………………..
3.3 Instructions For DB37 Socket…………………………………………………………
3.3.1 Pin Instruction of DB37……………………………………………………….
3.3.2 Circuit Diagram of DB37………………………………………………………
3.4 Instruction of Input & Output………….…………………………………………….
3.4.1 IO Function Definition………………………………………………….………
3.4.2 IO Function Instruction………………………………………………………….
3.5 Operation For First Time………………………………………………………………..
4. Off-Line Operation Interface………………………………………………………….…….
4.1 Off-Line Initialization…………………………………………………………………
4.2 Off- Line File Processing Interface…………………………………………….……..
4.2.1 Select Processing File……………………………………………………………
4.2.2 File Process……………………………………………………………….……..
4.2.3 Stop the File Processing………………………………………………………
4.2.4 File Processing Count & State…………………………………………………..
4.3 Off-Line Origin Calibration Interface…………………………………………….…..
4.4 Off-Line Loop-Work Parameter Setting Interface…………………………………....
4.5 Off-Line Testing Interface…………………………………………………….………..
4.6 Times of Nozzle Interface………………………………………………………………
5. Mounting and Bracketry………………………………………………………………...….….
5.1 Tool Plate - Valve Mounting Bracket……………………………………….…………..
5.2 Base Plate - Product Mounting Plate…………………………………………………….
5.3 Syringe Mounting Bracket - Attachment.........………………………………………
6. Trouble Shooting…………………………………………………………………….…….
7. Warranty……………………………………………………………………………………..
8. Manufacturer’s Declaration of Incorporation………………………………………...……………
9. Manufacturer’s Declaration of Conformity…………………………………………..………….
4
5-9
5
6
7
8
9
9-20
9
10
10
10
11
12-13
12
13
13
13
14-16
14
15-16
16-20
17-18
18-20
20
21-23
21
21
21
22
22
22
22
23
23
23
24
24
24
25
26
26
27
28

4
1. SAFETY INSTRUCTION
Caution about the main unit
⚫ Only use this robot with correct rated voltage and frequency (refer to the markings on the back of equipment).
⚫ Do not move the XY moving plate and the top head, by hand. This will protect them from damage.
⚫ During processing, do not touch the moving parts.
⚫ Before use, check the heating controller and pressure reduction valve have been fastened reliably (if fitted).
⚫ Keep the unit dry. Do not use or disconnect the equipment with wet hands.
⚫ If an emergency event occurs, press the emergency switch (red) immediately. The main unit will cut off the
power and stop processing the dispensing file.
Caution about the power cord
⚫ This machine is equipped with a 3-wire grounding plug and must be plugged into a 3-terminal grounded socket.
Do not modify the plug or use an ungrounded power socket. If an extension cord is necessary, use only a 3-wire
extension cord that provides grounding.
⚫ Do not turn on the power of the machine if any parts are damaged, especially if the power cord is damaged.
Caution about the teaching pendant
⚫ Do not connect the teaching pendant during a profile. When disconnecting the teaching pendant, loosen and
remove the fixing screws and then pull out it, once the profile has finished.
⚫ For protecting the teaching pendant, from damage, do not drop it on the floor or shake it intensively.
Caution about the air supply
⚫ Ensure the air flow is dry and clean. Select a suitable air pressure according the application. Suggested air
pressure is no more than 100 psi (6.9bar).
⚫ During use, do not over bend or over rotate the air tubes.
5
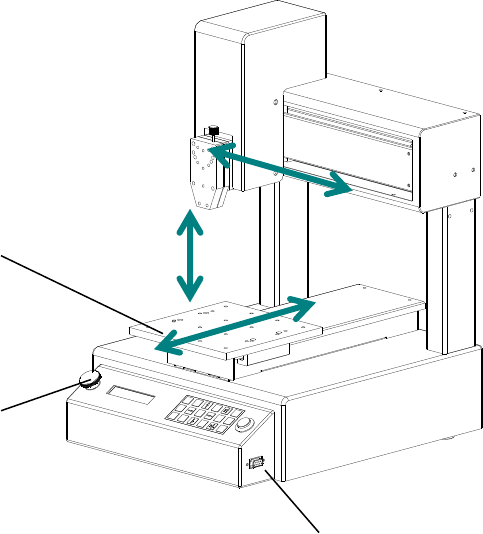
2. SUMMARY
This desktop robot is designed for the automated operation for dispensing fluid. It is a fully automatic and features
a high-resolution control system with 3 axis. This unit provides the operator with easy programming instructions,
increased parameters, a larger memory space and a higher speed, which highly improves productivity.
Note: the illustration may have some differences with each application. The dispensing equipment, such as a
dispensing valve, syringe, cartridge, etc. are optional.
2.1 Features
⚫ Comprehensive 3-dimensional drawing support, such as 3-dimensional linear interpolation, capabilities of
teaching 3D graphics and user-defined 3D array.
⚫ Capability to save mass files.
⚫ User-defined array function: easy solution for mould deviation. Supports user-defined 3D array. Smoothing
functions of changing speed and hi-speed trajectory whilst moving. User-definable speed parameters.
⚫ Group function: this function allows operators to copy, delete, modify, array, and pan multi-points.
⚫ Advanced teaching pendant that supports functions, such as array, group edit, sub-procedure, condition-call
procedure etc.
⚫ Unique merge function: easy resolution to process complex multi-layers, irregular array and non-array graphics.
⚫ Multiple processing modes, such as single-step operation, overall processing and automatic loop processing.
Moving Plate
Emergency Switch
Communication Interface:
Connect with teaching pendent