00195346-0302_SM_WPC4_EN.pdf - 第99页
SITEST for WPC4 Stepping the Lifting Axis SITEST Lifti ng Axi s Setti ngs Service Manual SIPLACE WPC4 99 5.9.1 Stepping the Lif ting Axis Acknowledge this with OK to open the following dialog box. Arrow point ing upwar…
SITEST for WPC4
SITEST Lifting Axis Settings Zero Point Correction
98 Service Manual SIPLACE WPC4
Menu field: Travel range
Reference bero: Moves the selected axis to the reference proximity switch so that the position of
the proximity switch can be redetermined. The position determined is then shown in a dialog box.
Select
OK
and another dialog box will open in which you can select
OK
to start a reference run of
the axis.
Limit switch -: Moves the selected axis to the limit switch so that the minimum approach position
can be redetermined. The position determined is then shown in a dialog box. Select
OK
and another
dialog box will open in which you can select
OK
to start a reference run of the axis.
Limit switch +: Moves the selected axis to the limit switch so that the maximum approach position
can be redetermined. The position determined is then shown in a dialog box. Select
OK
and another
dialog box will open in which you can select
OK
to start a reference run of the axis.
SITEST for WPC4
Stepping the Lifting Axis SITEST Lifting Axis Settings
Service Manual SIPLACE WPC4
99
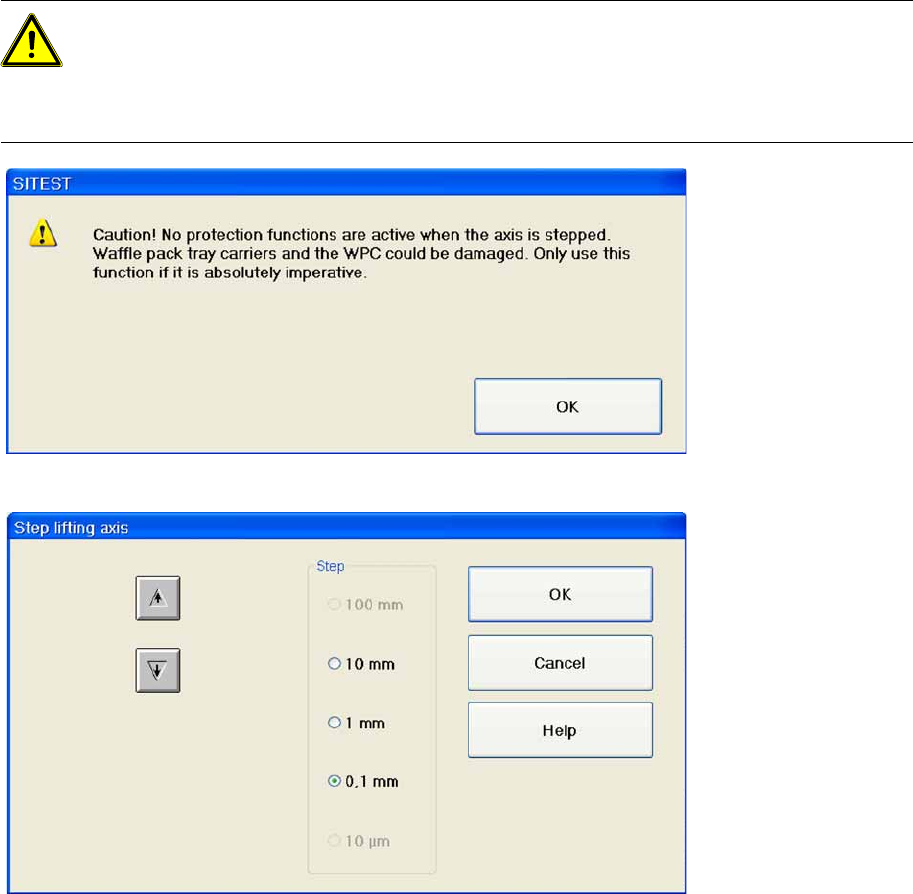
5.9.1 Stepping the Lifting Axis
Acknowledge this with
OK
to open the following dialog box.
Arrow pointing upwards: Each time you click on this button, the lifting axis will be moved one step
of the selected step size upwards.
Arrow pointing downwards: Each time you click on this button, the lifting axis will be moved one
step of the selected step size downwards.
Step: This is where you can set the required step size for moving the lifting axis.
OK : Closes the dialog box. The lifting axis remains in the position it has moved to.
Cancel: Closes the dialog box. The procedure is terminated.
ATTENTION: Only use the function "Step lifting axis" if it is absolutely imperative.
For example, if a waffle pack tray carrier has jammed in the WPC, you will no longer be able to
move the lifting axis. With the help of the buttons in this dialog box, the lifting axis can be moved
stepwise up or down, until the error can be fixed. The lifting axis does not need to be referenced
for this.

SITEST for WPC4
SITEST Lifting Axis Settings Teaching the Zero Point
100 Service Manual SIPLACE WPC4
5.9.2 Teaching the Zero Point
Teach zero point... Opens a dialog box with a warning.
Acknowledge this with
OK
and the following dialog box will open, in which you can teach the zero point.
Arrow pointing upwards: Each time you click on this button, the lifting axis will be moved one step
of the selected step size upwards.
Arrow pointing downwards: Each time you click on this button, the lifting axis will be moved one
step of the selected step size downwards.
Current position: Shows the position of the lifting axis approached during teaching.
Step: This is where you can set the required step size for moving the lifting axis.
Accept: Saves the current position and closes the dialog box.
You can now start a reference run.
To start the reference run, confirm the dialog box shown with
OK
.
Cancel: Closes the dialog box without saving any changes made.