03229208-01-01 All Purpose Clamping (APC) Manual DE.PDFA.pdf - 第87页
2 UNIVERSALKLEMMEN (APC) 2.8 KALIBRIERUNGEN EIGENSTÄNDIGES HANDBUCH UNIVERSALKLEMMEN (APC) 12/2019 87 6. Achten Sie darauf, dass die Lesung keinen Dezimalpunkt hat und bei Null steht, wenn keine Kraft ausgeübt wird und d…
2 UNIVERSALKLEMMEN (APC)
2.8 KALIBRIERUNGEN
86 EIGENSTÄNDIGES HANDBUCH UNIVERSALKLEMMEN (APC) 12/2019
2.8.2 Snug Kraft Kalibration
HINWEIS
Die APC Snug Kraft wurde vom Werk eingestellt und bedarf normalerweise keiner Kalibration. Die-
ser Vorgang sollte nur von einem geschulten ASM Kundendiensttechniker durchgeführt werden,
der Zugang zu den erforderlichen Geräten hat.
Zur Kalibration der APC Snug Kraft:
1. Starten Sie die DEK Software.
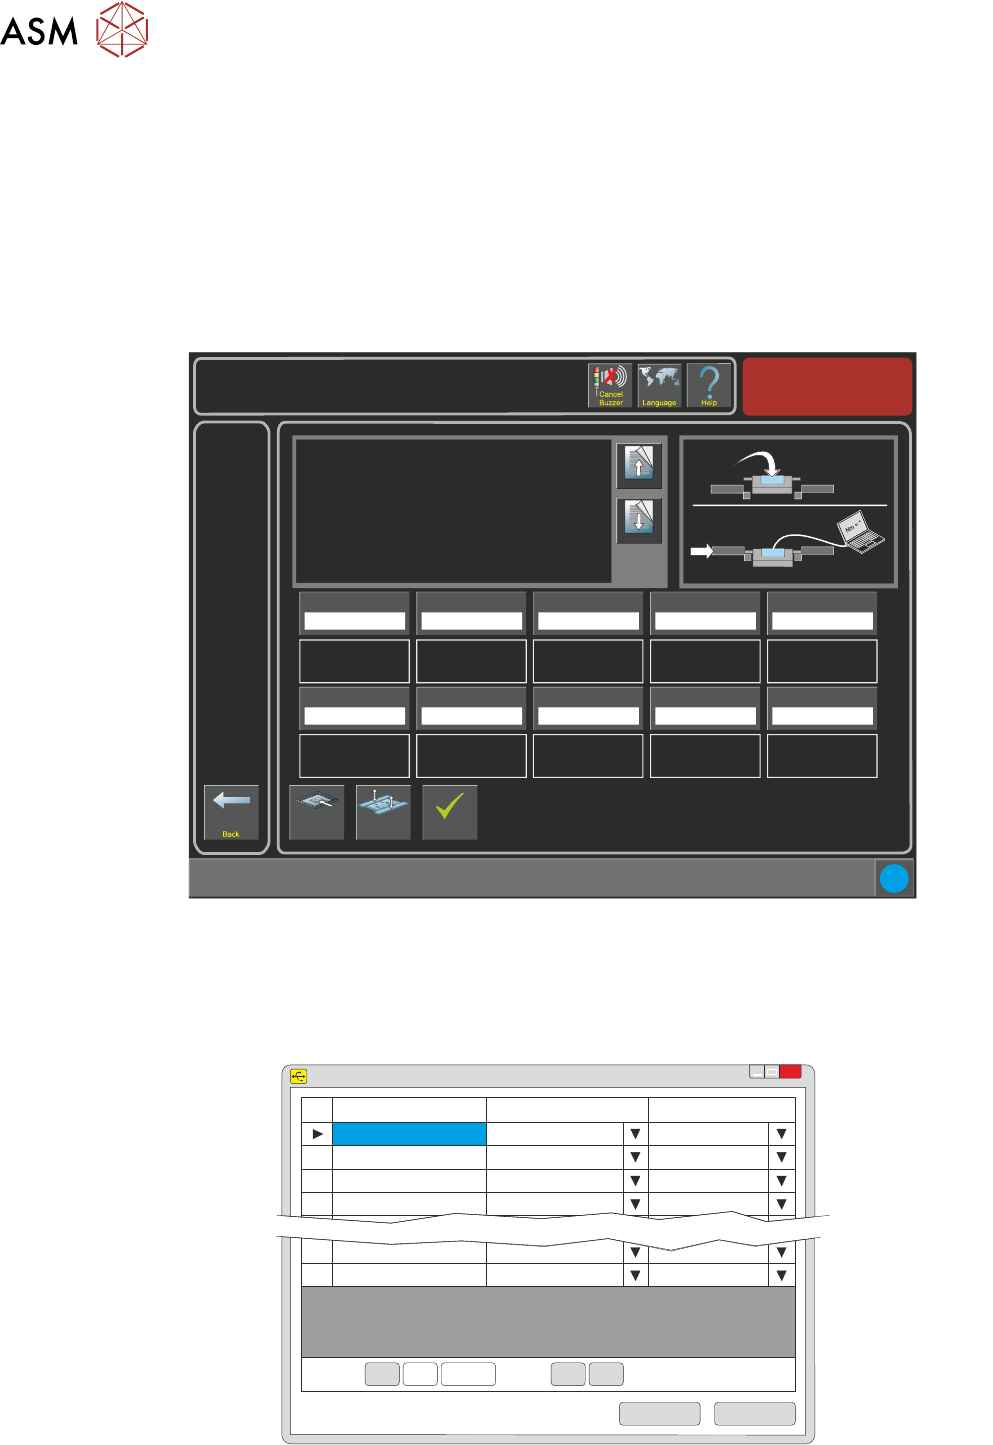
2. Wählen Sie Wartung/Maschineneinstellung/Grundeinstellung/APC Kalibration.
Torque Value 1
27.0%
i
Maintenance \ Machine Setup \ Basics \ APC Calibration
Page Up
Page
Down
On selecting this parameter, the rising table moves to
transport height, the transport rails are checked for boards,
and the rear rail is moved into position to allow the user to
place the test jig between the front and rear rails.
The ten read only Torque Value parameters represent the
percentage of the torque delivered. The torque applied to
the jig is measured by the sensor at its centre. Selecting
Torque On/Off applies torque to the jig, selecting Torque
On/Off again releases it.
Values are input into the ten Calibration Value parameters
Load Screen
Board
Clamps
Accept
Torque Value 2
28.0%
Torque Value 3
29.0%
Torque Value 4
30.0%
Torque Value 5
31.0%
Calibration Value 1
20.0 Newtons
Calibration Value 2
25.0 Newtons
Calibration Value 3
30.0 Newtons
Calibration Value 4
35.0 Newtons
Calibration Value 5
40.0 Newtons
Torque Value 6
32.0%
Torque Value 7
33.0%
Torque Value 8
34.0%
Torque Value 9
35.0%
Torque Value 10
36.0%
Calibration Value 6
45.0 Newtons
Calibration Value 7
50.0 Newtons
Calibration Value 8
55.0 Newtons
Calibration Value 9
60.0 Newtons
Calibration Value 10
65.0 Newtons
Nm
3. Stecken Sie das Kalibrationvorrichtung USB-Kabel in den Laptop.
4. Öffnen Sie die Sensit Software auf dem Laptop.
5. Wählen Sie die "Laden" Taste.
SENSIT Test and Measurement
TM
x
Device
Status
Serial Number
1
Enabled
641469
2
Disabled
3
Disabled
4
Disabled
15
Disabled
16
Disabled
Record: Of 16<< <
<< <
1
Save
Load
2 UNIVERSALKLEMMEN (APC)
2.8 KALIBRIERUNGEN
EIGENSTÄNDIGES HANDBUCH UNIVERSALKLEMMEN (APC) 12/2019 87
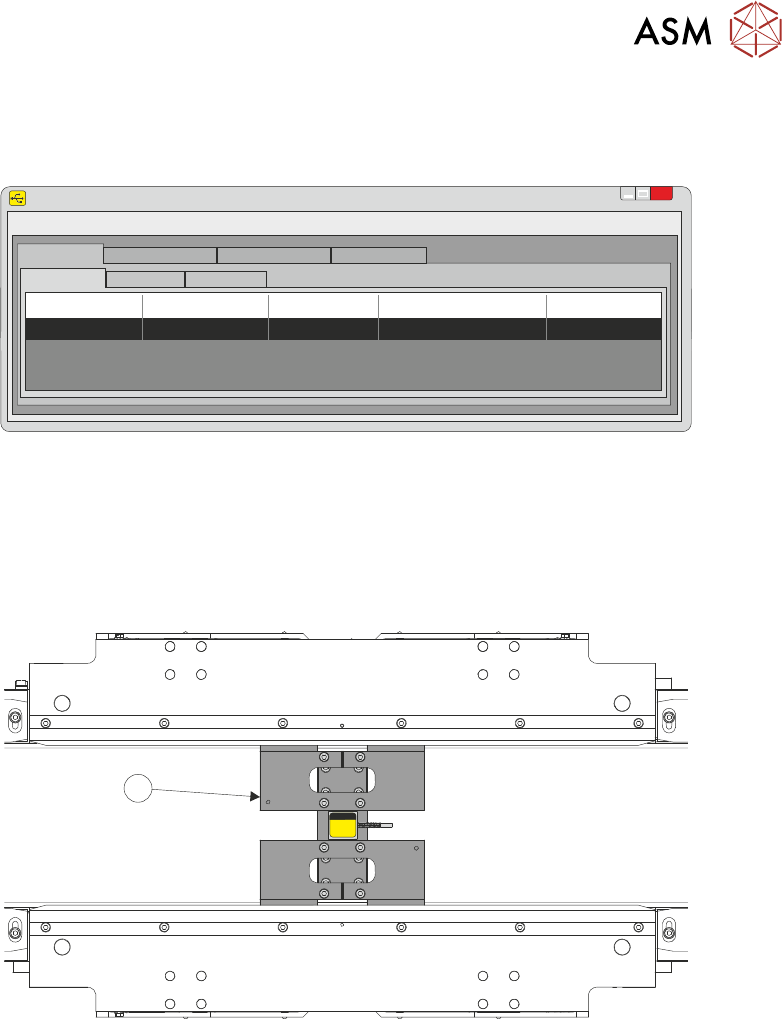
6. Achten Sie darauf, dass die Lesung keinen Dezimalpunkt hat und bei Null steht, wenn keine
Kraft ausgeübt wird und dass die Einheiten auf N für Newtons eingestellt sind.
SENSIT Test and Measurement
TM
x
File
Edit
View
Format
Help
Display Mode
Data Logging Mode
Live Graphing Mode Calibration Mode
Display Table
Sum Channel Math Channel
Device
Status S/N
Reading
Units
1 Enabled 641469 0 N
7. Installieren Sie die Kalibrationsvorrichtung (1) in der Mitte der APC-Klemmen. Achten Sie
darauf, dass die Lesung immer noch Null auf dem Laptop anzeigt und dass keine Kraft aus-
geübt wird.
1
Grundrissdarstellung des APC-Moduls
2 UNIVERSALKLEMMEN (APC)
2.8 KALIBRIERUNGEN
88 EIGENSTÄNDIGES HANDBUCH UNIVERSALKLEMMEN (APC) 12/2019
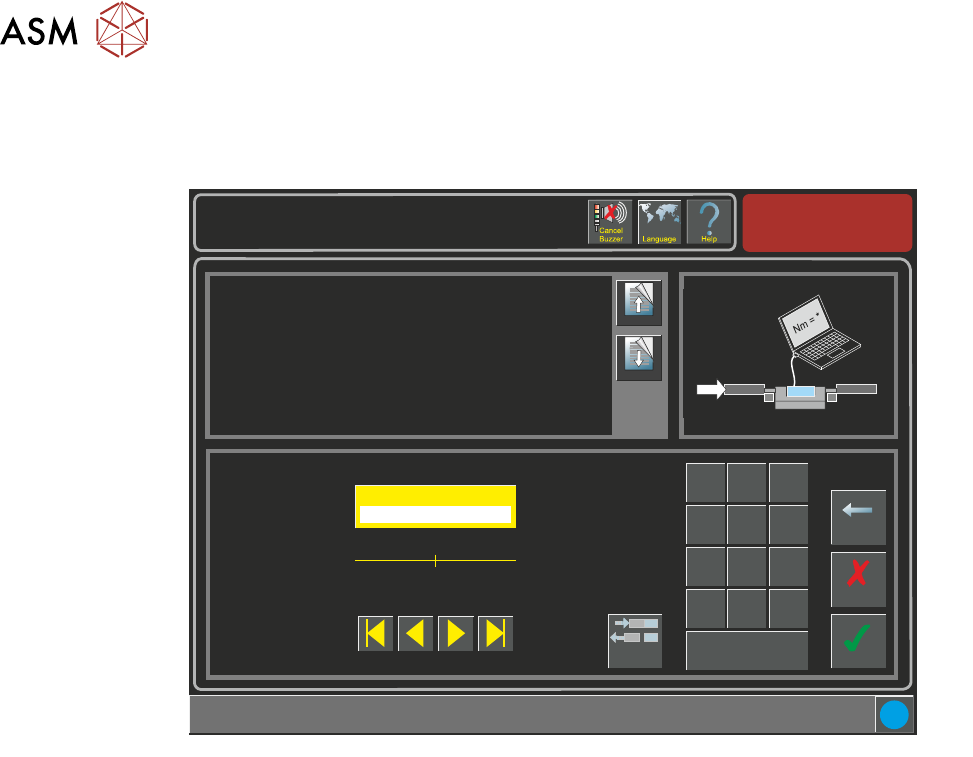
8. Auf der APC-Kalibration Seite, wählen Sie Drehmomentwert 1 Parameter. Wählen Sie die
Drehmoment Ein/Aus Umschalttaste. Der Kalibrationsdrehmoment ist jetzt EIN.
Maintenance \ Machine Setup \ Basics \ APC Calibration
Page Up
Page
Down
Sets the first torque value for APC Calibrations.
Accept
Cancel
Torque Value 1 ( % )
27.0
Backspace
Min
5.0
Max
75.0
7
8 9
4
5
6
1 2
3
0
.
+/-
Apply
i
Torque
On/Off
Nm
9. Vergleichen Sie die aktuelle Newtons Lesung vom Laptop zum Kalibrationswert 1. Die ange-
zeigte Lesung muss die Gleiche sein wie der Kalibrationswert 1.
10. Justieren Sie den Drehmomentwert 1 Parameter hoch oder runter, wie erforderlich.
11. Wählen Sie die Drehmoment Ein/Aus Umschalttaste. Der Kalibrationsdrehmoment ist jetzt
AUS.
12. Wählen Sie Akzeptieren.
13. Wählen Sie den Drehmomentwert 1 Parameter. Wählen Sie die Drehmoment Ein/Aus Um-
schalttaste. Der Kalibrationsdrehmoment ist jetzt EIN.
14. Vergleichen Sie die aktuelle Newtons Lesung vom Laptop zum Kalibrationswert 1. Die ange-
zeigte Lesung muss die Gleiche sein wie der Kalibrationswert 1.
15. Wiederholen Sie die Schritte 10 bis 14, bis der Drehmomentwert 1 zur Messung auf dem
Laptop passt.
16. Wiederholen Sie die Schritte 8 bis 15 für die verbleibenden neun Kalibrationswerte.
17. Entfernen Sie die Kalibrationsvorrichtung von der Maschine.
18. Schließen Sie die DEK Software.