252301 Issue 2.0.pdf - 第153页
GEM Manual for DEK Printers Appendix B I ssue 2.0 June 9th, 2011 page 153 of 156 12 A ppendix B Operator instructions for configuring and using GEM on DEK printers. 12.1 Netw ork Configuration The GEM I P Address for the…

GEM Manual for DEK Printers Appendix A
Issue 2.0 June 9th, 2011 page 152 of 156
Remote Command Parameters:
PP
-SELECT Parameters
CPNAME (ASCII) DESCRIPTION CPVAL type min-max
RECEIVED_FILE_NAME Name of the process program to use. ASCII
RENAME_PRODUCT Parameters
CPNAME (ASCII) DESCRIPTION CPVAL type min-max
OLD_FILE_NAME The old name of the process program. ASCII
NEW_FILE_NAME The new name of the process program. ASCII
ADJUST_PARAMETER Parameters
CPNAME (ASCII) S2F21 DESCRIPTION CPVAL
type
Range Resol.
ADJUST_PASTE 0 Adjusts paste dispense rate. F8, none 0-100 1
ADJUST_SPEED 1 Adjusts both front and rear print
speeds.
F8, mm/s 2-150 1
ADJUST_FRONT_PRESS 2 Adjusts forward print pressure. F8, Kg 0-20 0.2
ADJUST_REAR_PRESS 3 Adjusts reverse print pressure. F8, Kg 0-20 0.2
ADJUST_GAP 4 Adjusts print gap. F8, mm 0-6 0.025
ADJUST_SEPARATE 5 Adjusts separation speed. F8, mm/s 0.1–20 0.1
ADJUST_CLEAN 6 Adjusts clean screen rate. F8, none
0−100 1
ADJUST_FWD_X 7 Adjusts forward X offset. F8, mm
±1
0.004
ADJUST_FWD_Y 8 Adjusts forward Y offset. F8, mm
±1
0.004
ADJUST_FWD_T 9
Adjusts forward θ offset.
F8, arcsec
±1000
2
ADJUST_REV_X 10 Adjusts reverse X offset. F8, mm
±1
0.004
ADJUST_REV_Y 11 Adjusts reverse Y offset. F8, mm
±1
0.004
ADJUST_REV_T 12
Adjusts reverse θ offset.
F8, arcsec
±1000
2
ADJUST_PROFLOW_PRESS - Adjusts Proflow print pressure. F8, Kg 0-20
0.2
ADJUST_INSP_RATE - Adjusts post print inspection
rate.
F8, none 0-100
1
ADJUST_BATCH_LIMIT - Adjusts batch limit.
0 = continuous operation.
U4, none 0-99999
1
ADJUST_FRONT_SPEED - Adjusts front print speed. F8, mm/s 2-150
1
ADJUST_REAR_SPEED - Adjusts rear print speed. F8, mm/s 2-150
1
CHANGE_SCREEN Parameters
CPNAME =
“CHANGE_METHOD”
DESCRIPTION CPVAL type
CPVAL = “AUTO” Exchange the screen in the printer (if present) with one in the
autochanger. Load the new screen to the position specified
by the process program.
ASCII
CPVAL = “MAN_LOAD” Load the screen in the printer to the position specified by the
process program.
ASCII
GEM Manual for DEK Printers Appendix B
Issue 2.0 June 9th, 2011 page 153 of 156
12 Appendix B
Operator instructions for configuring and using GEM on DEK printers.
12.1 Network Configuration
The GEM IP Address for the machine must be set up in the DekSECSII.cfg file, this can be checked
and edited if necessary in the configuration file D:\Program
Files\DEK\MachineControl\Printer\DekSECSII.cfg.
Set the PASSIVE ENTITY IP ADDRESS to the printer’s IP Address.
The IP Address can be obtained by using the ipconfig command at the command prompt.
If there is more than one printer communicating with the GEM host, set the DEVICEID differently for
each printer. The default value is 0x109 (265). Alternate DEVICEID values should be chosen within
the range 0x0000 – 0x7FFF (0 – 32767).
12.2 Enabling GEM
Classic User Interface
From the Ready page:
1. Select Maintenance (F8)
2. Select Set Prefs (F5)
3. Change the value of Host Comms to GEM
4. Select Enable Comms (F1).
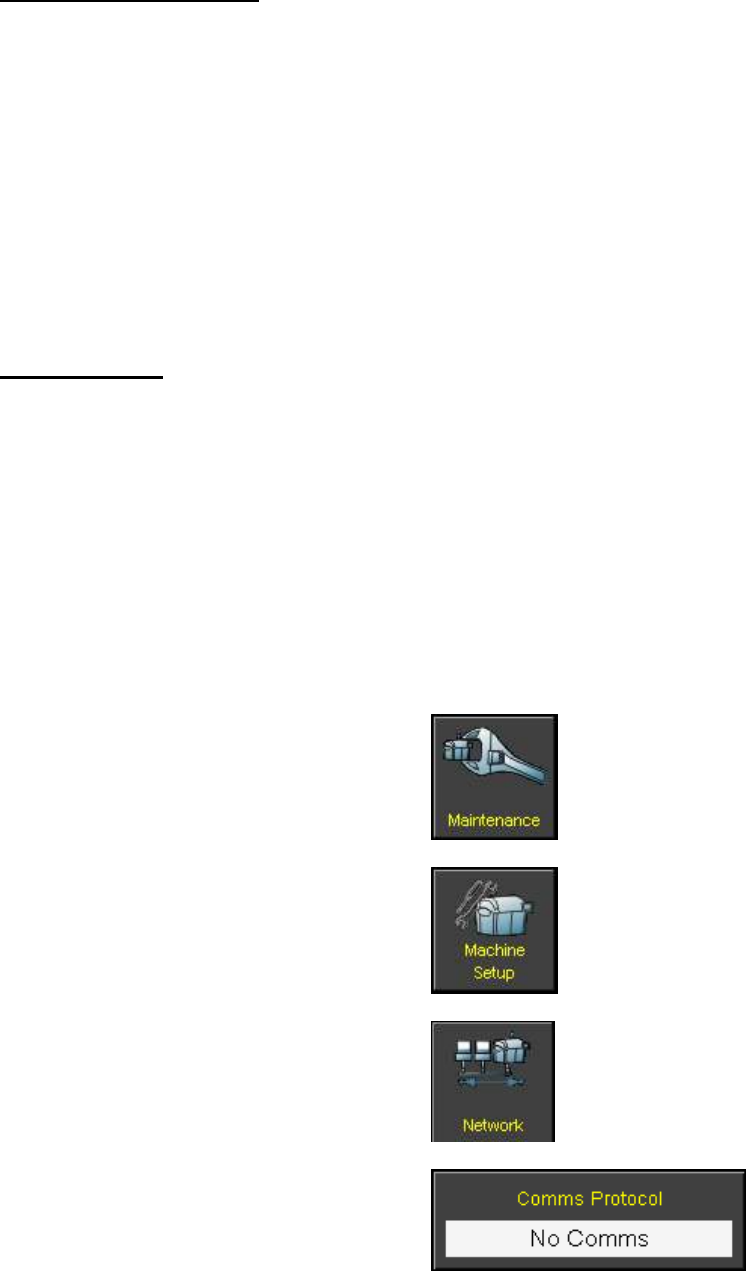
Instinctiv User Interface
From the Ready page:
1. Select Maintenance
2. Select Machine Setup
3. Select Network
4. Change the Comms Protocol to GEM

GEM Manual for DEK Printers Appendix B
Issue 2.0 June 9th, 2011 page 154 of 156
5. Select Enable Comms
12.3 Using GEM
Once enabled and communicating with a host, the operator can perform the following functions:
1. Switch between online and online state
2. Switch between local and remote state
3. Transfer product files to and from the host
4. Terminal services
Classic User Interface
From the Ready page:
1. Select Monitor (F7)
2. Select Host Comms (F2)
3. To switch to online state, select On-Line (F4). The printer will change to “Attempt On-Line”
state until the host accepts the request.
4. To switch to offline state, select Off-Line (F5)
5. To switch between local and remote modes, select Local/Remote (F6)
6. To transfer a product from the printer to the host, select Transfer To Host (F2):
a. Navigate to the required product using Left, Right, Previous, Next (F4 – F7)
b. Select Upload (F1) to transfer the product
c. Select Exit (F8) to cancel the transfer
7. To transfer a product from the host to the printer, select Transfer To Equipment (F3):
a. Enter the name of the product file
b. Select Download (F1) to transfer the product
c. Select Exit (F8) to cancel the transfer
8. To access terminal services, select Terminal Services (F1):
a. Recent messages from the host will be displayed
b. Type a new message and select Send Message (F1) to send a message to the host
c. Select Exit (F8) when finished
9. To test communications with the host, select Test Comms (F7)
Instinctiv User Interface
From the Ready page:
1. Select Host Comms
2. To switch to the online state, select Online