00195327-03_EN_DE_Install_eWinXP_MC.pdf - 第20页
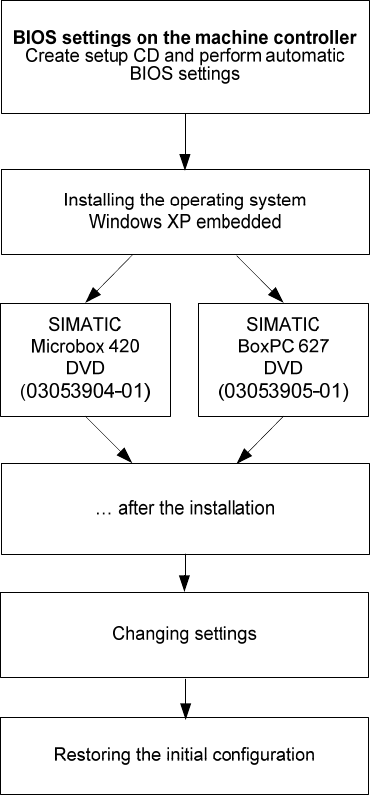
Installation Manual, Windows XP Embedded operating syst em for the machine controller Issue 04/2007 6 Inst allation for the Microbox 420 and SIMA TIC BoxPC 627 6.1 Overview See the section 6.2 . See the section 6.3 . See…
Installation Manual, Windows XP Embedded operating system for the machine controller Issue 04/2007
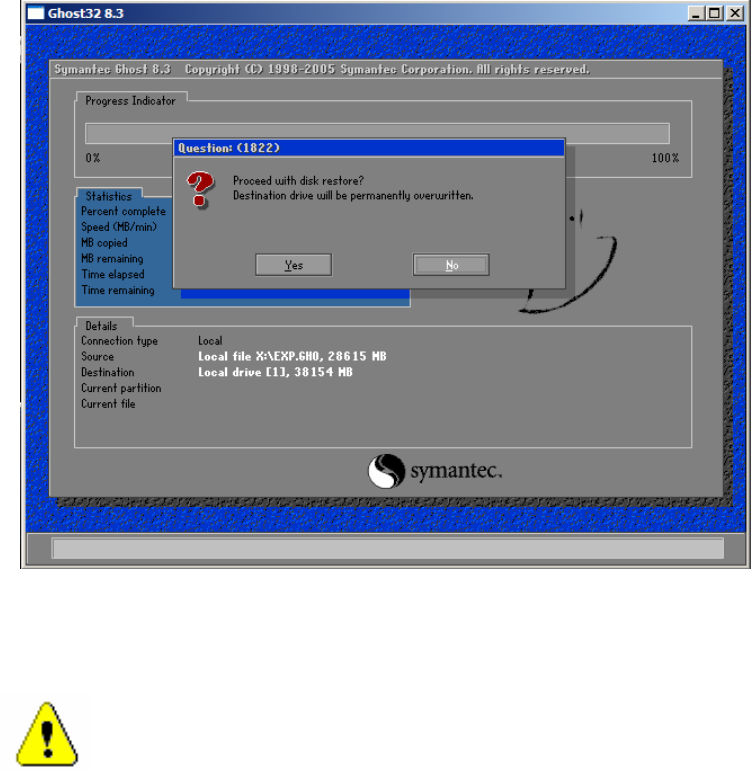
The following dialog is displayed.
→ Confirm the safety query with „Yes“.
The operating system is installed.
→ Insert the image CD2 for the relevant computer type if the computer requires it.
Caution:
After inserting the second CD, wait approx. 30 seconds. After the 30 seconds confirm with OK.
→ Remove the CD from the drive.
→ Shut down and reboot the computer.
→ Proceed with chapter
7 „…after the installation“.
19 of 28

Installation Manual, Windows XP Embedded operating system for the machine controller Issue 04/2007
6.2 Automatic BIOS settings on the machine controller
→ Disconnect the USB keyboard from the station computer and connect it to the machine controller
computer.
→ Switch the video multiplexer from the station computer to the machine controller.
→ Use the USB cable to connect the external DVD drive to the machine controller computer.
A setup CD must first be created to automatically make the BIOS settings on the machine controller. To do
this, you require a computer running Windows XP that is fitted with a DVD and CD-RW drive.
The image files necessary for creating the CD (see table below) are in the "BIOS-Images" folder of the CD
for version 604.01 of the software.
Machine controller
Computer type
BIOS settings
ISO image
SIMATIC Microbox 420 CPU420_MC_BIOS_Settings.iso
SIMATIC Box PC 627 CPU627_SR_MC_BIOS_Settings.iso
Table 6-1: Files required for creating the data media for making the BIOS settings on the MC
6.2.1 Creating a setup CD
→ Insert an empty writable CD in the drive on any computer.
→ Insert the CD for version 604.01 of the software in the drive.
→ In the Windows Explorer, open the "BIOS-Images" folder on the CD.
→ Open the image file for the relevant computer type (see table above) using the installed CD writing
program and follow the instructions on screen.
→ Once the CD has been written, remove the CDs from the drives.
6.2.2 Making the BIOS settings on the machine controller
Note:
Before you start work, ensure that the CD-ROM drive is set as the first boot device in the
BIOS to allow the computer to be booted from CD.
→ Insert the CD you have created in the drive on the machine controller and boot from the CD by
switching the machine on.
→ Follow the instructions regarding the BIOS settings that appear on screen.
→ Remove the setup CD from the DVD drive.
→ Press the key combination <Ctrl><Alt><Del> to perform a warm start of the MC computer.
21 of 28