3MAINTENANCE__O.pdf - 第177页
3.8 HDD / FDD Operation ( 2 ) How to Delete the Bypass & Rate Data on “ FD ” Side Insert a floppy disk ( FD ) into the floppy disk drive ( FDD ) . Press the [ FD [ DISK FREE SPACE : XXXXKB ] ] key . The bypass & …
3.8
HDD
/
FDD
Operation
3.8
.
9
Bypass
&
Rate
Data
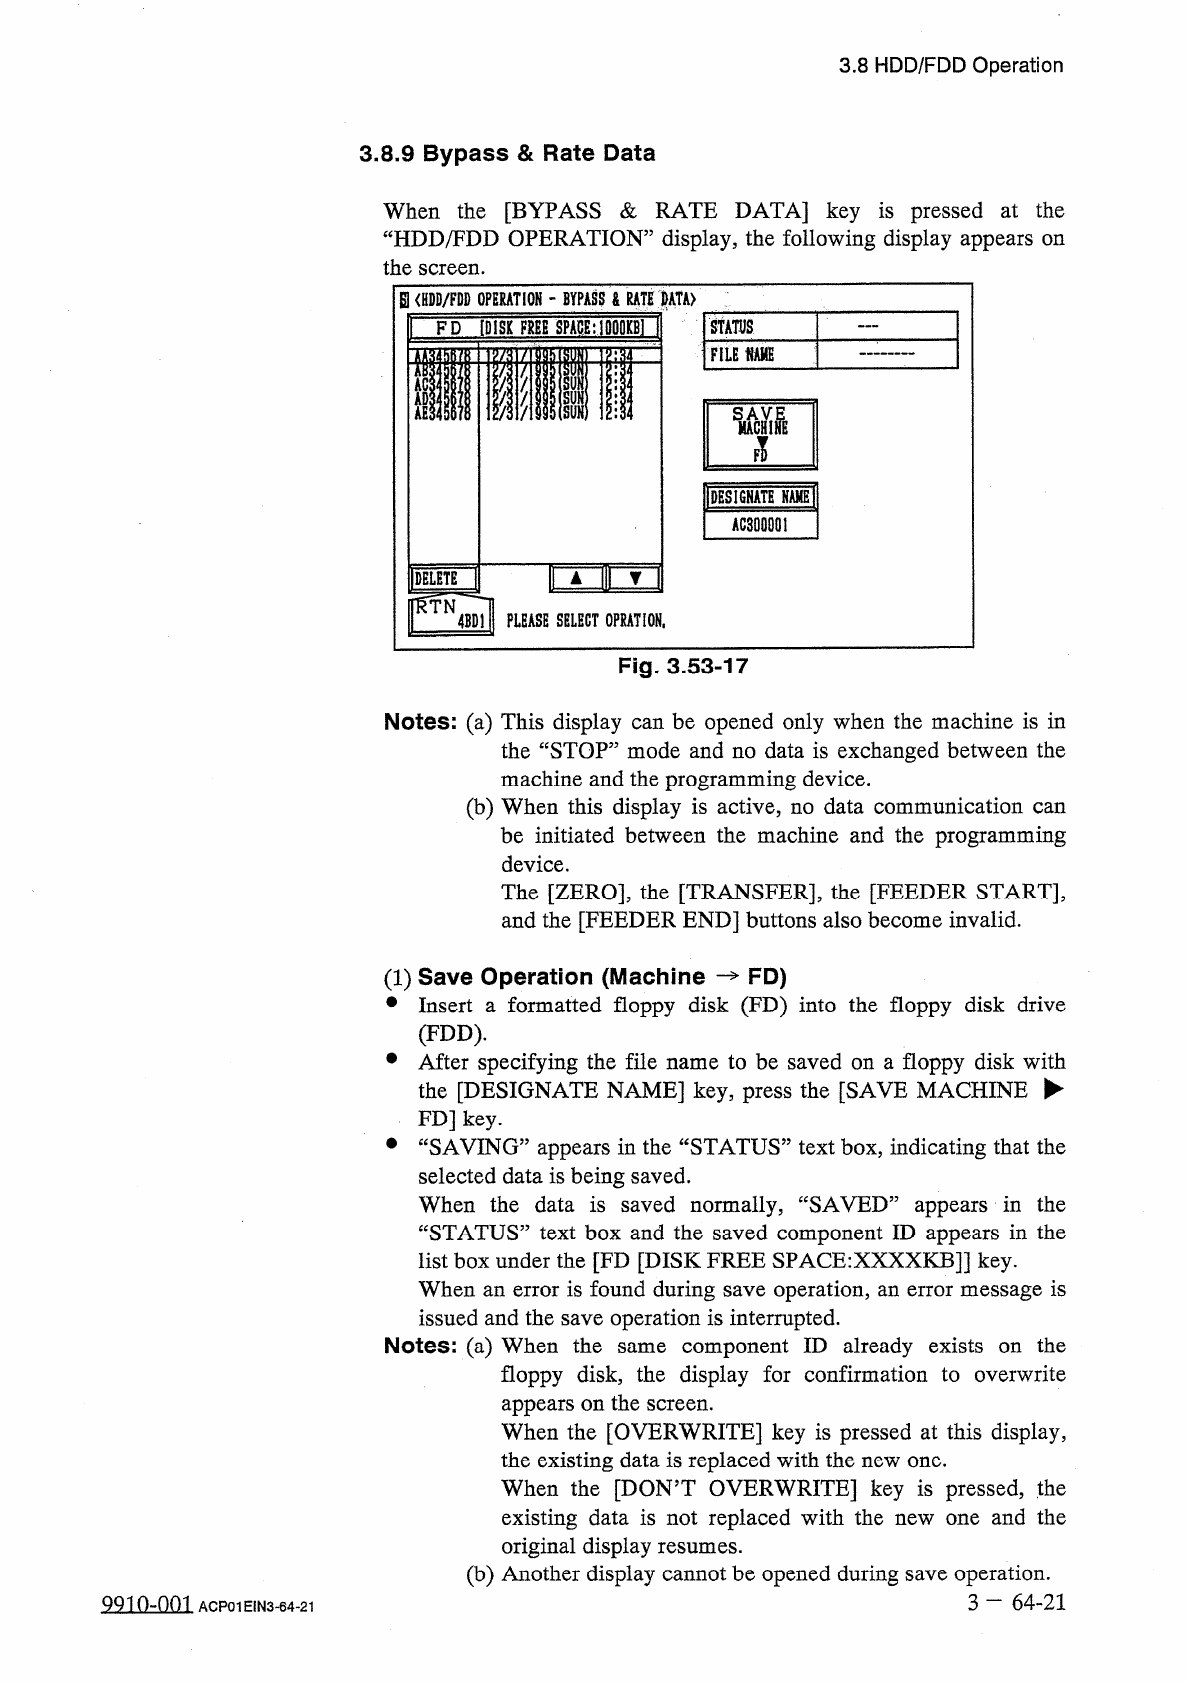
When
the
[
BYPASS
&
RATE
DATA
]
key
is
pressed
at
the
“
HDD
/
FDD
OPERATION
”
display
,
the
following
display
appears
on
the
screen
.
B
<
HDD
/
FDD
OPERATION
-
BYPASS
&
RATE
MTA
)
1
FD
[
DISK
FREE
SPAGE
:
10
D
0
KB
]
~
一
STATUS
FILE
m
ACS
SUN
w
,
SUN
SUN
观
F
!
IDESIGNATE
NAHEI
AC
3
D
000
!
imilT
DELETE
ITN
4
BD
1
PLEASE
SELECT
OPRATION
.
Fig
.
3.53
-
17
Notes
:
(
a
)
This
display
can
be
opened
only
when
the
machine
is
in
the
“
STOP
”
mode
and
no
data
is
exchanged
between
the
machine
and
the
programming
device
.
(
b
)
When
this
display
is
active
,
no
data
communication
can
be
initiated
between
the
machine
and
the
programming
device
.
The
[
ZERO
]
,
the
[
TRANSFER
]
,
the
[
FEEDER
START
]
,
and
the
[
FEEDER
END
]
buttons
also
become
invalid
.
(
1
)
Save
Operation
(
Machine
—
FD
)
•
Insert
a
formatted
floppy
disk
(
FD
)
into
the
floppy
disk
drive
(
FDD
)
.
•
After
specifying
the
file
name
to
be
saved
on
a
floppy
disk
with
the
[
DESIGNATE
NAME
]
key
,
press
the
[
SAVE
MACHINE
►
FD
]
key
.
•
“
SAVING
”
appears
in
the
“
STATUS
”
text
box
,
indicating
that
the
selected
data
is
being
saved
.
When
the
data
is
saved
normally
,
“
SAVED
”
appears
in
the
“
STATUS
”
text
box
and
the
saved
component
ID
appears
in
the
list
box
under
the
[
FD
[
DISK
FREE
SPACE
:
XXXXKB
]
]
key
.
When
an
error
is
found
during
save
operation
,
an
error
message
is
issued
and
the
save
operation
is
interrupted
.
Notes
:
⑻
When
the
component
ID
already
exists
floppy
disk
,
the
display
for
confirmation
to
overwrite
appears
on
the
screen
.
When
the
[
OVERWRITE
]
key
is
pressed
at
this
display
,
the
existing
data
is
replaced
with
the
new
one
.
When
the
[
DONT
OVERWRITE
]
key
is
pressed
,
the
existing
data
is
not
replaced
with
the
new
one
and
the
original
display
resumes
.
(
b
)
Another
display
cannot
be
opened
during
save
operation
.
3
-
64
-
21
the
on
same
QQIO
^
nm
ACP
01
EIN
3
-
64
-
21
3.8
HDD
/
FDD
Operation
(
2
)
How
to
Delete
the
Bypass
&
Rate
Data
on
“
FD
”
Side
Insert
a
floppy
disk
(
FD
)
into
the
floppy
disk
drive
(
FDD
)
.
Press
the
[
FD
[
DISK
FREE
SPACE
:
XXXXKB
]]
key
.
The
bypass
&
rate
data
on
the
floppy
disk
is
searched
.
When
the
component
IDs
are
found
,
they
are
displayed
.
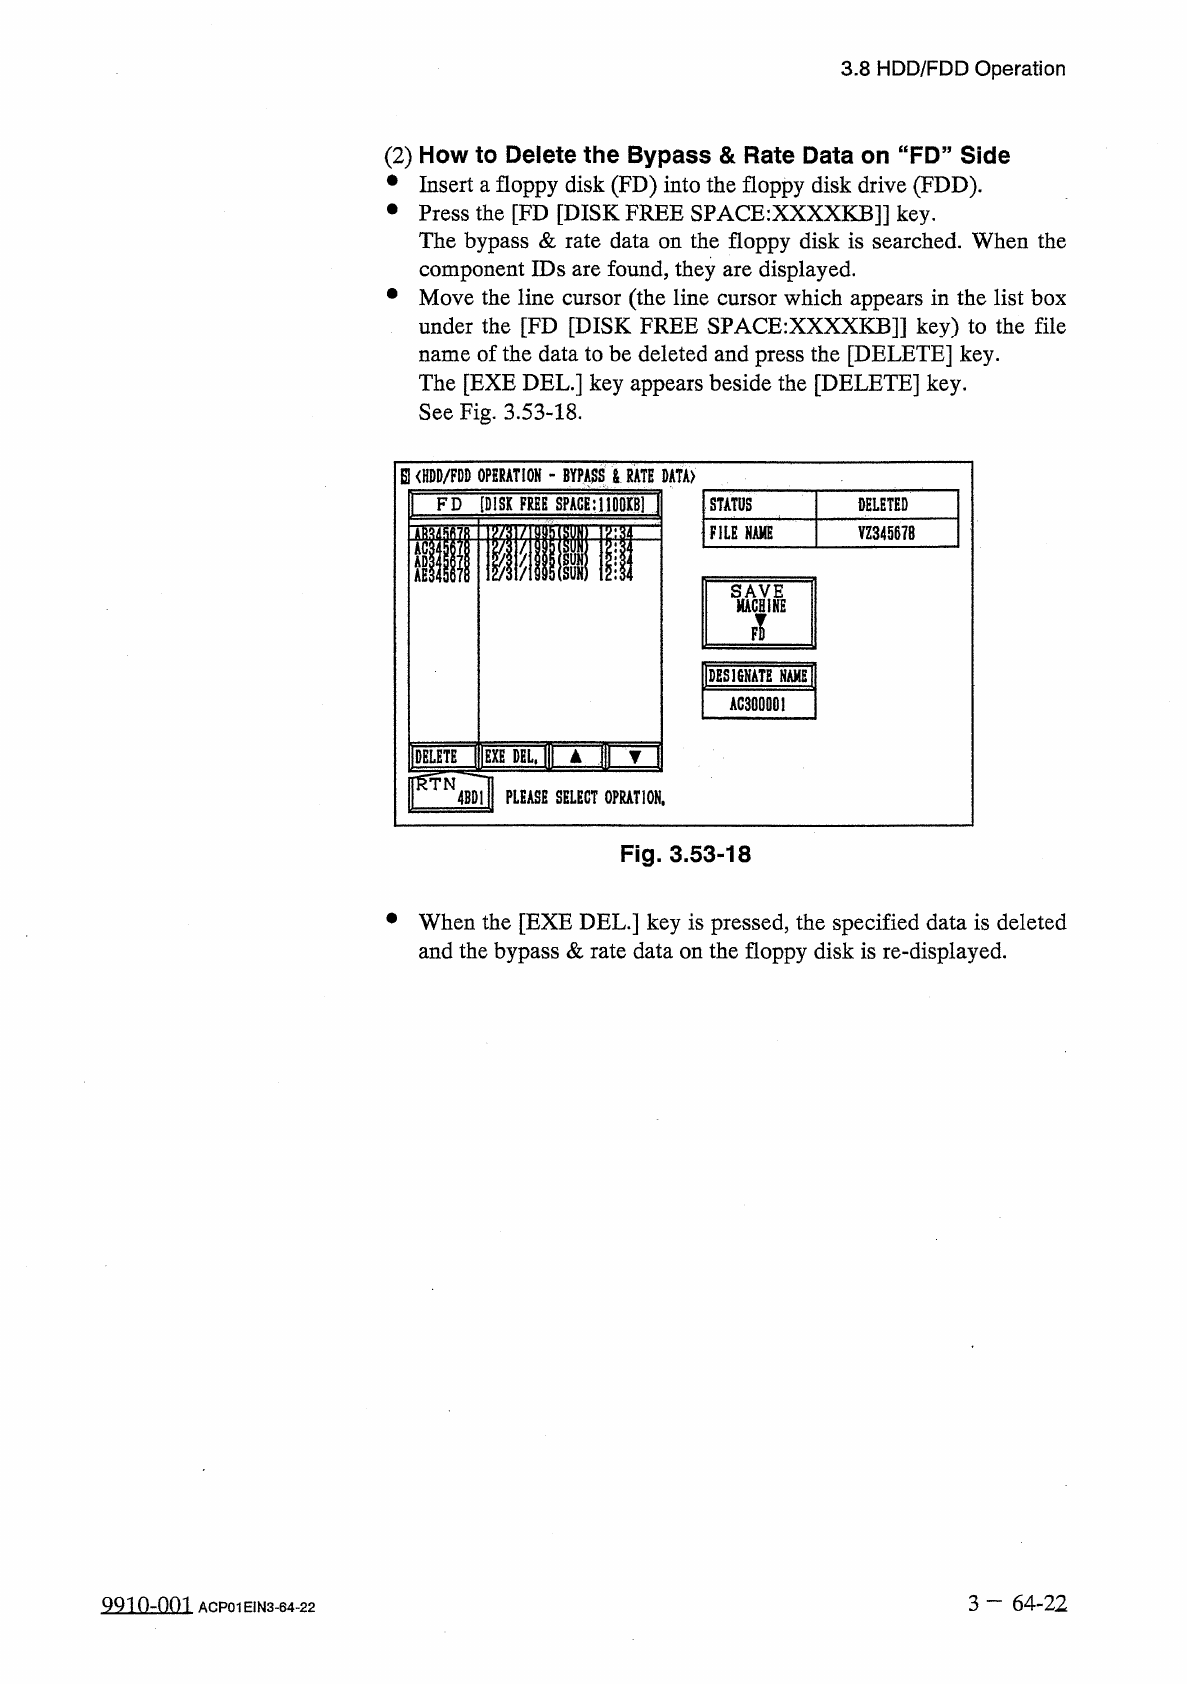
Move
the
line
cursor
(
the
line
cursor
which
appears
in
the
list
box
under
the
[
FD
[
DISK
FREE
SPACE
:
XXXXKB
]]
key
)
to
the
file
name
of
the
data
to
be
deleted
and
press
the
[
DELETE
]
key
.
The
[
EXE
DEL
.
]
key
appears
beside
the
[
DELETE
]
key
.
See
Fig
.
3.53
-
18
.
參
參
EUHDD
/
FDD
OPERATION
_
BYPASS
>
RATE
DATA
)
FD
[
DISK
FREE
SPACE
;
I
|
001
tBl
STATUS
DELETED
FILE
NAME
YZ
34567
B
im
llAGHli
IDESISNATE
AC
300001
IDELETE
lUmTELj
▲
fl
]
rNJ
PLEASE
SELECT
0
PRAT
10
N
,
Fig
.
3.53
-
18
•
When
the
[
EXE
DEL
.
]
key
is
pressed
,
the
specified
data
is
deleted
and
the
bypass
&
rate
data
on
the
floppy
disk
is
re
-
displayed
.
3
—
64
-
22
QQio
-
nm
ACP
01
EIN
3
-
64
-
22
3.9
Setting
of
Maintenance
Warning
Mode
3.9
Setting
of
Maintenance
Warning
Mode
(
1
)
OIL
-
CHECKUP
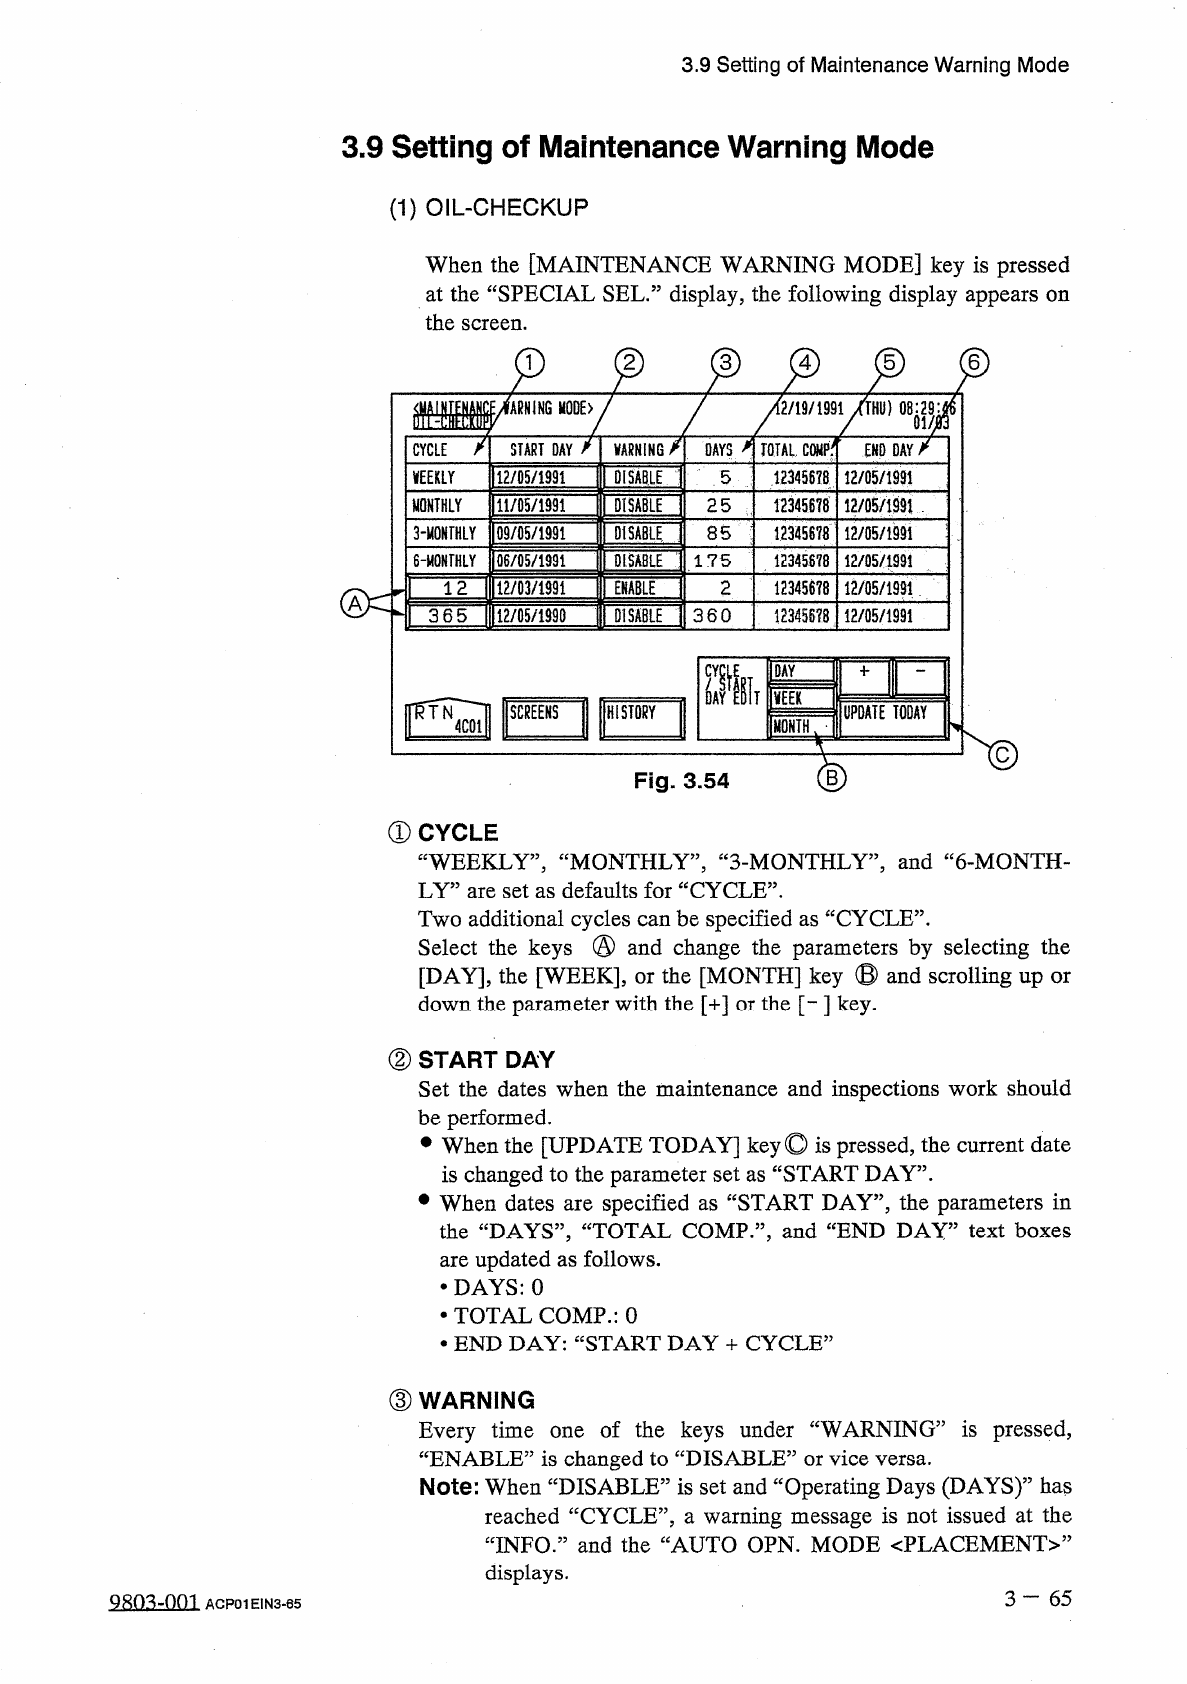
When
the
[
MAINTENANCE
WARNING
MODE
]
key
is
pressed
at
the
“
SPECIAL
SEL
•
”
display
,
the
following
display
appears
on
the
screen
.
p
p
2
6
[
2
/
19
/
1991
/
THU
)
fARNING
_
E
>
VARMING
/
ENO
DAY
/
START
DAY
CYCLE
DAYS
TOTAL
,
COMP
^
DISABLE
:
.
12345678
12
/
05
/
1991
5
12
/
05
/
1991
WEEKLY
"
PISABii
MONTHLY
11
/
05
/
1991
12345678
25
12
/
05
/
1991
123456
?
8
3
-
MONTHLY
09
/
05
/
1991
DISABLE
,
85
12
/
05
/
1991
DISABLE
6
-
MONTHLY
12345878
06
/
Q
5
/
1991
175
12
/
05
/
1
S
91
12
/
05
/
1991
12
/
03
/
1991
ENABLE
2
12345678
1 2
360
365
12
/
05
/
199
Q
DISABLE
12345578
12
/
05
/
1991
CY
(
DAY
'
Ml
画
1
^
1
SCREENS
UPDATE
TODAY
HISTORY
MONTH
v
Fig
.
3.54
①
CYCLE
“
WEEKLY
”
,
“
MONTHLY
”
,
“
3
-
MONTHLY
,,
,
and
“
6
-
MONTH
-
LY
”
are
set
as
defaults
for
“
CYCLE
”
.
Two
additional
cycles
can
be
specified
as
“
CYCLE
”
.
Select
the
keys
@
and
change
the
parameters
by
selecting
the
[
DAY
]
,
the
[
WEEK
]
,
or
the
[
MONTH
]
key
⑬
and
scrolling
up
down
the
parameter
with
the
[
+
]
or
the
[
-
]
key
.
or
②
START
DAY
Set
the
dates
when
the
maintenance
and
inspections
work
should
be
performed
.
•
When
the
[
UPDATE
TODAY
]
key
©
is
pressed
,
the
current
date
is
changed
to
the
parameter
set
as
“
START
DAY
”
.
•
When
dates
are
specified
as
“
START
DAY
”
,
the
parameters
in
the
“
DAYS
”
,
“
TOTAL
COMP
”
,
and
“
END
DAY
”
text
boxes
are
updated
as
follows
.
•
DAYS
:
0
•
TOTAL
COMP
.
:
0
•
END
DAY
:
“
START
DAY
+
CYCLE
”
③
WARNING
Every
time
one
of
the
keys
under
“
WARNING
”
is
pressed
,
“
ENABLE
”
is
changed
to
“
DISABLE
:
Note
:
When
“
DISABLE
”
is
set
and
“
Operating
Days
(
DAYS
)
55
has
reached
“
CYCLE
”
,
a
warning
message
is
not
issued
at
the
“
INFO
.
”
and
the
“
AUTO
OPN
.
MODE
<
PLACEMENT
>
,
,
displays
.
or
vice
versa
.
3
—
65
Q
8
Q
3
-
001
ACP
01
EIN
3
-
65