4OM-1064-001.pdf - 第187页
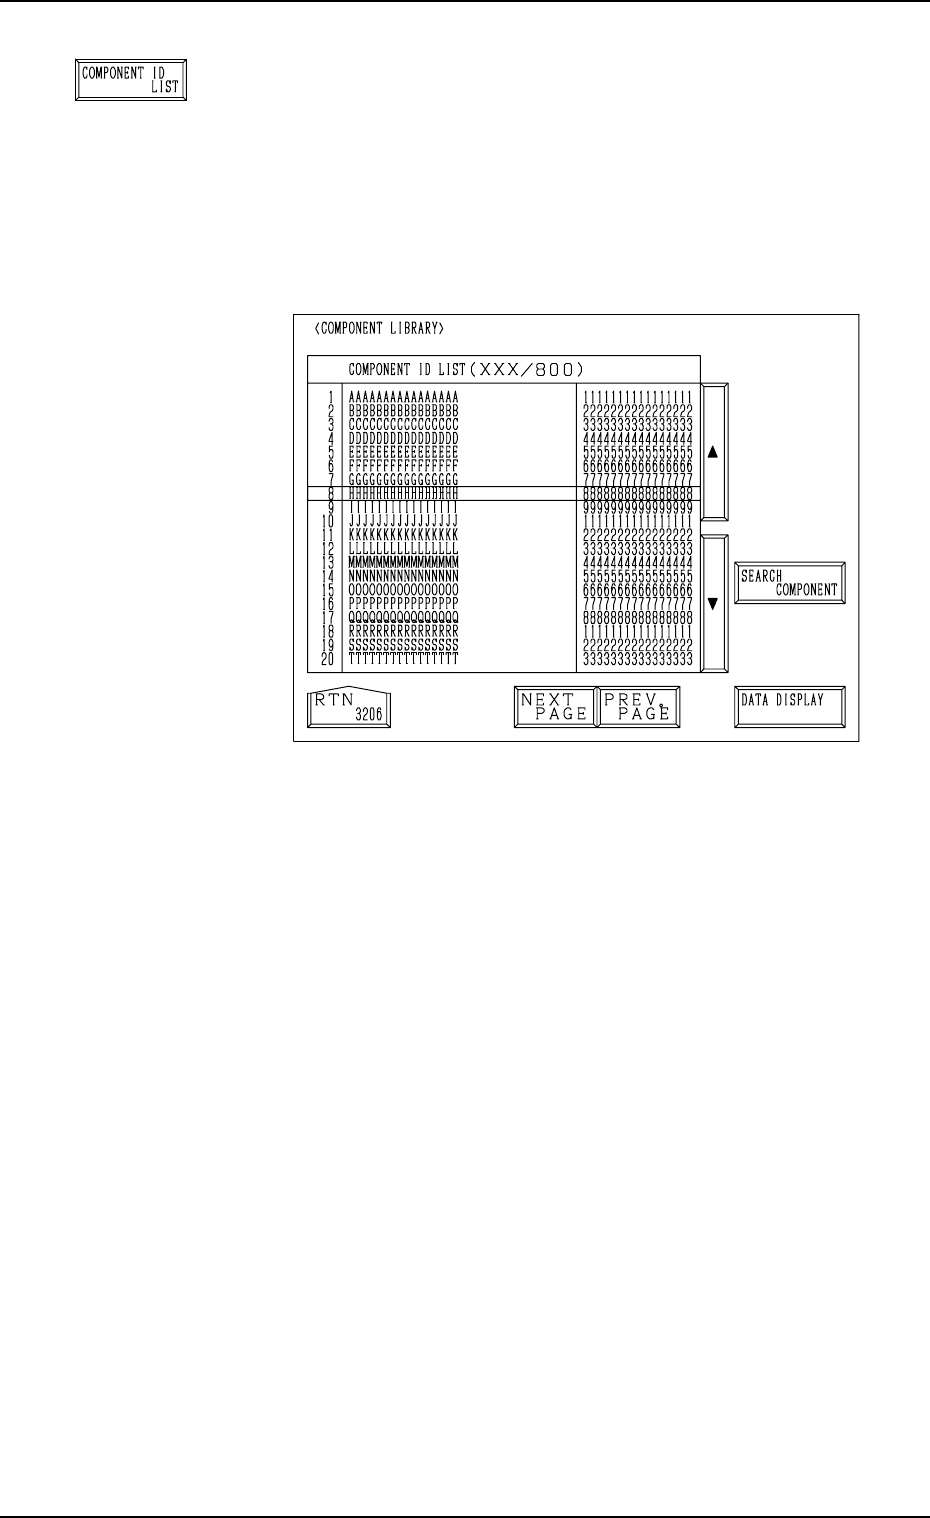
Tg0249-PM-MM 7. DEVICE TEST Display 0004-002 3-141 [COMPONENT ID LIST] Key When this key is pressed, the following display appears on the screen. The [SEARCH COMPONENT] key is proved to easily lo- cate the component ID…
Tg0249-PM-MM
[EDIT DATA] Key
When this key is pressed, a display appears, enabling the
editing of the data which corresponds to the test compo-
nent ID at the line cursor position in the list box under the
[TEST ID LIST (XXX/100)] key.
Refer to the “COMPONENT LIBRARY” for details.
[COMP. LIBRARY ENTRY] Key
When this key is pressed, the data corresponding to the test
ID at the cursor position in the list box under the [TEST ID
LIST (XXX/100)] key can be registered in the component
library with a component ID.
When the registration is completed normally, it is indicated
at B in Fig. 3.92-1 for 5 seconds.
When the same component ID is already registered, the
“DATA SAVE MODE” display appears, enabling the op-
erator to select one of the option keys ([SAVE] and [DON’T
SAVE] key).
Note: As test IDs are protected by the password in the
same level (password available areas) as that of the
component library data (Saving and Deleting), they
may not be registered.
Refer to “3. Management of Password of Section
4” for details.
[NEXT TEST ID] and [PREV. TEST ID] Keys
When the [NEXT TEST ID] key is pressed, another list of
test IDs appears in the list box. Pressing the [PREV. TEST
ID] key lists up the previous test IDs.
[RTN] Key
When this key is pressed, the test ID data at the line cursor
position in the list box is set as the component ID objective
in data correction.
[NEXT COMP. LIBRARY] and [PREV. COMP. LI-
BRARY] Keys
When the [NEXT COMP. LIBRARY] or the [PREV. COMP.
LIBRARY] key is pressed, the next or the previous library
data appears in the “COMP. LIBRARY” text boxes *A.
[TEST ID ENTRY] Key
When this key is pressed, the component IDs (component
library data) in the text box A in Fig.3.92-1are registered
as test ID data.
Ref.: Up to 100 pieces of test ID data can be registered.
7. DEVICE TEST Display
0004-002 3-140
Tg0249-PM-MM
7. DEVICE TEST Display
0004-002 3-141
[COMPONENT ID LIST] Key
When this key is pressed, the following display appears on
the screen.
The [SEARCH COMPONENT] key is proved to easily lo-
cate the component ID of the data set as test ID data. The
located component ID appears at A in Fig. 3.92-1.
The [DATA DISPLAY] key is also provided to display the
contents of the component library data.
Fig. 3.92-3
Tg0249-PM-MM
7. DEVICE TEST Display
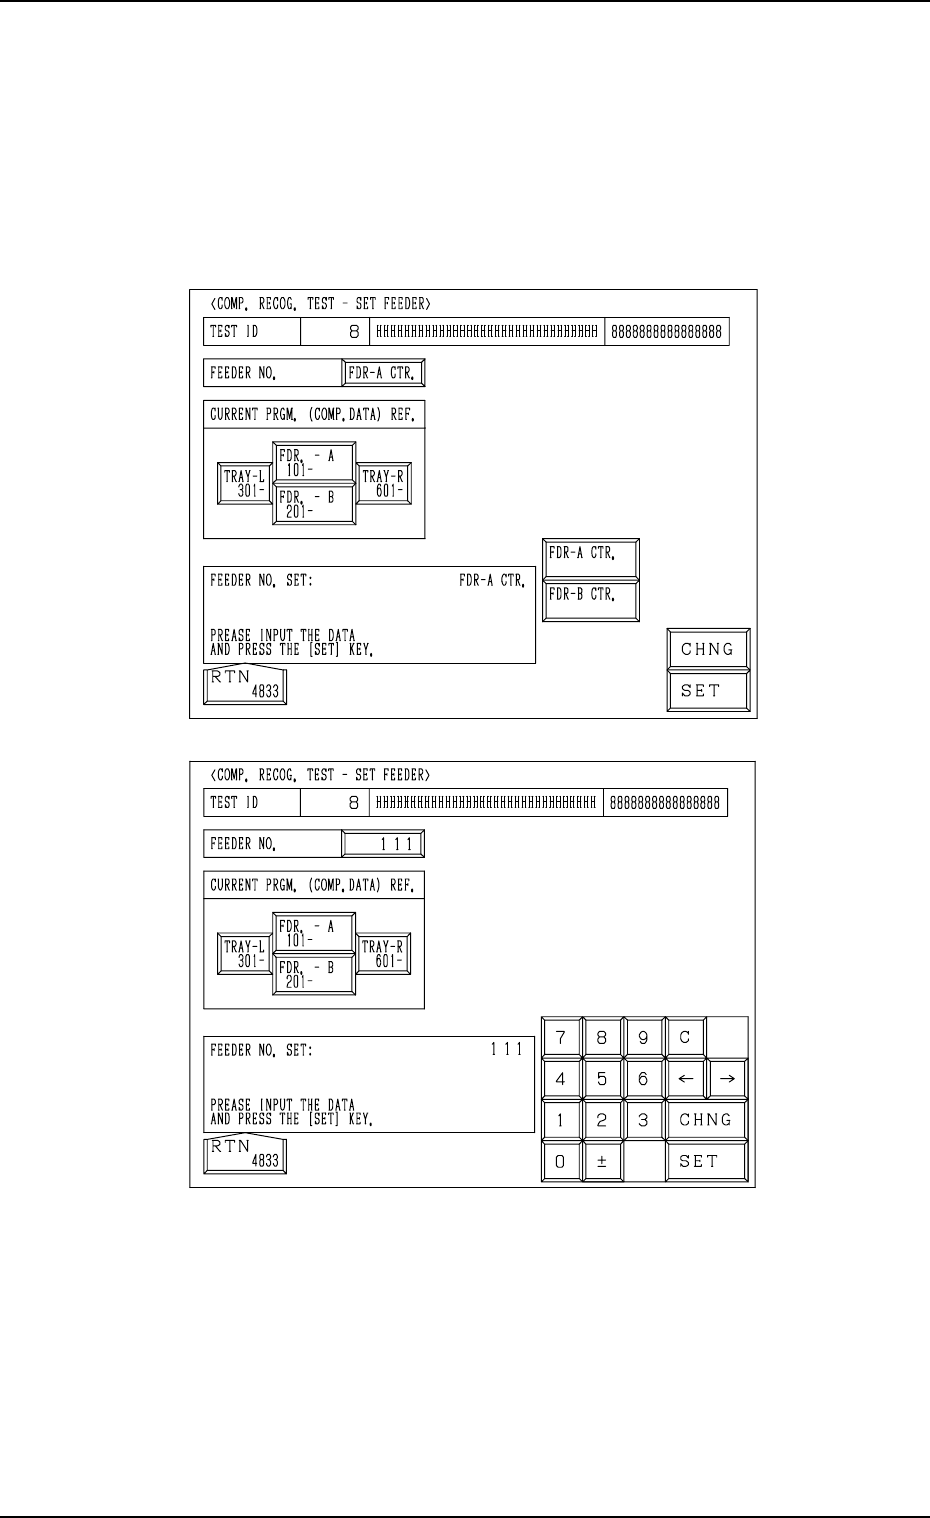
7.2.2 COMP. RECOG. TEST - SET FEEDER Display
• This display allow the operator to specify the slot No. of the feeder from
which the component should be taken out for the component recognition
test or the position where the component should be attached manually.
When the [SET FEEDER] key is pressed at the “COMPONENT RECOG.
TEST” display, the following display appears on the screen.
The contents of the display change according to the selected feeder No.
To manually attach a component
(1) Select the [FDR. - A 101-] or the [FDR. -B 201-] key located under “CUR-
RENT PRGM. (COMP. DATA) REF.”.
(2) Select the [FDR-A CTR.] or the [FDR-B CTR.] key and press the [SET]
key.
A component can be attached manually above the component discharge
box or the component discharge conveyor (option).
To directly enter the feeder No.
(1) Press the [CHNG] key at the display (Fig. 3.93-1).
(2) Enter the feeder No., using the ten-key pad and press the [SET] key.
Fig. 3.93-1
Fig. 3.93-2
9910-001 3-142