OI_WT1_WT1H_supplementary.pdf - 第10页
10 Menu 1 Pressing the Menu button takes you to menu 1 Standby T emp. The standby temperature is a preset value to which a soldering tool is adjusted when not in use. Option Description OFF Standby deactivated (factory s…
9
Löten und Entlöten
Führen Sie die Lötarbeiten gemäß der Betriebsanleitung Ihres angeschlossenen Lötwerkzeuges durch.
Behandlung der Lötspitzen
• Benetzen Sie beim ersten Aufheizen die selektive und
verzinnbare Lötspitze mit Lot. Dies entfernt lagerbedingte
Oxydschichten und Unreinheiten der Lötspitze.
• Achten Sie bei Lötpausen und vor dem Ablegen des
Lötkolbens darauf, dass die Lötspitze gut verzinnt ist.
• Verwenden Sie keine zu aggressiven Flussmittel.
• Achten Sie immer auf den ordnungsgemäßen Sitz der
Lötspitzen.
• Wählen Sie die Arbeitstemperatur so niedrig wie möglich.
• Wählen Sie die für die Anwendung größtmögliche
Lötspitzenform
Daumenregel: ca. so groß wie das Lötpad.
• Sorgen Sie für einen großächigen Wärmeübergang
zwischen Lötspitze und Lötstelle, indem Sie die Lötspitze
gut verzinnen.
• Schalten Sie bei längeren Arbeitspausen das Lötsystem
aus oder verwenden Sie die Weller Funktion zur
Temperaturabsenkung bei Nichtgebrauch.
• Benetzen Sie die Spitze mit Lot, bevor Sie den Lötkolben
für längere Zeit ablegen.
• Geben Sie das Lot direkt auf die Lötstelle, nicht auf die
Lötspitze.
• Wechseln Sie die Lötspitzen mit dem dazugehörigen
Werkzeug.
• Üben Sie keine mechanische Kraft auf die Lötspitze aus.
Hinweis
Die Steuergeräte wurden für eine mittlere Lötspitzen-
größe justiert. Abweichungen durch Spitzenwechsel
oder der Verwendung von anderen Spitzenformen
können entstehen.
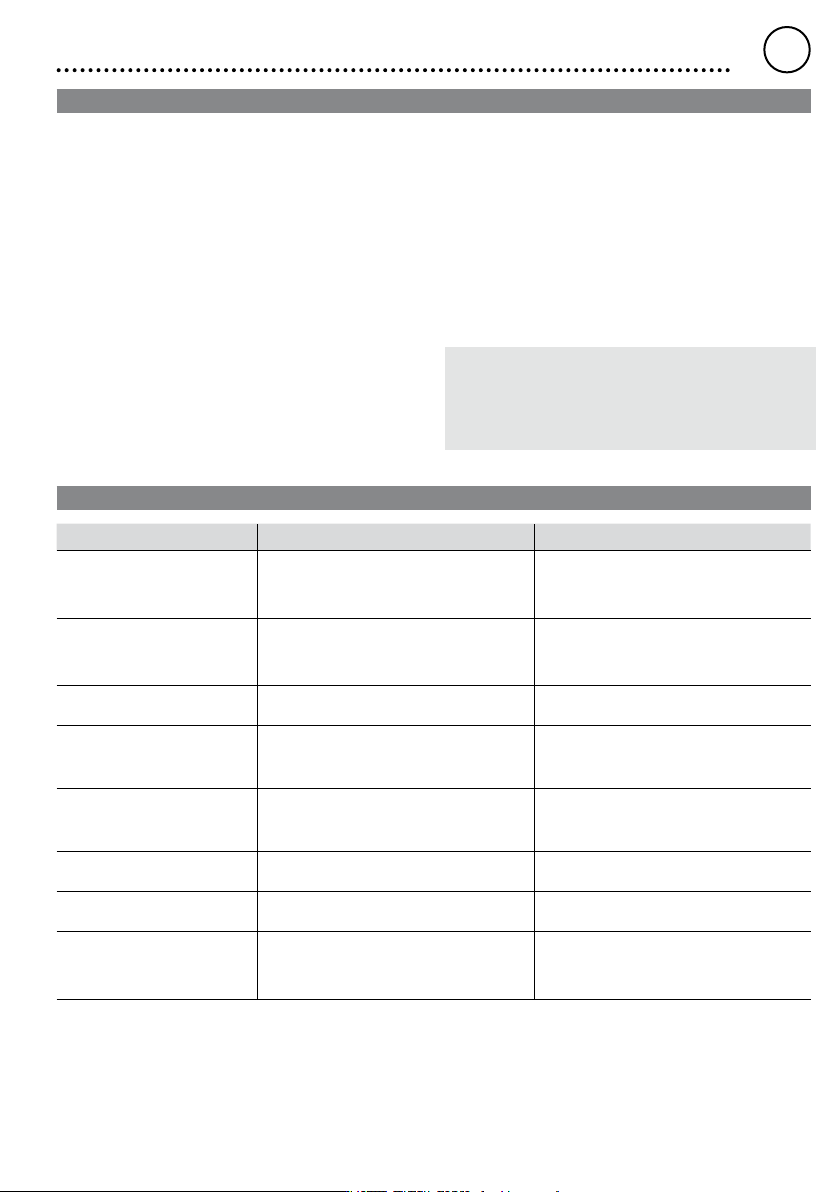
Fehlermeldungen und Fehlerbehebung
Meldung/Symptom Mögliche Ursache Maßnahmen zur Abhilfe
• Anzeige „- - -“ • Werkzeug wurde nicht erkannt
• Werkzeug defekt
• Werkzeug nicht kompatibel
• Anschluss des Werkzeugs am Gerät
überprüfen
• Angeschlossenes Werkzeug überprüfen
• Keine Displayfunktion
(Display aus)
• Keine Netzspannung vorhanden • Netzschalter einschalten
• Netzspannung überprüfen
• Gerätesicherung überprüfen
• OFF • Station bendet sich im Standby oder
OFF Modus
• Mit den Tasten UP oder Down Lötwerk-
zeug wieder aktivieren
• Werkzeug bleibt kalt • Station bendet sich im Standby oder
OFF Modus
• Kolben bewegen
• Mit den Tasten UP oder Down Lötwerk-
zeug wieder aktivieren
• Temperaturanzeige im
Display
• Werkzeug bleibt kalt
• Heizung defekt • Lötwerkzeug prüfen / ersetzen
• Station funktioniert nicht wie
gewohnt
• Parameter verstellt • Station Zurücksetzen auf Werkseinstellun-
gen
• Einstellungsänderungen nicht
möglich
• Station verriegelt • Station entriegeln
• Zero Smog läuft nicht an • Keine Netzspannung vorhanden
• Kein Signal vorhanden
• Netzversorgung prüfen
• Schnittstellenverkabelung prüfen
• Einstellungen Schnittstelle prüfen
DE
DEUTSCH
10
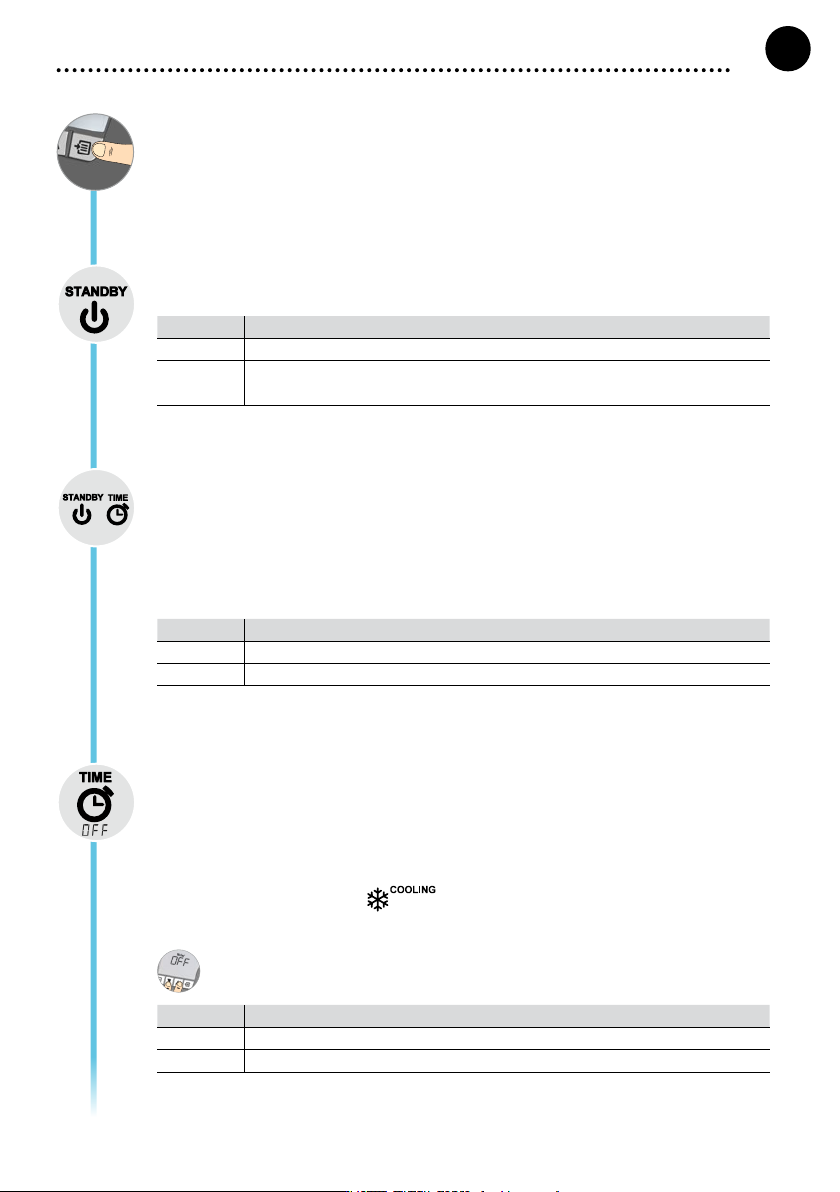
Menu 1
Pressing the Menu button takes you to menu 1
Standby Temp.
The standby temperature is a preset value to which a soldering tool is adjusted when not in use.
Option Description
OFF Standby deactivated (factory setting 180°C (360°F)
100-300 °C
200-600 °F
Standby Temp., Individually adjustable
Standby time (temperature deactivation)
On soldering tools with a usage sensor in the handle, the soldering tool is adjusted to the standby tem-
perature after the preset standby time if not in use. The sensor integrated in the tool detects changes
in status and deactivates standby mode as soon as the tool is moved.
On soldering tools without a usage sensor, the soldering tool is adjusted to the standby temperature
after the preset standby time if no soldering process is being performed.
Pressing the UP and DOWN buttons exits standby mode.
Option Description
OFF Standby deactivated (factory setting 2 min)
1-99 min Standby Time, Individually adjustable
OFF time
If the soldering tool is not in use, the heating for the soldering tool is deactivated after the OFF time
elapses. Temperature deactivation is performed independently of the set standby function. The actual
temperature is indicated by ashing LED and serves as a residual heat display. The display reads
„OFF“.
While the soldering tool cools, the residual heat is displayed.
Cooling also ashes in the display.
As soon as the temperature falls below 50 °C (122 °F), OFF appears in the display and the backligh-
ting is deactivated.
Pressing the UP and DOWN buttons at the same time exits OFF mode.
Option Description
OFF OFF time Deactivated (factory setting 10 min)
1-999 min OFF time, Individually adjustable
GB
ENGLISH
11
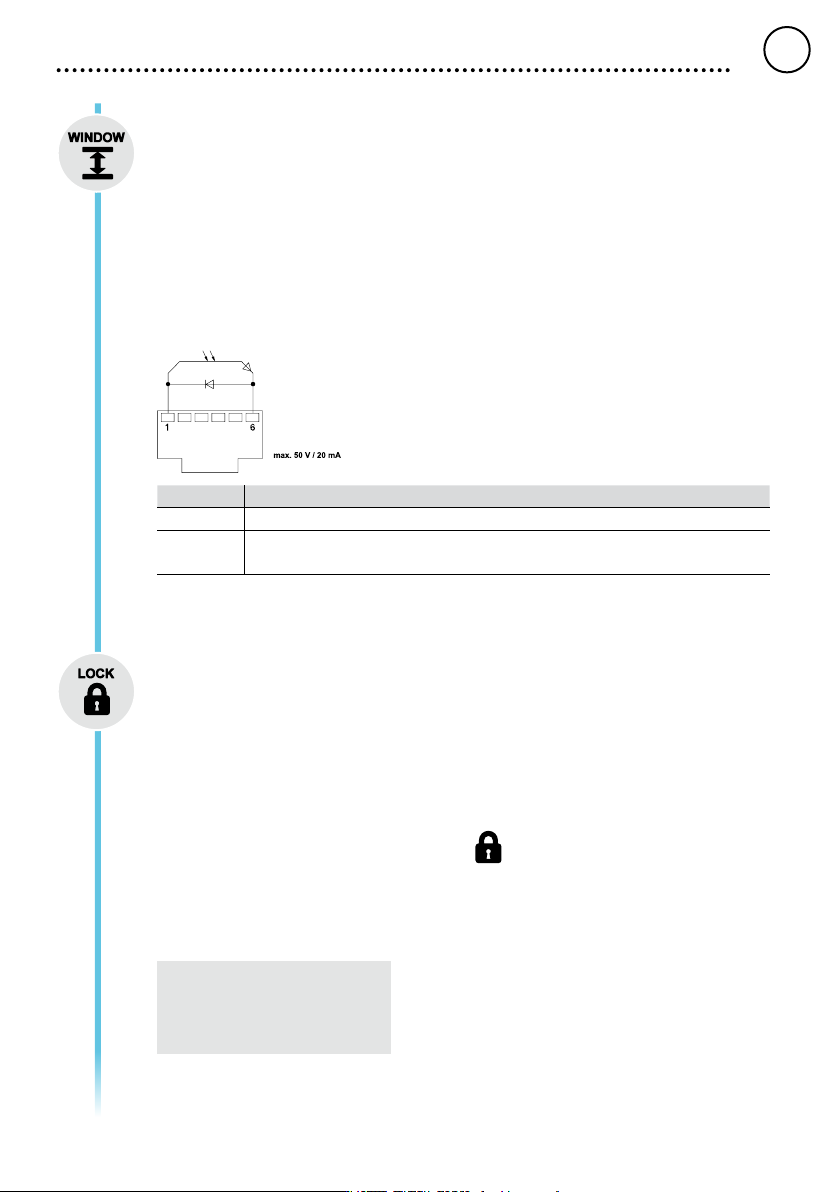
Window function
Option 1 (factory setting):
Set the potential-free switching output to ES FE.
Limiting the adjustment range to ± 1-99 °C (±1-180 °F) based on a temperature locked using the
„LOCK“ function.
The locked temperature therefore represents the middle of the adjustable temperature window.
Option 2:
Set the potential-free switching output to ES rob.
Starting from a set, locked temperature, it is possible to set a temperature window of ± 1-99 °C (±1-
180 °F) using the WINDOW function. If the actual temperature is within this window, the potential-free
contact (optocoupler output) becomes conductive.
Option Description
OFF Window function Deactivated (factory setting OFF)
1-99 °C
1-180 °F
Window function, Individually adjustable
LOCK
Lock for the station. After the station is locked, it is no longer possible to change any device settings.
Exception 1: Fixed temperature buttons activated.
Exception 2: Window function Option 1.
All other settings are disabled until the station is unlocked again.
Locking the station
Set the three-digit locking code of your choice (between 001 and 999) and conrm by pressing the
Menu button.
The lock is active (the display shows a lock symbol).
Unlocking the station
Press the Menu button. ON appears in the display
Set the three-digit locking code.
Press the Menu button to conrm the code.
Forgotten code?
Please contact our Customer
Service: technical-service@weller-
tools.com
GB
ENGLISH