ITT-Cannon-RF50-Catalog.pdf - 第53页
B B B B A A I I - - 1 1 2 2 0 0 3 3 C C o o a a x x i i a a l l T T e e r r m m i i n n a a t t i i o o n n s s , , 1 1 a a n n d d 2 2 P P o o i i n n t t D D i i r r e e c c t t P P C C B B T AB FERRULE CRIMP BODY 12,7…
Cannon 50 Ohm Connectors ASSEMBLY INSTRUCTIONS
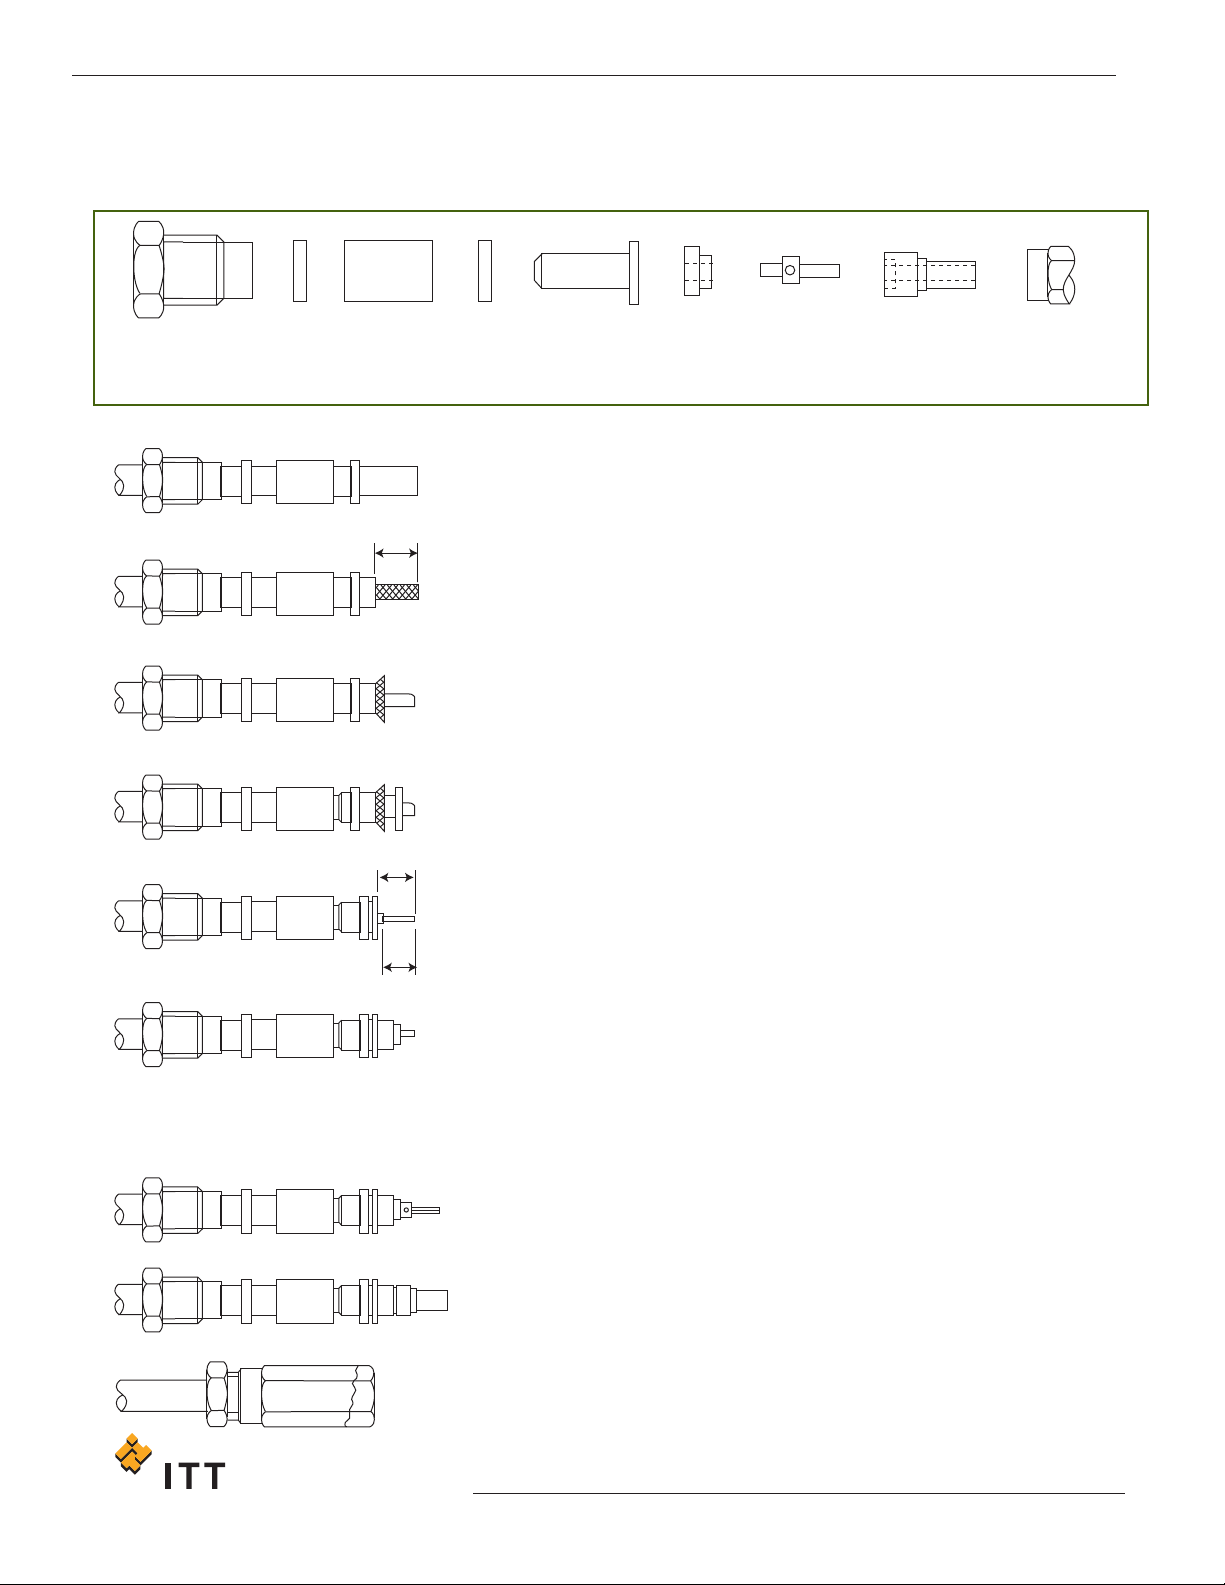
BBAAII--000011 SSMMBB // SSMMCC SSttrraaiigghhtt CCoonnnneeccttoorrss,, CCllaammpp TTyyppee ffoorr BBrraaiiddeedd CCaabbllee
CLAMP NUT No.1
WASHER
No.2
WASHER
GASKET SLEEVE REAR
INSULATOR
CONTACT FRONT
INSULATOR
FRONT
BODY
2,50
(.098)
3,50
(.138)
5,50
(.216)
1. Slide clamp nut, No.1 washer, gasket and No.2 washer over cable.
2. Trim cable to dimension shown taking care not to nick the braid.
3. Thumb braid out radially at right angles to dielectric.
4. A small chamfer may now be cut on the end of cable dielectric, to assist
assembly of sleeve.
5. Slide sleeve over cable dielectric and under braid and outer jacket until
the flange of the sleeve is flush against the braid.
6. Move No. 2 washer up to braid and trim braid flush with the flange of
the sleeve.
7. Trim cable dielectric and center conductor to dimensions shown taking
care not to nick the center conductor.
8. Tin center conductor (DO NOT OVER TIN).
9. Slide rear insulator over cable.
10. Place a small solder preform made from 0,26 - 0,31 (.010 - .012) dia (28
swg) multi-core sodler in rear of contact.
11. Push contact on center conductor as far as possible. Heat center
conductor and push until the shoulder of the contact is flush against the
rear insulator. Do not allow solder to protrude outside spill hole.
12. Slide on front insulator flush against rear insulator (if not already
assembled in body).
13. Move clamp nut, No.1 washer and gasket up to No. 2 washer, slide on
front body and tighten clamp nut to required torque: 0,63 - 0,70 Nm (90-
100 in. ozs.)
Only common cable retention features are shown in detail. V
arious body
configurations can apply
.
52
www
.ittcannon.com
Dimensions shown in mm (inch)
Specifications and dimensions subject to change
STEP 9
STEP 7
STEP 5
STEP 3
STEP
2
STEP 1
STEP 13
STEP 12
STEP 11
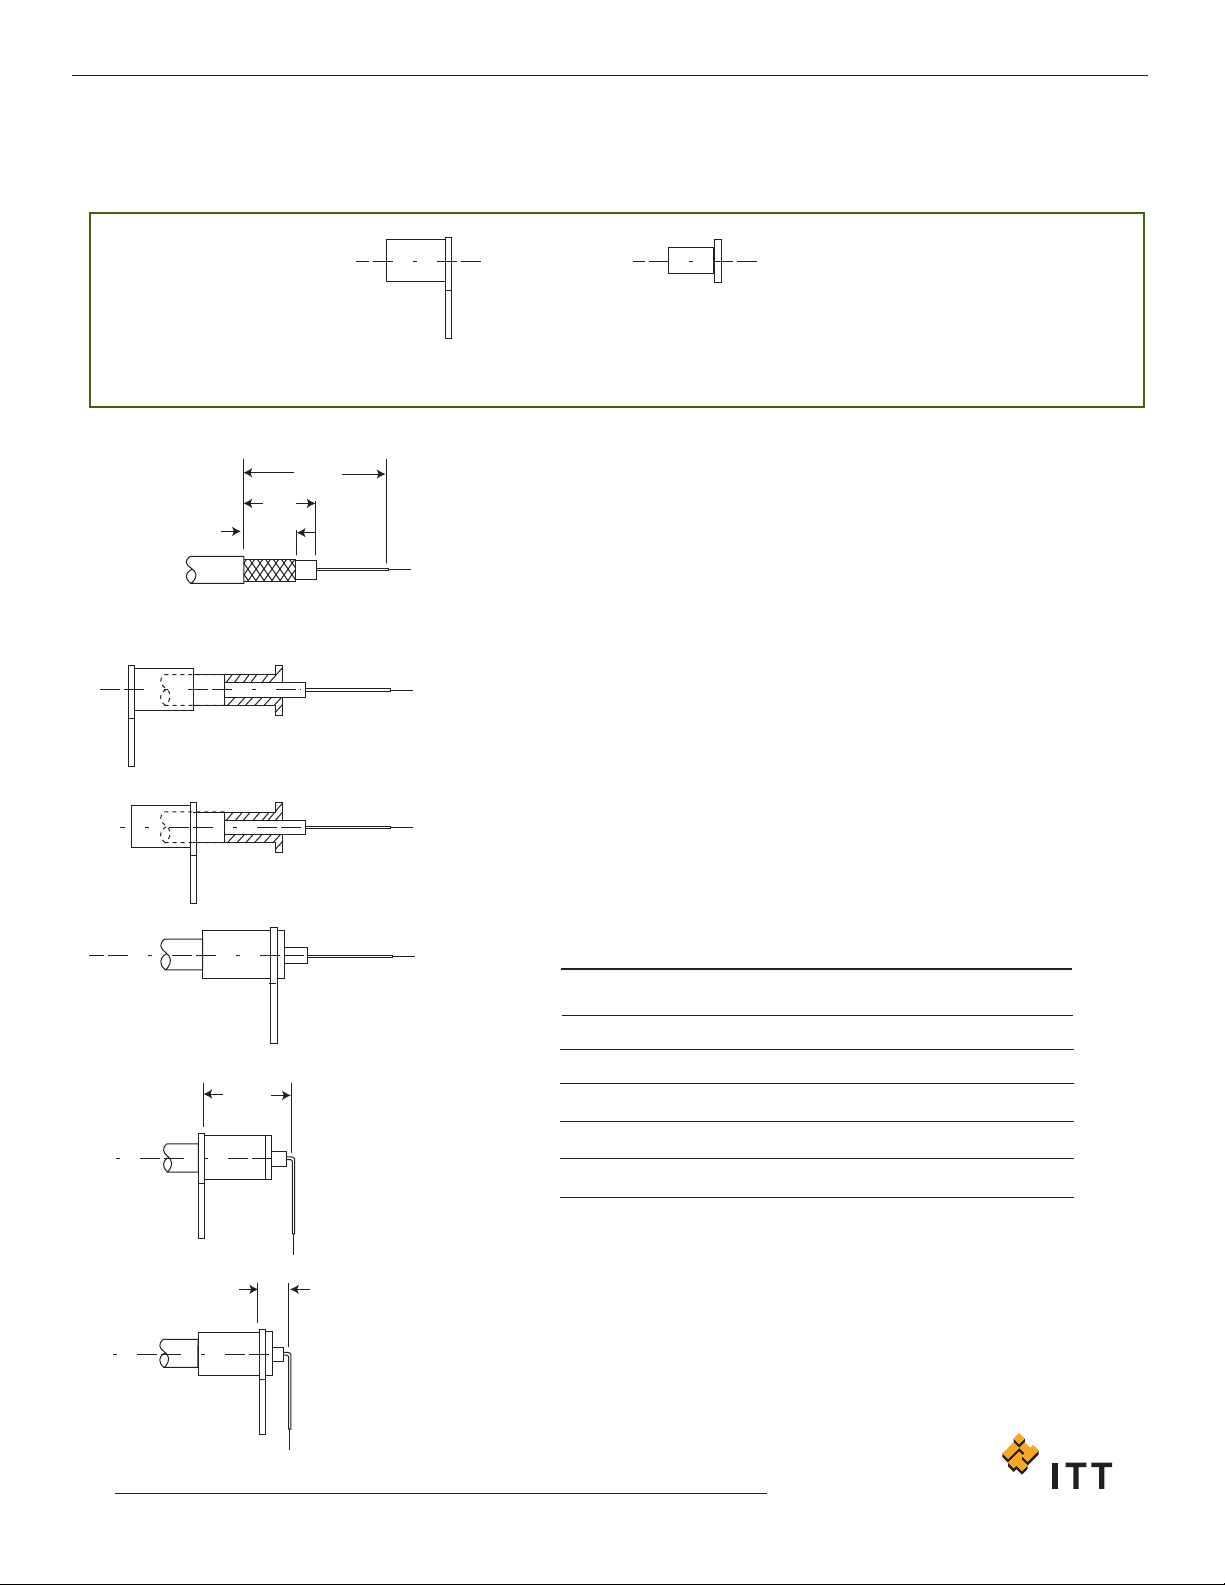
BBBBAAII--11220033 CCooaaxxiiaall TTeerrmmiinnaattiioonnss,, 11 aanndd 22 PPooiinntt DDiirreecctt PPCCBB
TAB FERRULE CRIMP BODY
12,70*
(.500)
6,35*
(,250)
4,57
(.180)
7,62
(.300)
2,54
(.100)
1. Trim cable to dimensions shown being careful not to nick or damage
braids or center conductor. Trim center conductor. * These dimensions
suit 2,54 (.100) and 7,62 (.300) PCB pitches, for other pitches see Note 4.
2. Slide Tab-Ferrule over cable.
NOTE: Orientation of tab-ferrule is optional depending upon mounting
requirements. Flare braids and slide crimp body over cable dielectric until
braids meet flange on crimp body.
3. Slide tab-ferrule over braids to face of flange and crimp using Cannon’s
Crimp Tool and suitable Die Set (see table).
4.
Bend center conductor to dimension shown depending upon preferred
orientation. These dimensions suit 2,54 (.100) and 7,62 (.300) PCB
pitches. For other pitches of 2,54 (.100) multiples add 2,54 (.100)
multiples to the 12,70 (.500) and 6,35 (.250) dimensions in the cable
stripping instructions Note 1.
Cable Numbers
RG174/U
RG178/U
RG179/U
RG188/U
RG196/U
RG316/U
Die Size
3,25 (.128)
2,67 (.105)
3,25 (.128)
3,25 (.128)
2,67 (.105)
3,25 (.128)
Die Set
K29263
K29263
K29263
K29263
K29263
K29263
Cannon 50 Ohm Connectors ASSEMBLY INSTRUCTIONS
53
www.ittcannon.com
Dimensions shown in mm (inch)
Specifications and dimensions subject to change
STEP 4
STEP 3
STEP 2
STEP 2
STEP 1
STEP 4
SOLDER
54
www
.ittcannon.com
Cannon 50 Ohm Connectors ASSEMBLY INSTRUCTIONS
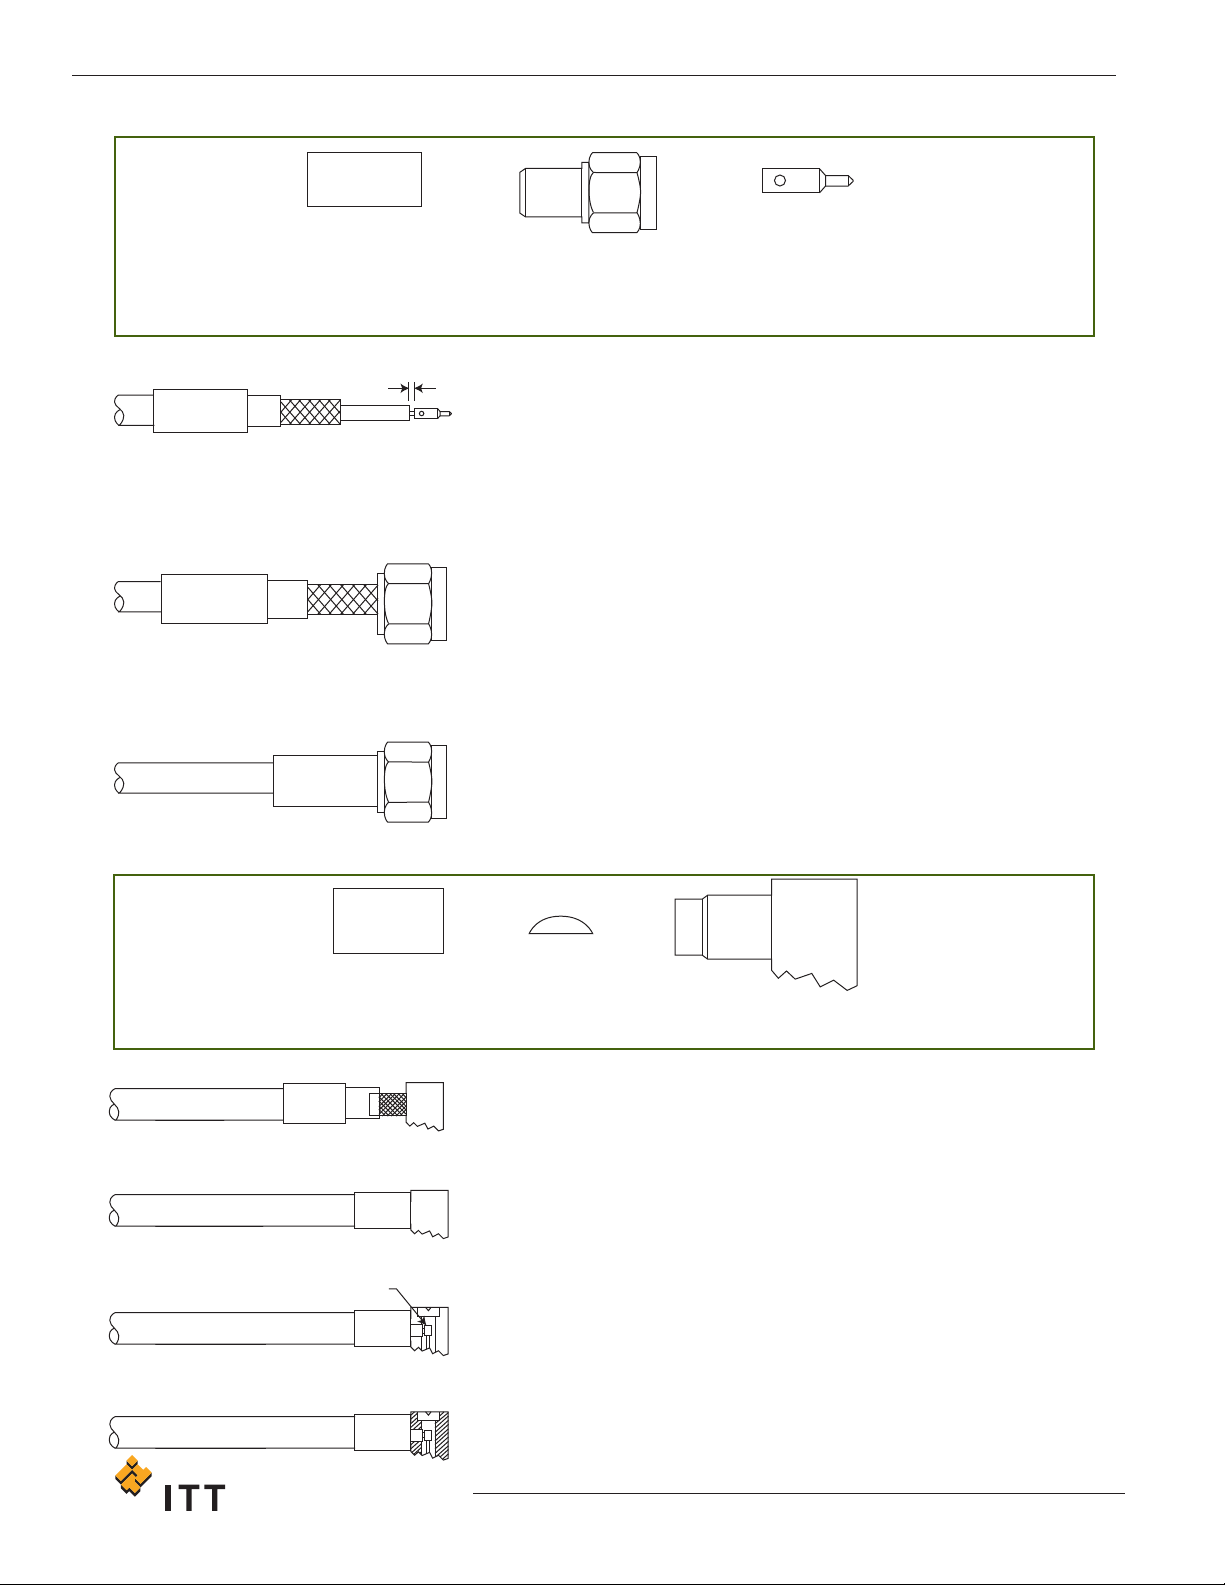
CCSSMMAA 11 -- SSMMAA SSttrraaiigghhtt CCoonnnneeccttoorrss,, CCrriimmpp TTyyppee ffoorr BBrraaiiddeedd CCaabbllee
CRIMP FERRULE BODY ASSEMBLY CONTACT
NOTE: Other body configurations apply
0,38
(.015)
1. Slide ferrule on to cable.
2. Trim cable dimension shown next to the applicable connector
drawing on page 15 or page 16.
3. Solder contact attachment:
Solder contact to inner conductor.
Crimp contact attachment:
Crimp contact to inner conductor using Cannon’s Hand Tool T4897
with positioner T4898 (for male contacts) and T4899 (for female
contacts).
4. Insert trimmed cable into the rear of the body assembly. Tubular
body extension will slide under the braid with the rear portion of
extension fitting under the jacket as shown. NOTE: When using
cables with inflexible jackets it is permissible to make two 3.17 (.125)
long longitudinal slits in the outer jacket.
5. Slip ferrule flush against the body and crimp in position using
Cannon’s Crimp Tool and Suitable Die Set (see table on page 58).
CCSSMMAA 22 -- SSMMAA RRiigghhtt AAnnggllee CCoonnnneeccttoorrss,, CCrriimmpp TTyyppee ffoorr BBrraaiiddeedd CCaabbllee
CRIMP
FERRULE
CAP BODY ASSEMBLY
1. Slide ferrule on to cable.
2.
T
rim cable dimension shown next to the applicable connector
drawing on page 15.
3. Tin center conductor (DO NOT OVER TIN).
4.
Slide body over cable dielectric and under the braid until braid is flush
against underside of body. Ensure center conductor is is located in
the forked end of the contact. NOTE: When using cables with
inflexible jackets it is permissible to make two 3.17 (.125) longitudinal
slits in the outer jacket.
5.
Slide ferrule flush against the body and crimp in position using
Cannon’s Crimp Tool and Suitable Die Set (see table on page 58).
6. Using a small soldering iron solder center conductor to contact.
NOTE: The center conductor should not protrude beyond the contact
or touch the body. Solder should not protrude beyond the slotted
section of the contact.
7.
Locate the cap in rear of body and press flush to outer body to
ensure it is locked in position.
STEP 1 - 3
STEP 5
STEP 4
STEP 6
STEP 5
STEP 1 - 4
STEP
7