KY Config_Manual_ENG_Final.pdf - 第23页
4.2. Inline Tab This section describes the it ems displayed by clicking the I nline tab in the pop-up window displayed by clicking Barcod e Setting button on the main screen. The following t able shows the items in the I…

• CAM Barcode: Select this to use the Cam Barcode Reader.
• Not Use Manual Barcode Input: Select this not to pop-up manual Barcode Input window when barcode
recognition is failed.
2.No inspection until
barcode comes
When this is selected, inspection is not proceeded until the barcode is read.
3.M in 1
When this is selected, the JOB File corresponding to the read barcode is automatically selected and used for
inspection while several JOB Files are loaded.
4.Use Display All Array
Barcode
When this is selected, it displays all Array Barcodes.
5.Master Array Option
This item is selected to use Master Barcode for Multi Panel. “Use Master Barcode for Multi Panel” is the
option use when multiple corresponding Barcode is added based on the master Barcode inputted.
• Input Data: Sets Panel or Array number by input Cut and Serial item when ‘Use Master Barcode for Multi
Panel’ option is used.
• Digit: Sets Panel or Array number by input Digit item when ‘Use Master Barcode for Multi Panel’ option is
used.
• Increase: This item is selected to increase barcode amount one by one when ‘Use Master Barcode for Multi
Panel’ option is used.
6.Pre Conv
• Use Pre Conv: This item is selected to set communication of Conveyor which located advance to SPI
system.
• Comm Port: Sets Pre Conv Serial Port.
• Speed: Sets Serial Communication speed.
• Data: Sets Serial Communication Date Bit value.
• Parity: Sets Serial Communication Parity Bit value.
• Stop: Sets Serial Communication STOP Bit value.
7.Use Work BAR_PRE
Select this option if barcode is attached on Work Conveyor Center.
8.Use Login Before Input
Barcode
Login first and input Barcode when Barcode is inputted manually.
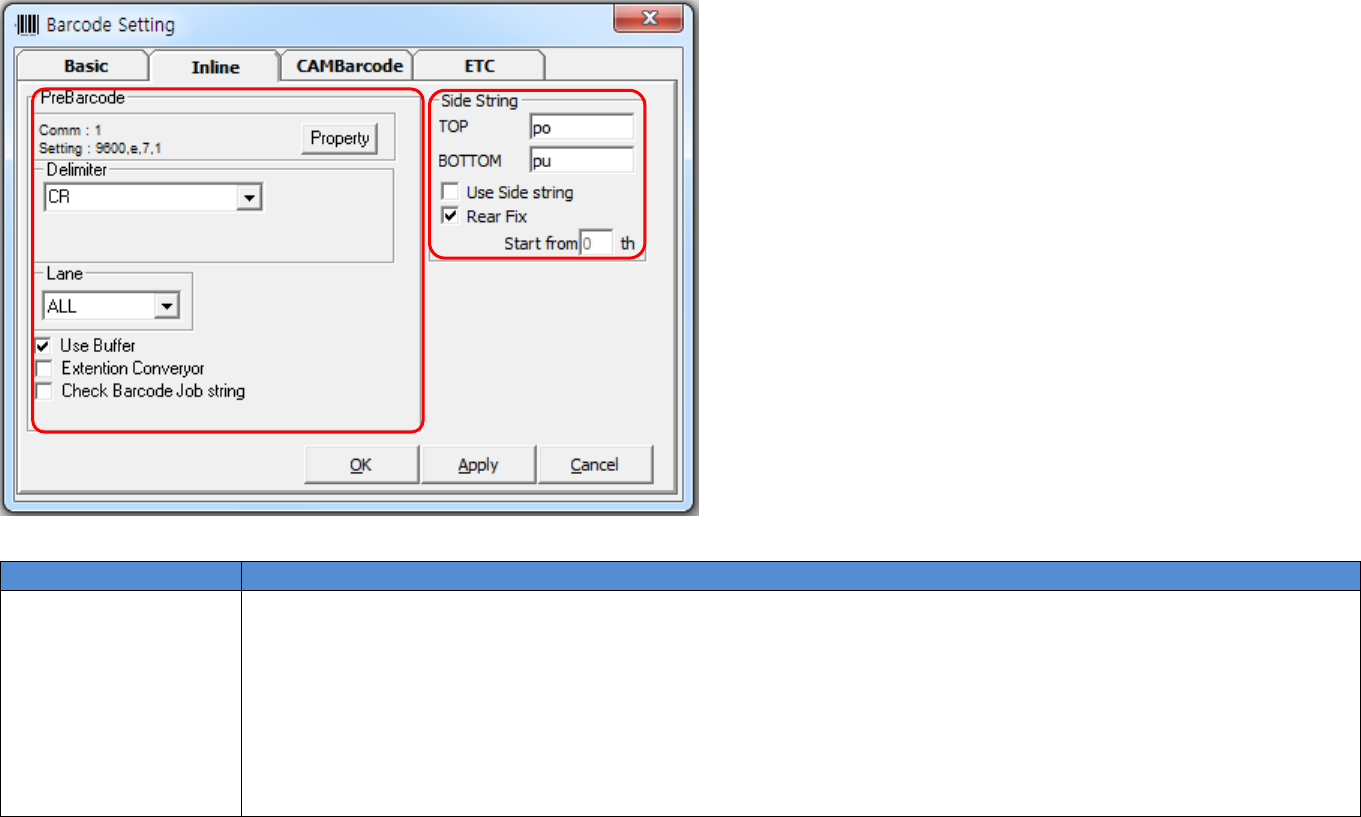
4.2. Inline Tab
This section describes the items displayed by clicking the Inline tab in the pop-up window displayed by clicking Barcode Setting button on the main screen.
The following table shows the items in the Inline tab.
Field Name
Field Description
1.Pre Barcode
Select the options related to the serial communication required to use the Inline Barcode Reader.
• Comm: Enter the port number.
• Setting: Enter the communication type.
• Property: Click this button; Comm Port Property window appears. For more information, refer to 4.2.1 in this
manual.
• Delimiter: Select the delimiter type.
1
2

- CR: Select this when Enter is placed at the end of the barcode.
- CR+LF: Select this when Enter and a new line state are placed at the end of the barcode.
- ENQ: Select this when an end character is placed at the end of the barcode.
- Custom: Select this when user-defined characters are placed at the end of the barcode.
• Lane: Select the number lanes which are being used currently. When 2 Lane is selected, it is available to check
whether the barcode is transmitted from only 1 Lane or the entire two lanes.
- All:
- 1Lane
- 2Lane
• Use Buffer: Select this to temporarily save the barcode of a PCB coming into the machine while inspection of
other PCB is in progress in the buffer memory and use it after the current inspection is completed.
• Extension Conveyor: Select this when your machine has an extension conveyor.
• Check Barcode Job string: Select this when you use the function that checks the barcode string for checking
whether the PCB is Top or Bottom.
2.Side String
Sets the settings related to a barcode which allows to recognizing whether the PCB in inspection is properly
positioned or its upside is down.
When this is selected, it is available to adjust the barcode used to recognize the PCB position.
• TOP: A string to be included in the barcode of which PCB is corresponding to the top of the PCB.
• BOTTOM: A string to be included in the barcode of which PCB is corresponding to the bottom of the PCB.
• Use Side string: When this is selected, the ‘Side string’ function can be used. ‘Side string’ function recognizes
whether the PCB in inspection is properly positioned or its upside is down using its barcode.
• Rear Fix: When this is selected, the string set in TOP and BOTTOM is added to the rear of barcode. When this
is not selected, it is added to the front of the barcode.