ThermoFlex-Manual.pdf - 第62页
Section 4 4-4 ThermoFlex Thermo Scientific mode mode mode mode Controller Loops The controller has the capability to display various loops whic h indicate operating conditions and parameters . The loops are selected and c…
Section 4
ThermoFlex 4-3
Thermo Scientific
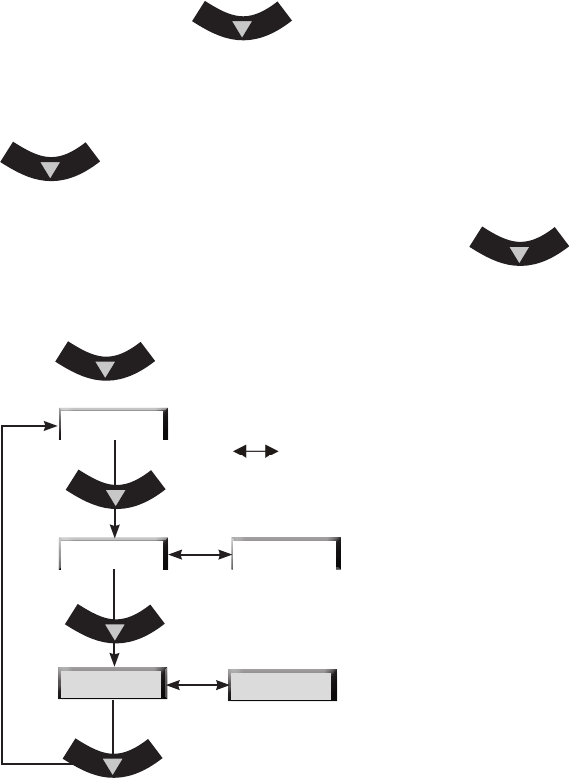
If desired, press the key to display the pump's discharge
pressure - P 1 . The display will alternate between P 1 and the pump's
discharge pressure value.
If the chiller is equipped with an optional ow transducer, pressing
again will display the ow rate - FLo. The display will alternate
between FLo and the ow rate value.
After displaying P1 or FLo for 60 seconds, if the
key is
not depressed the display will automatically revert to the process uid
temperature.
Press
again to display the process uid temperature.
P 1 - Pump discharge pressure
in PSI, bar or kPa*.
FLo - Flow rate in liters or gallons per
minute* (optional feature).
* See Setup Loop in this Section to
change displayed scales.
indicates the controller display is alternating
between the two displays.
Figure 4-2 Main Loop
FLo
xx.x C
xx
xx
P1
Section 4
4-4 ThermoFlex
Thermo Scientific
mode mode
mode
mode
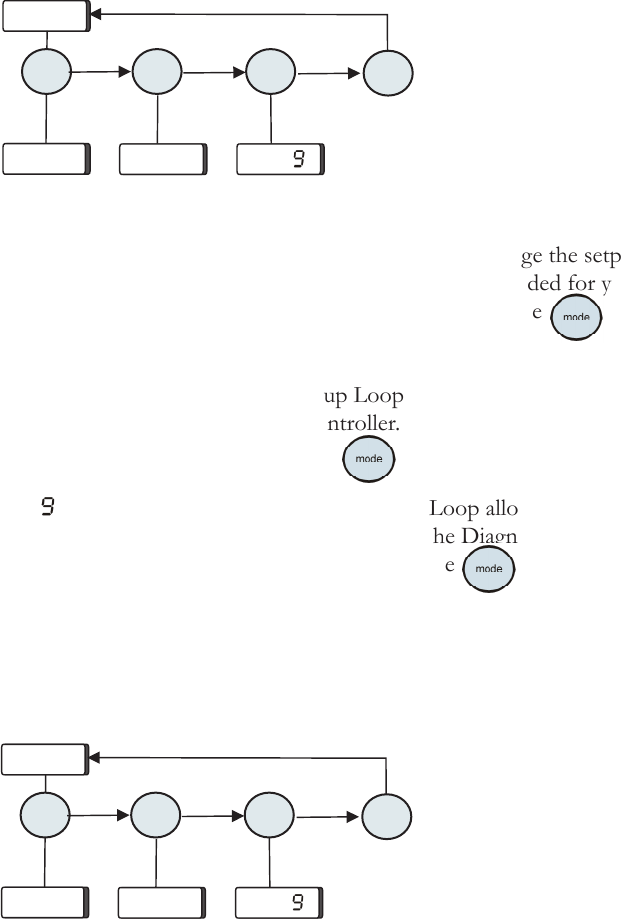
Controller Loops
The controller has the capability to display various loops which indicate
operating conditions and parameters. The loops are selected and changed
by pressing the appropriate keys.
When the controller is rst powered up it goes through a short
initialization (~15 seconds) and then displays the process uid temperature.
Use the key combination shown below to scroll through the loops.
SP is the Setpoint Loop and is used to display and change the setpoint.
The setpoint is the desired process uid temperature needed for your
application. The Setpoint Loop is accessed by pressing the
key, see
next page.
SEtuP is the Setup Loop. The Setup Loop allows you to display and/or
alter different parameters of the controller. The Setup Loop is accessed
from the SP display by pressing the
key.
diA is the Diagnostic Loop. The Diagnostic Loop allows you to display
the operating times for various components. The Diagnostic Loop is
accessed from the Setup display by pressing the
key, see Section 6
for more details.
Note The loops can be accessed and changed without the chiller running
as long as the circuit protector (ThermoFlex900-10000s) is in the on
( I ) position.
Figure 4-3 Controller Loops (Chiller running)
SP
SEtuP
diA
xx.x C
Figure 4-4 Controller Loops (Chiller not running)
mode mode
mode
mode
SP
SEtuP
diA
Section 4
ThermoFlex 4-5
Thermo Scientific
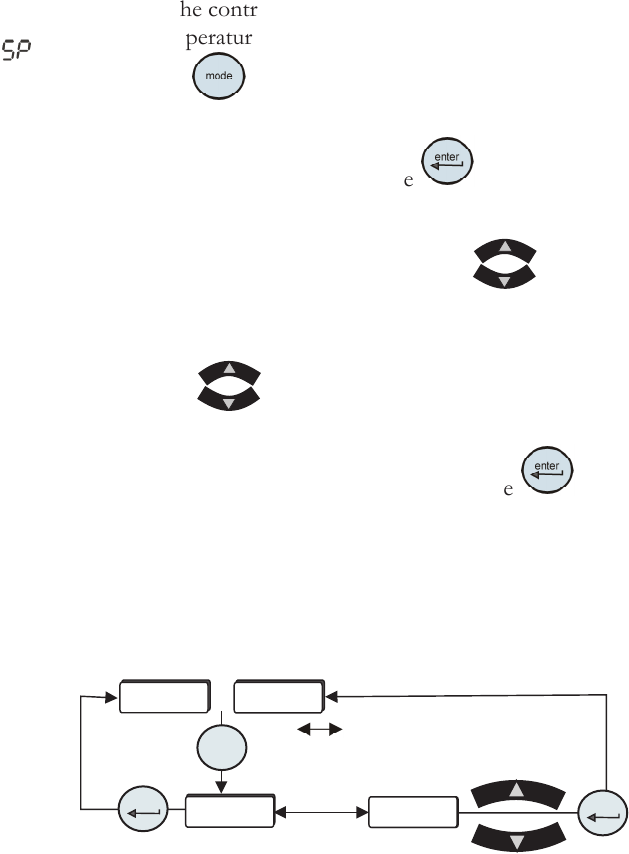
SP
xx.x C
xx.x C
mode
enter
enter
Setpoint Loop
( )
• Ensure the controller is either a blank screen or displaying the process
uid temperature.
• Press the
key and the controller display will alternate between SP
and the setpoint value.
• If no change is required press the
key to return the controller to
the previous display.
• If a setpoint change is required, use the
keys.
The setpoint range is +5°C to +40°C (41°F to 104°F).
Note If the are not used within one minute the controller will time
out and return to the previous display, any changes will not be saved.
• Once the desired value is displayed press the key to conrm the
change.
• The controller will return to the process uid temperature display or a
blank screen.
indicates the controller
display is alternating between the
two displays.
Figure 4-5 Setpoint Loop
or