ThermoFlex-Manual.pdf - 第86页
6-6 ThermoFlex Section 6 Thermo Scientific DI Filter (Optional) Establish a preventi ve maintenance sc hedule for the DI lter car tridge based on your specic application. The Puralite sensor located on the back of your …
Section 6
ThermoFlex 6-5
Thermo Scientific
Chiller Surface
Hoses
ThermoFlex7500 - 10000
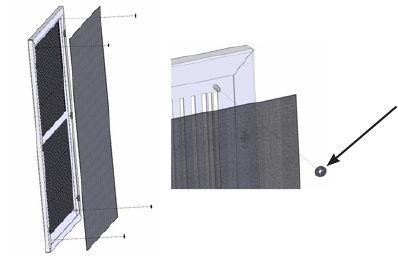
For air-cooled chillers, remove the one-piece grill assembly by pulling the
assembly away from the chiller.
Water-cooled chillers do not have a lter.
The lter goes over four studs and plastic "fast nuts" hold it in place.
Replace it or vacuum the old lter with a soft-bristle brush, or wash it.
Shake off as much of the excess water as possible before reinstalling.
Tuck the lter around the perimeter of the grill and over the four studs,
use the plastic "fast nuts" to hold it in place.
Replacement grills are available from Thermo Fisher.
Figure 6-4 Filter Removal/Replacement ThermoFlex7500 - 10000 Air-Cooled
"fast nut"
Clean the chiller's surface with a soft cloth and warm water only.
Inspect he chiller's external hoses and clamps on a regular basis.
ThermoFlex15000 - 24000
The air-cooled chillers do not have lters but the condenser ns can be
cleaned by removing the eight screws securing the lower-front panel.
6-6 ThermoFlex
Section 6
Thermo Scientific
DI Filter (Optional)
Establish a preventive maintenance schedule for the DI lter cartridge
based on your specic application.
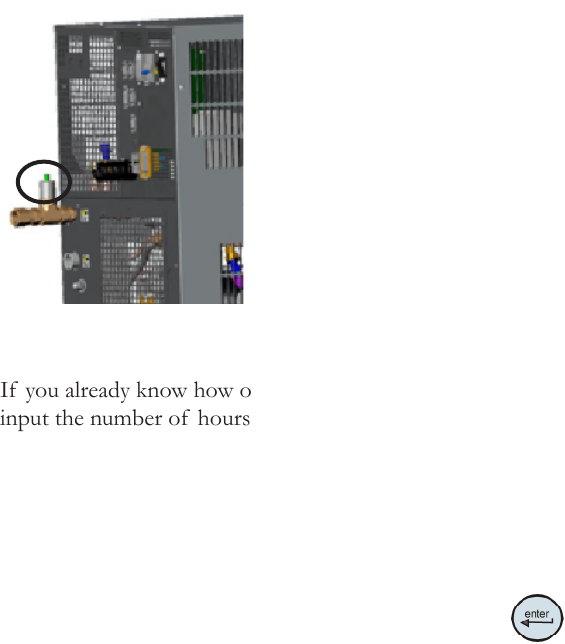
The Puralite sensor located on the back of your chiller will illuminate red
when it is time to change the DI lter cartridge (< 1 MΩ-cm).
Note When the chiller is initially powered, or
has been sitting idle for a period of time, the
sensor may illuminate. The length of time it
will be on varies with your application.
Although the Puralite sensor is the primary
indicator that the cartridge needs changing,
the chiller also has a separate integrated alarm
that works independently of the Puralite. The
alarm is based on chiller run hours that will
alert you when it is time to change your lter.
The di t alarm is enabled using the Setup
Loop, see Section 4.
If you already know how often your DI lter needs changing, you can
input the number of hours into the Setup Loop's di t display. When
the time is reached, the controller will ash di and the audible alarm, if
enabled, will sound.
When alerted, check the Puralite sensor to see if it is illuminated. If it is
not illuminated reset the di t timer and then check the Puralite periodically.
To clear this message and stop the audible alarm press
.
If the Puralite has turned red and the controller alarm has not gone off,
access the Diagnostic Loop di display, see next page. Check the system run
hours, this will give you an accurate DI replacement time. Adjust the di t
lter alarm to match the time needed between lter cartridge changes.
This will automatically restart the preventive maintenance timer for your
DI lter. If you change the lter before the preventive maintenance timer
alerts you, you can clear the timer by again accessing the Diagnostic Loop
di display, see next page.
Note It may be necessary to monitor the Puralite three or four times
to establish an accurate changing schedule. Also, lter operating time is
reduced every time new uid is added.
Figure 6-5 Puralite
Section 6
ThermoFlex 6-7
Thermo Scientific
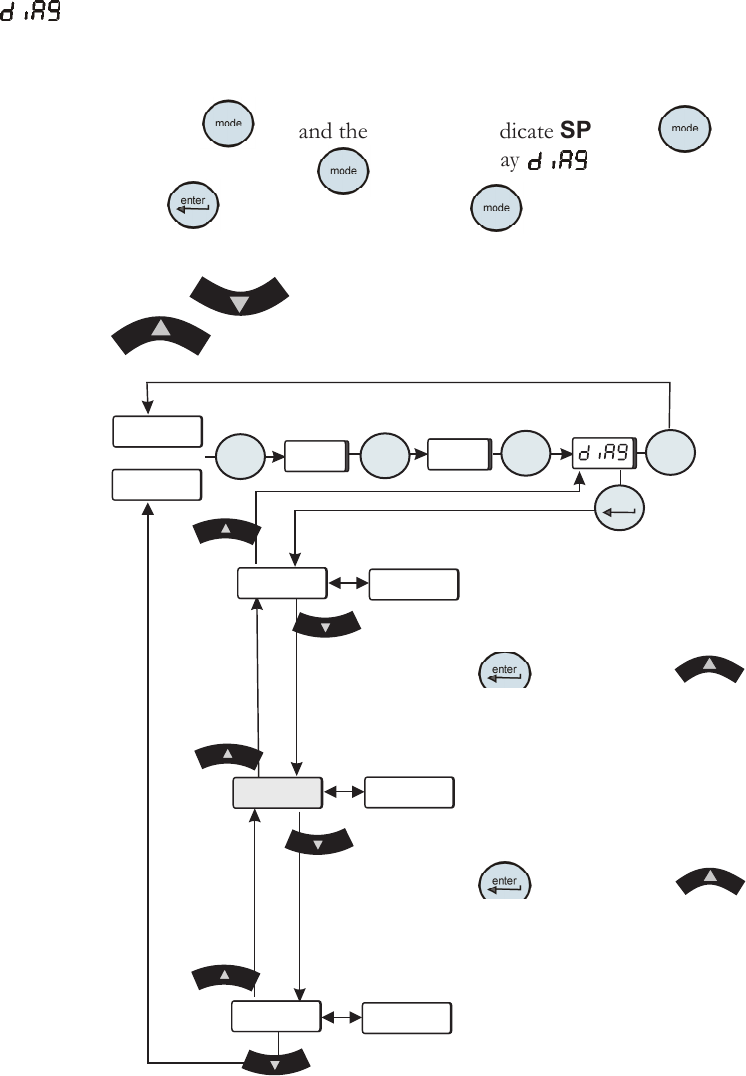
The Diagnostic Loop is used to view or reset the operating times of
various chiller components.
To enter the Diagnostic Loop ensure the controller display is either a blank
screen (chiller off) or displaying the process uid temperature.
Press the
key and the display will indicate SP, press again to
display SEtuP, press again to display .
Press
to enter the loop or press to return to the process uid
temperature or blank display.
Use the key to sequence down through the loop. Use the
key to sequence up through the loop.
Figure 6-6 Diagnostic Loop
Diagnostic Loop
( )
FLtrS
xxxx
xxxx
xxxx
di
unit
SP
SEtuP
enter
mode
mode
mode
mode
xx.x C
or
FLtrS - Indicates the total hours
the air and uid lters have been in
use. If desired, press and hold
and then press to
reset the value to 0.
di - Indicates the total hours the
optional di lter cartridge has been
in use. If desired, press and hold
and then press to
reset the value to 0.
unit - Indicates the chiller
operating hours. This value can not
be reset.
Testing the Safety
Features
For chillers equipped with auto rell switch we recommend slowly draining
the reservoir and ensure the auto rell activates.