YSM40 Mainte_E.pdf - 第41页
1-2 1 Maintenance 1.2 Impor tance of periodic inspections and cleaning P eriodicinspectionsandcleaningareextremelyimportantmaintenancetasks.F ailuretoperforminspections andcleaningwillpreventthemac hine…
1-1
1
Maintenance
1. Maintaining machine performance
The most important condition essential for maintaining the performance of the machine you purchased is
using it under good environmental conditions. Performing daily maintenance and periodic inspections is also
absolutely essential.
1.1 Essential conditions and working environment
n
Air
Item Description
Air pressure
Supply air pressure: 0.45MPa
Setting air pressure: 0.40MPa (0.39MPa to 0.41MPa)
Head unit air pressure: 0.040MPa (0.039MPa to 0.041MPa)
Air consumption
HS head (4-beam type): 160Nl/min (average), 240Nl/min (max.)
HS head (2-beam type): 110Nl/min (average), 180Nl/min (max.)
MU head (2-beam and 4-beam types): 30Nl/min (average), 140Nl/min (max.)
FL head (2-beam and 4-beam types): 30Nl/min (average), 140Nl/min (max.)
Use conditions
Air hose with inner diameter of 8mm or more should be used.
Clean air passed through air dryer and air filter should be used.
n
Power
Item Description
Power supply 200/208/220/240/380/400/416VAC (±10%), 3-phase AC line
Frequency 50 Hz or 60 Hz
Power supply capacity 13.9KVA
Average power consumption 3.2KW
Power supply connection Power cable conductor cross-section area: 5.5 mm
2
minimum
n
Environment
Item Description
Noise Complies with EN61000-6-2 standard.
Humidity 20 to 80% (no condensation), optimal range: 50 to 60%
Temperature Functions guaranteed within 15 to 35°C. Machine precision guaranteed within 20 to 28°C.
Overvoltage category category III
Pollution degree degree 2
Altitude 1000m or less above sea level
Installation
Flat level location sturdy enough so no vibration occurs during operation.
Wooden floors in particular are unsuitable.
Required floor flatness
When using feeder exchange carriages on the front and rear sides of the machine, the
flatness of the floor must be within 10mm, including the area directly under the machine.
Floor load-bearing strength 1000kg/m
2
or more
n
NOTE
Keep the humidity at 40% or higher to prevent electrostatic charges. When using an industrial humidifier, use water
that is equal to pure water.

1-2
1
Maintenance
1.2 Importance of periodic inspections and cleaning
Periodicinspectionsandcleaningareextremelyimportantmaintenancetasks.Failuretoperforminspections
andcleaningwillpreventthemachinefromdeliveringfullperformanceandmayleadtocomponentmounting
problemsorequipmentbreakdowns.
Examples:
•Dirtynozzlesmightcausemistakesincomponentrecognitionandcausemountingerrors.
•Dirtyairpathsmaycausenumerouspickupandmountingerrors.
•Inadequatefeederandfeederplateinspectionsmaycausepickuperrors.
•Dirtyopticalsystem(camera,lighting,etc.)maycauserecognitionerrors.
•Poorgreasingofaxesmaycauseabnormalnoises.
•PoorinspectionssuchasofvalvesmaycauseerrorsinPCBclampingandconveying.
Astheseexamplesshow,failuretomakeinspectionsmayleadtoequipmentproblems.Westronglyrecommend
youperformperiodicinspectionsandcleaningtoensurethemachineisusedunderoptimalconditions.
1-3
1
Maintenance
2. Preparing for maintenance tasks
Tasks described in this section focus mainly on replacing parts (consumable parts) that might cause a gradual
loss of machine functions during use. This section also describes how the user can easily replace parts when
a breakdown occurs.
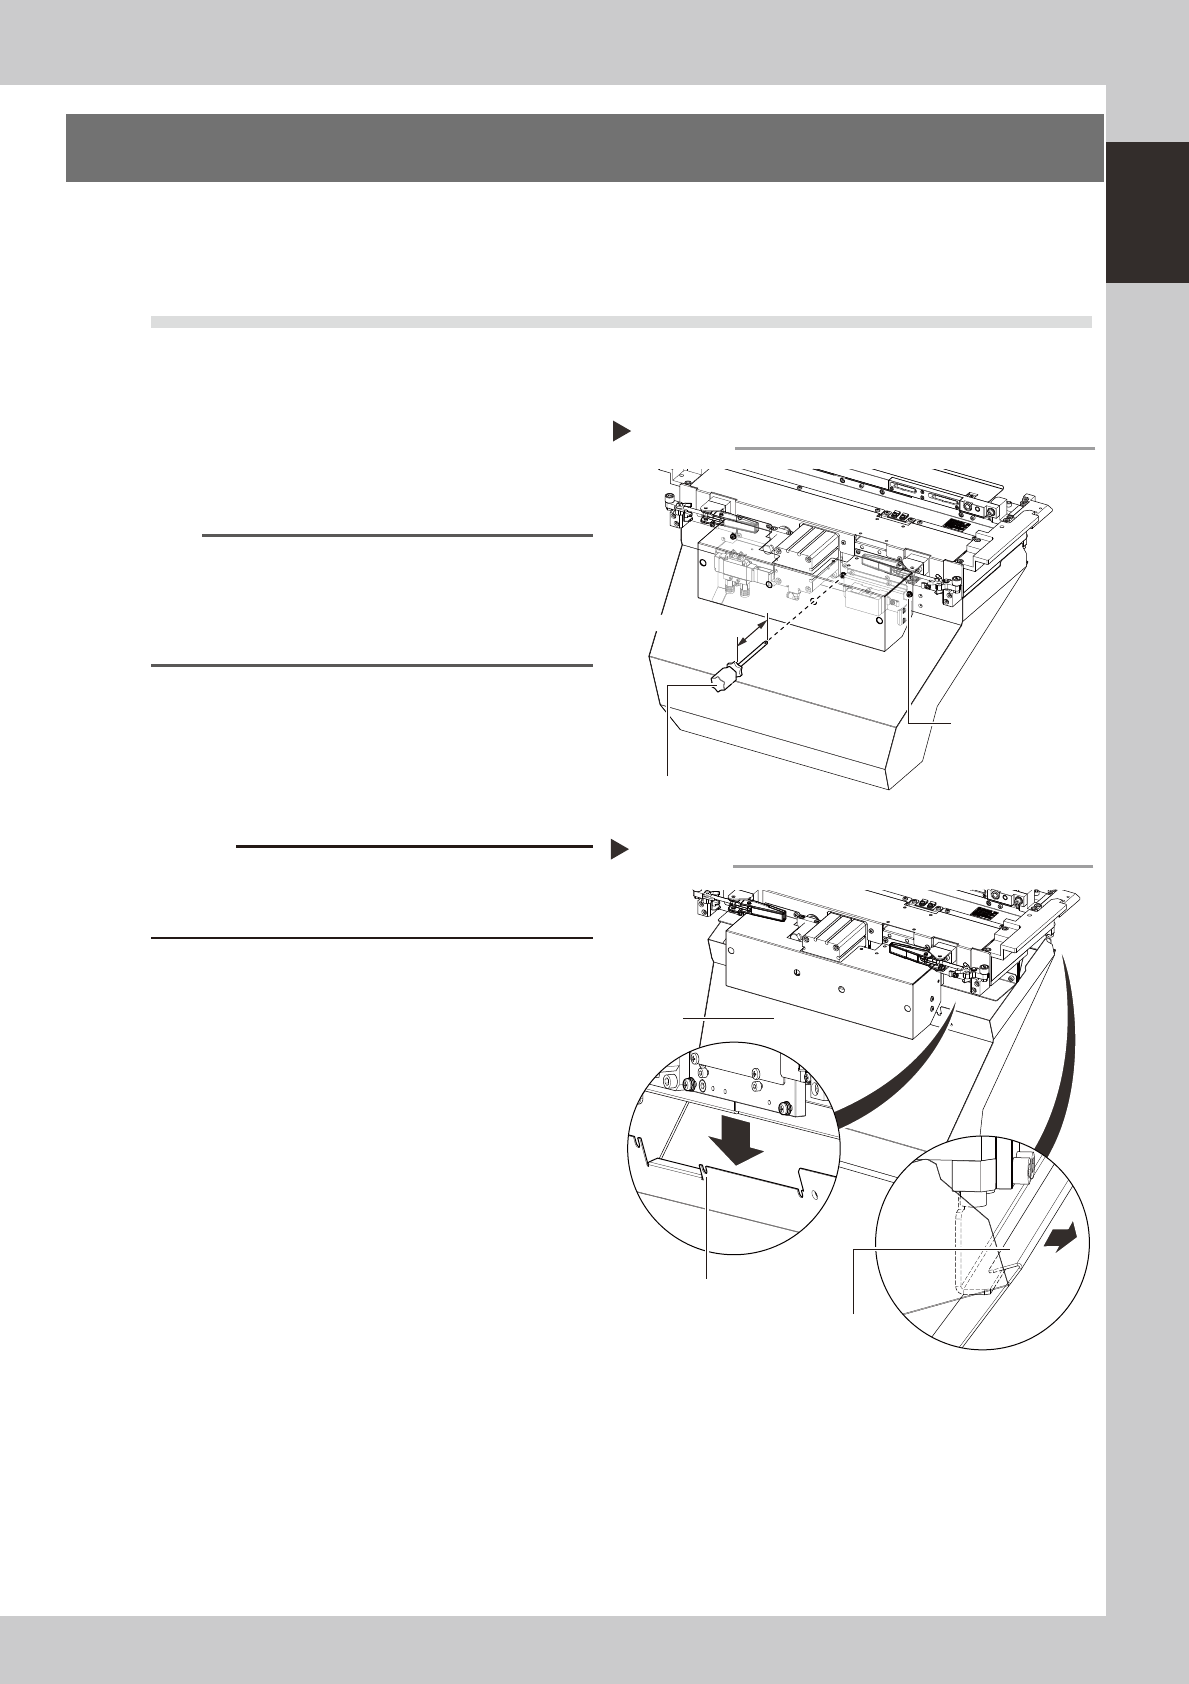
2.1 Removing the tape cutter duct
Thetapecutterductcanberemovedbothformaintenanceproceduresandfacilitatingaccessintothemachine
interior.Theductremovalprocedureisgivenbelow.
1
Loosen the duct securing screws.
Use a Phillips screwdriver to loosen the 4
duct securing screws as shown in the figure
at right.
n
NOTE
Do not completely remove the duct securing screws.
The duct can be removed simply by partially loosening
the screws.
Use a Phillips screwdriver with a shaft length longer than
100mm.
53100-N5-00
2
Remove the duct.
As shown in the figure at right, slide the duct
downward first, then detach the rear hooks
to remove the duct.
c
below.
53101-N5-00
3
Reattach the duct.
After the maintenance work, etc. has been
completed, reattach the duct by reversing
Remove the duct
Step 2
Duct
Duct securing screw
position (notched)
Hook
Loosening the duct securing screws
Step 1
Duct securing screws
(4 screws)
Phillips screwdriver
Longer than 100mm