YSM40 Mainte_E.pdf - 第77页
3-9 3 Periodic maintenance items 1.2.2 Cleaning the nozzle air path (monthly) e 1 Remo ve the nozzle from the head. Always first press the emergency stop button and then remove the nozzle from the he ad. The machine must…
3-8
3
Periodic maintenance items
1.2 Nozzle cleaning
ThefollowingdescribesthecleaningprocedureforType50XGroupnozzles.Usethesameprocedurewhen
cleaningType51XGroupandType60XGroupnozzles.
1.2.1 Cleaning the nozzle buffing area
e
1
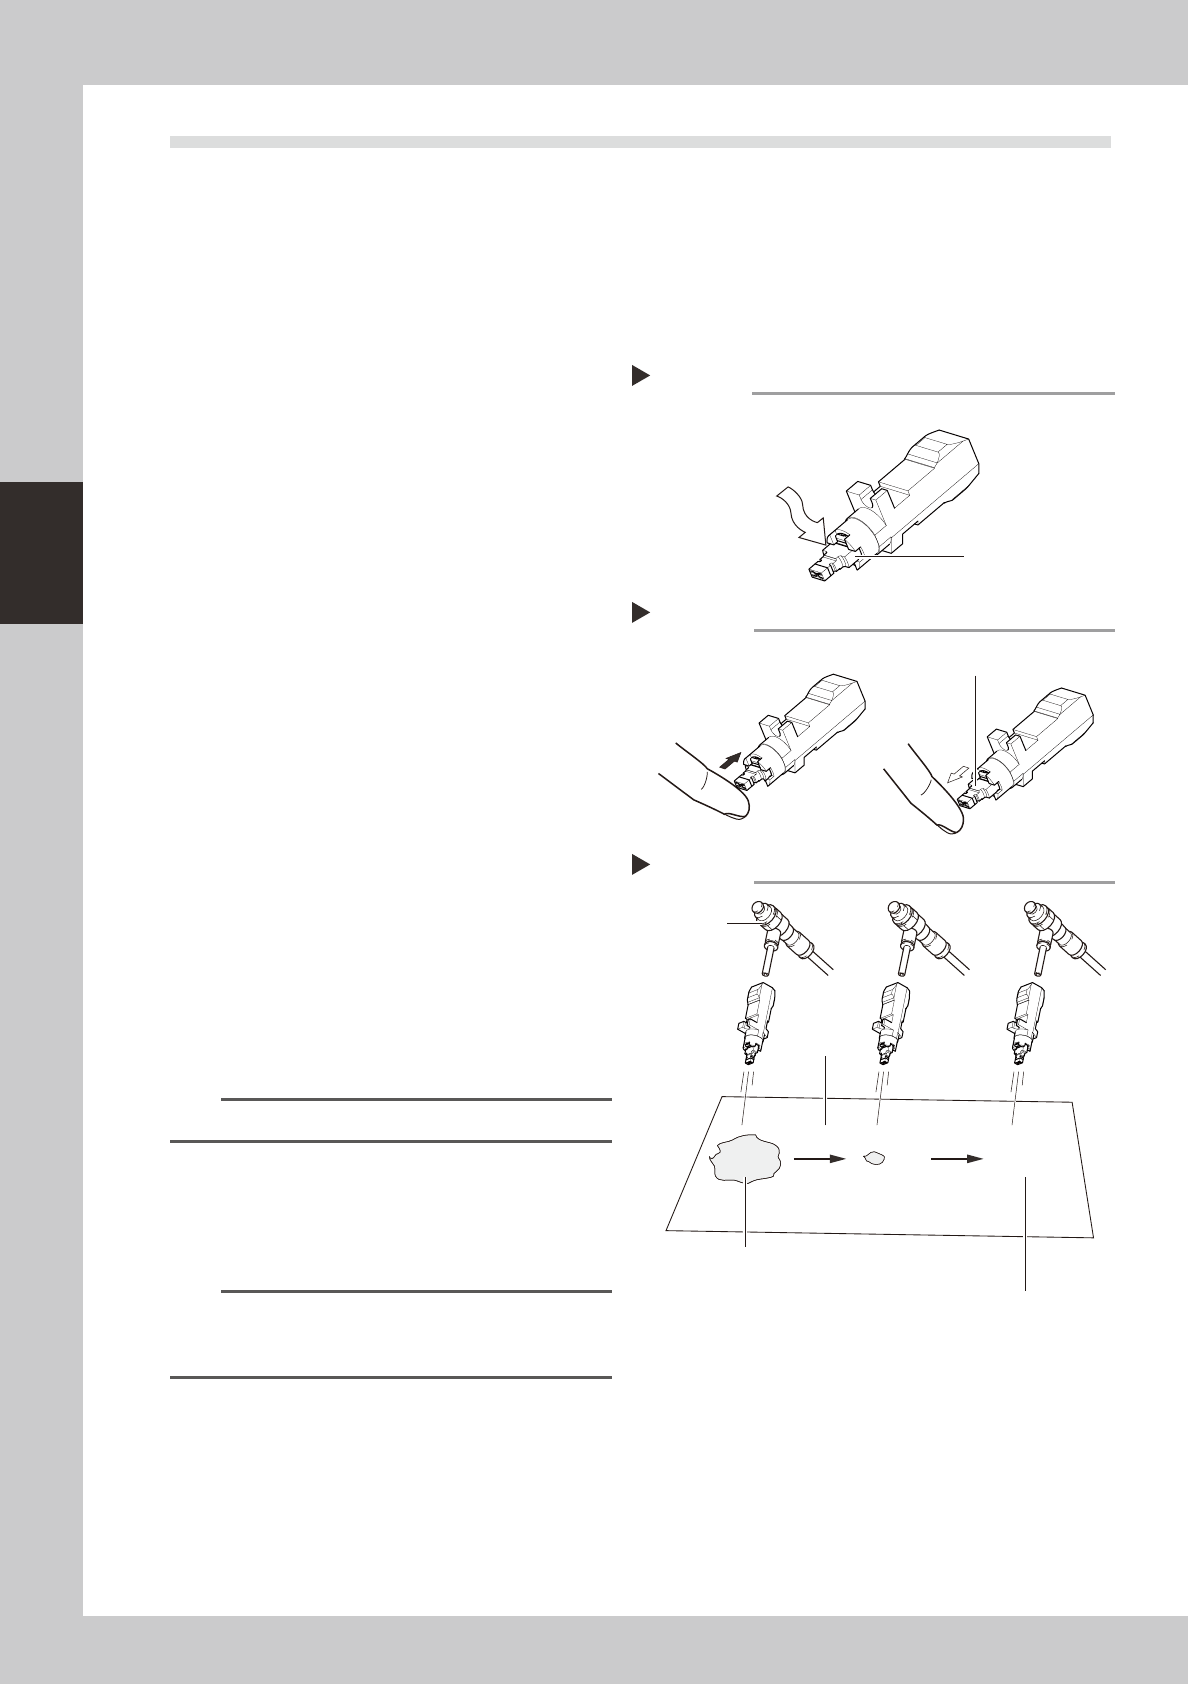
Remove the nozzle from the head.
Always first press the emergency stop button
and then remove the nozzle from the head.
The machine must be in emergency stop to
ensure safety during work.
2
Clean the slide section.
Apply IPA (isoprophyl alcohol) or ethanol to
the slide section. Push the nozzle tip several
times to repeat the buffing action (spring
action) to clean the slide section. After
cleaning, blow sufficient air to remove IPA or
ethanol.
3
Lubricate the slide section.
Using a precision screwdriver or similar tool
with a pointed tip, apply a small amount of
turbine oil (just enough so that it sinks in) to
the slide section.
53301-N5-00
4
Check the buffing action (spring
action).
Push the nozzle tip several times to repeat
the buffing action and spread turbine oil.
Use a lint-free cleaning cloth to wipe away
excess oil from around the nozzle.
53302-N5-00
5
Remove excess oil remaining in the
nozzle.
Air blow with the aIr blow tool for
approximately 5 seconds from the nozzle tip
side, and approximately 5 seconds from the
nozzle mounting side. Repeat this process a
few times to remove excess turbine oil
remaining in the nozzle.
n
NOTE
A thin coat of oil is enough to lubricate the slide section.
6
Check that the oil was removed.
Blow air through the nozzle again while
placing commercially-available oil blotting
paper over the opposite end of the nozzle,
and check for residual oil in the nozzle.
n
NOTE
Performing step 5 is usually sufficient to remove oil
remaining in the nozzle. However, if oil still remains then
blow air through the nozzle once again.
53303-N5-00
7
Return the nozzle to its original
position.
After verifying again that the nozzle is free of
oil, return the nozzle to its original position
(head or nozzle station).
Lubricating the slide section
Step 3
Buffing area
Use a precision screwdriver
to apply a small amount of
turbine oil.
Checking the spring action
Step 4
Spring action at nozzle tip
Checking for residual oil
Step 6
Oil will appear after blowing air (first time) for
about 5 seconds from the nozzle tip.
Repeat the air blow for about 5 seconds
each from the nozzle tip and from the
attachment side.
This task is finished when oil no
longer appears.
Oil blotting
paper
AIr blow tool
3-9
3
Periodic maintenance items
1.2.2 Cleaning the nozzle air path (monthly)
e
1
Remove the nozzle from the head.
Always first press the emergency stop button
and then remove the nozzle from the head.
The machine must be in emergency stop to
ensure safety during work.
c
return the nozzle to the head from which it was
removed.
2
Blow air through the nozzle.
1. Detach the nozzle tip and air blow the
nozzle from the nozzle mounting side.
2. Attach the nozzle tip and air blow the
nozzle from the nozzle mounting side.
53308-N5-00
n
NOTE
The nozzle tip of Type 60X Group nozzles cannot be
removed.
c
the inner spring.
n
NOTE
If there are dust deposits in the nozzle, perform steps 3
and 4.
3
Clean the nozzle hole.
1. Pass a nozzle cleaning wire through the
nozzle hole.
2. Clean the nozzle by moving it as shown
at right.
53309-N5-00
4
Blow air onto the nozzle tip again.
Remove the nozzle cleaning wire, then
air-blow the nozzle interior with the air blow
tool as described in Step 2.
Air blow
Step 2
Air blow unit (optional)
Rotate 90 degrees while
pressing the tip.
Pull the tip outward
to detach it.
Air tube (orange)
connected to
air supply port
Blow air from the nozzle attachment side.
■ Attaching/detaching the nozzle tip
Detach the nozzle tip, and
air-blow from that side.
Cleaning a nozzle
Step 3
Nozzle
Nozzle cleaning wire
3-10
3
Periodic maintenance items
1.2.3 Cleaning the nozzle tip
Tocleanthetipofanozzle,usethe“nozzletipcleaningtape(hereaftercalled“cleaningtape”)thatcomes
suppliedwiththemachine.
n
NOTE
The cleaning tape helps remove dirt or grime from a nozzle, which was not removed with an ultrasonic cleaner (option).
n
How to use
Usetheadhesivesurfaceofthecleaningtapetoremovedirtorgrimeonthetipofeachnozzle.
n
HS head
TheoptionalnozzlecleanerforHShead(hereaftercalled“nozzlecleaner”)allowscleaningthetipsof8nozzlesata
timewithoutdetachingthenozzlesfromthemachine.
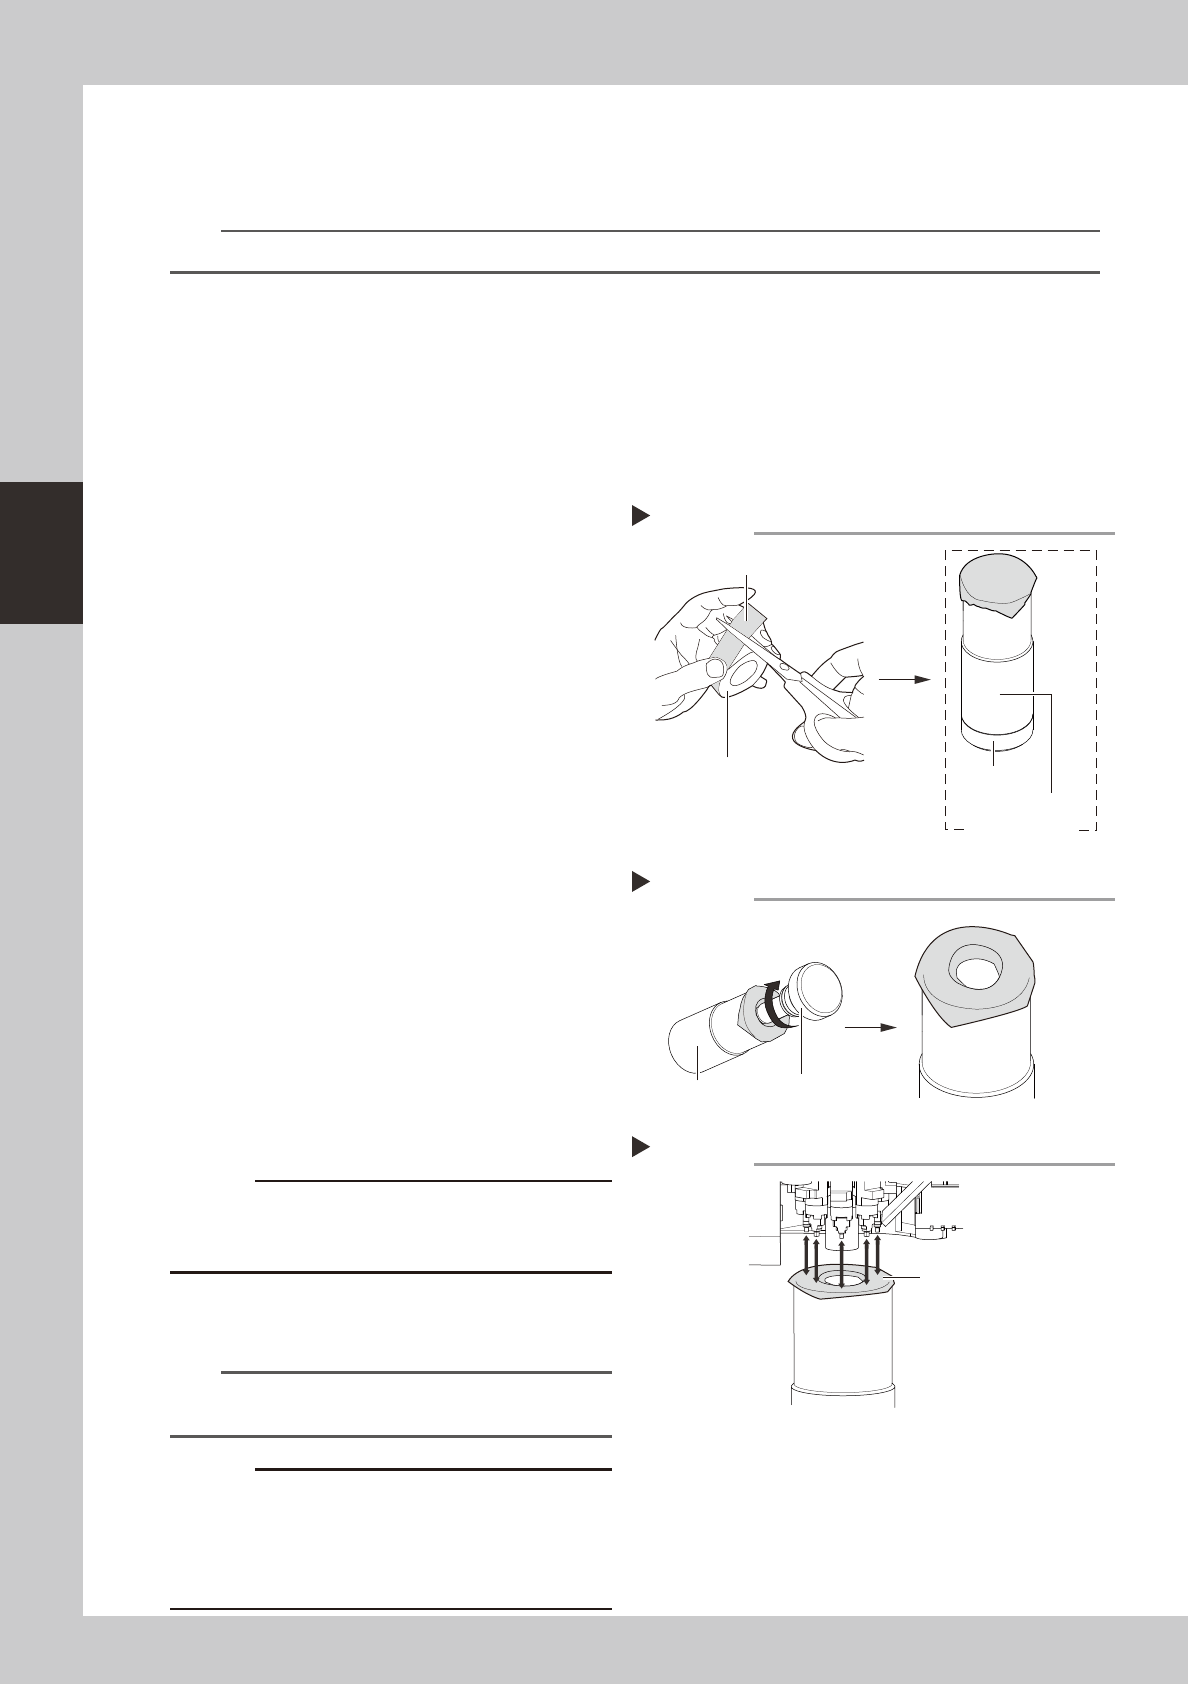
1
Attach a cleaning tape to the
nozzle cleaner.
1. Cut the cleaning tape into a square.
2. Attach the cleaning tape to the tip of
the nozzle cleaner.
533D1-N5-00
2
Make a hole in the cleaning tape.
1. Pull out the cleaner 2 and make a hole in
the center of the cleaning tape.
2. After making a hole, widen the hole by
pressing the tape against the inner wall
of cleaner 1.
533D2-N5-00
e
3
Remove the feeder exchange carriage.
Press the emergency stop button and then
remove the feeder exchange carriage from
the machine.
4
Move the head to a position where
the nozzles can be cleaned easily.
5
Clean the nozzle tips.
Clean the nozzle tips by pressing the nozzle
cleaner up against the nozzle tips a few
times from below the HS head rotary.
533D3-N5-00
c
cleaning tape to adhere to the nozzle tips.
6
Peel the cleaning tape off the
nozzle tips.
n
NOTE
We recommend replacing the cleaning tape for every
4 tables.
c
cleaner if the cleaning tape is left attached to the
nozzle cleaner. When storing the nozzle cleaner after
tape off the nozzle cleaner.
Attaching a cleaning tape
Cleaning tape
Step 1
Cut into a square.
Nozzle cleaner
Cleaner 2
Cleaner 1
Making a hole in the cleaning tape
Step 2
Cleaner 2
Cleaner 1
Cleaning the nozzle tips
Step 5
Tape surface