YSM40 Mainte_E.pdf - 第99页
3-31 3 Periodic maintenance items 3. Three-month inspection n When carr ying out inspection without removing the head e T akethefollowingprecautionstocarryoutinspection. 1. T akeoffthewristwatch,magneticID…
3-30
3
Periodic maintenance items
2.4 Conveyor (and other areas)
Thissectionexplainsthecleaningproceduresfortheboardconveyorarea.Thisareaincludestheboard
detectionsensorsattransitpositions,theboarddetectionsensorsattheINandOUTports,andthefeederlift
sensor.
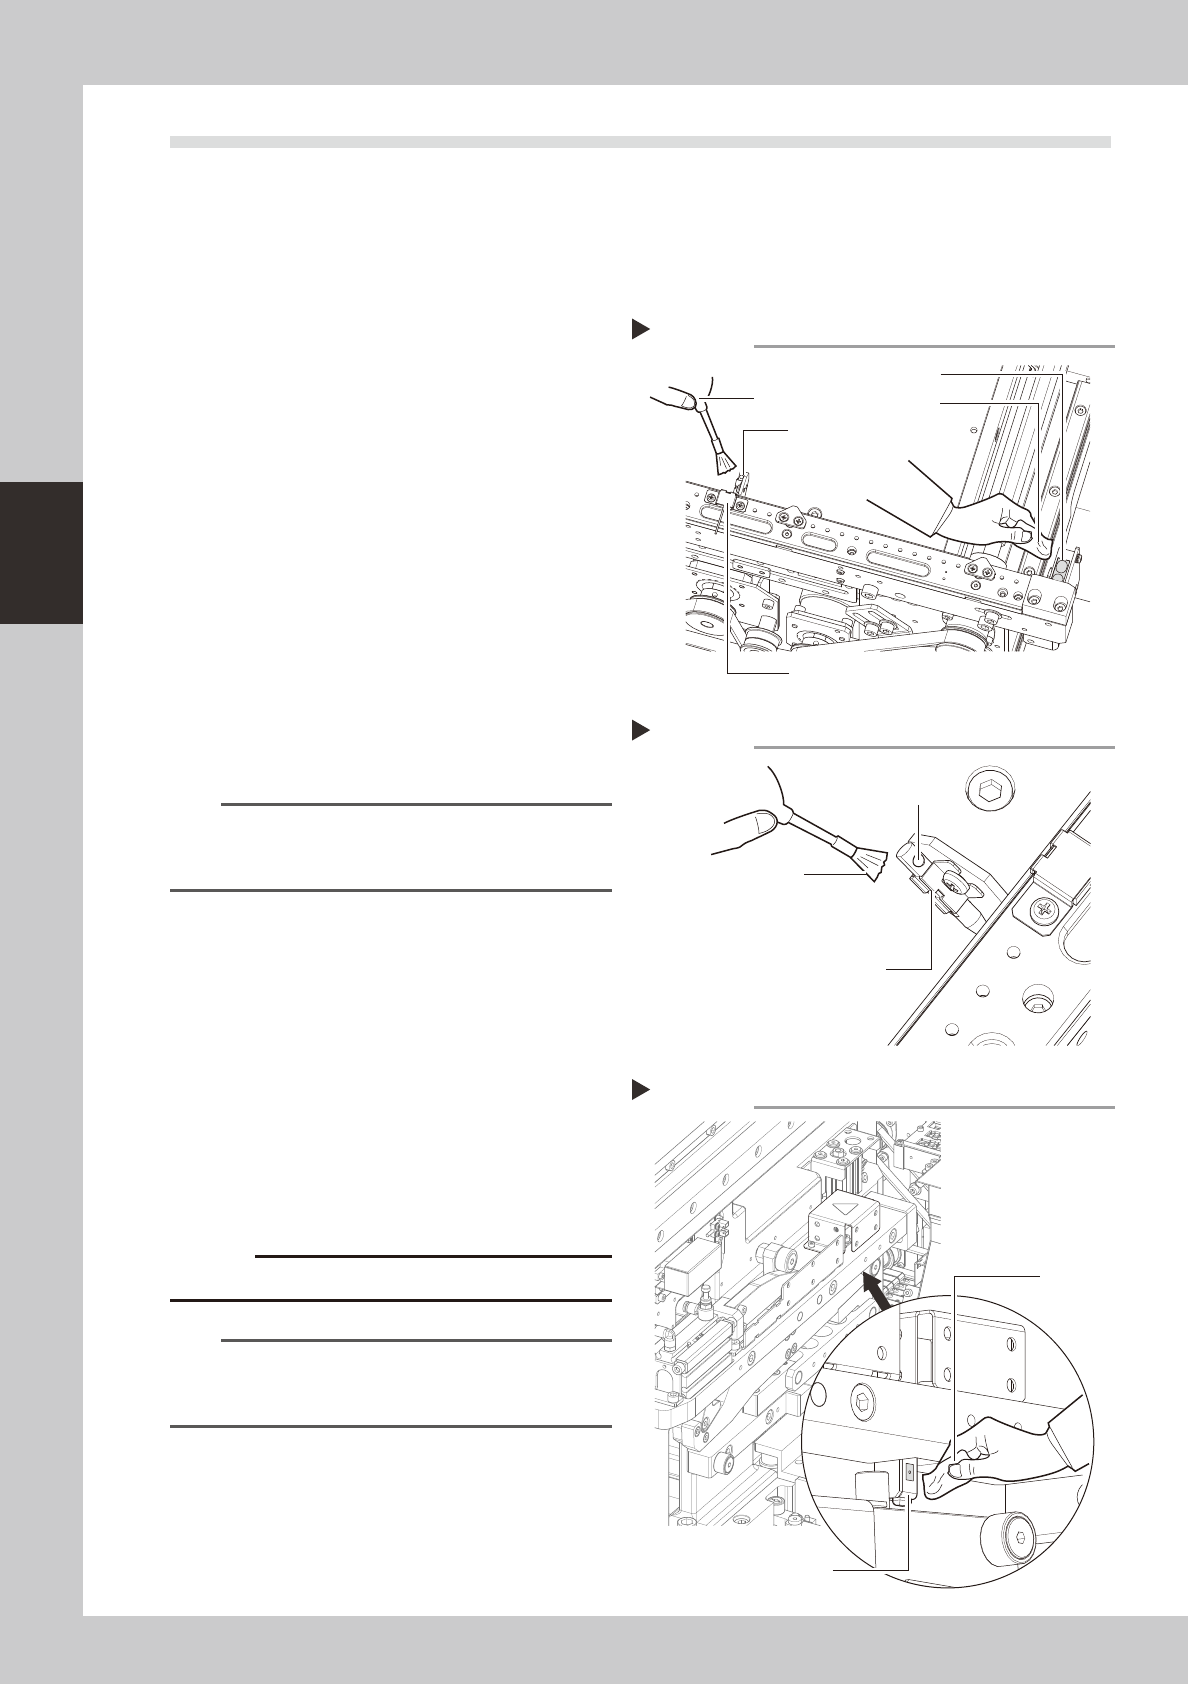
2.4.1 Board sensors
1
Clean the board detection sensors
at the IN and OUT ports.
1. Use an optical brush to clean the dust
from the top faces of the sensors.
2. Use either a cotton swab or a cloth
dampened with a small amount of IPA to
clean the top faces of the sensors.
53380-N5-00
2
Clean the transit position sensor
beam receiver.
Use an optical brush to clean the transit
position sensor beam receiver.
3
Clean the transit position sensor
beam emitter.
Use an optical brush to clean the end hole
of the transit position sensor beam emitter.
53381-N5-00
n
NOTE
If foreign matter other than dust is lodged inside the
laser beam emitter's end hole, use the vacuum
assembly (optional) to suck it out.
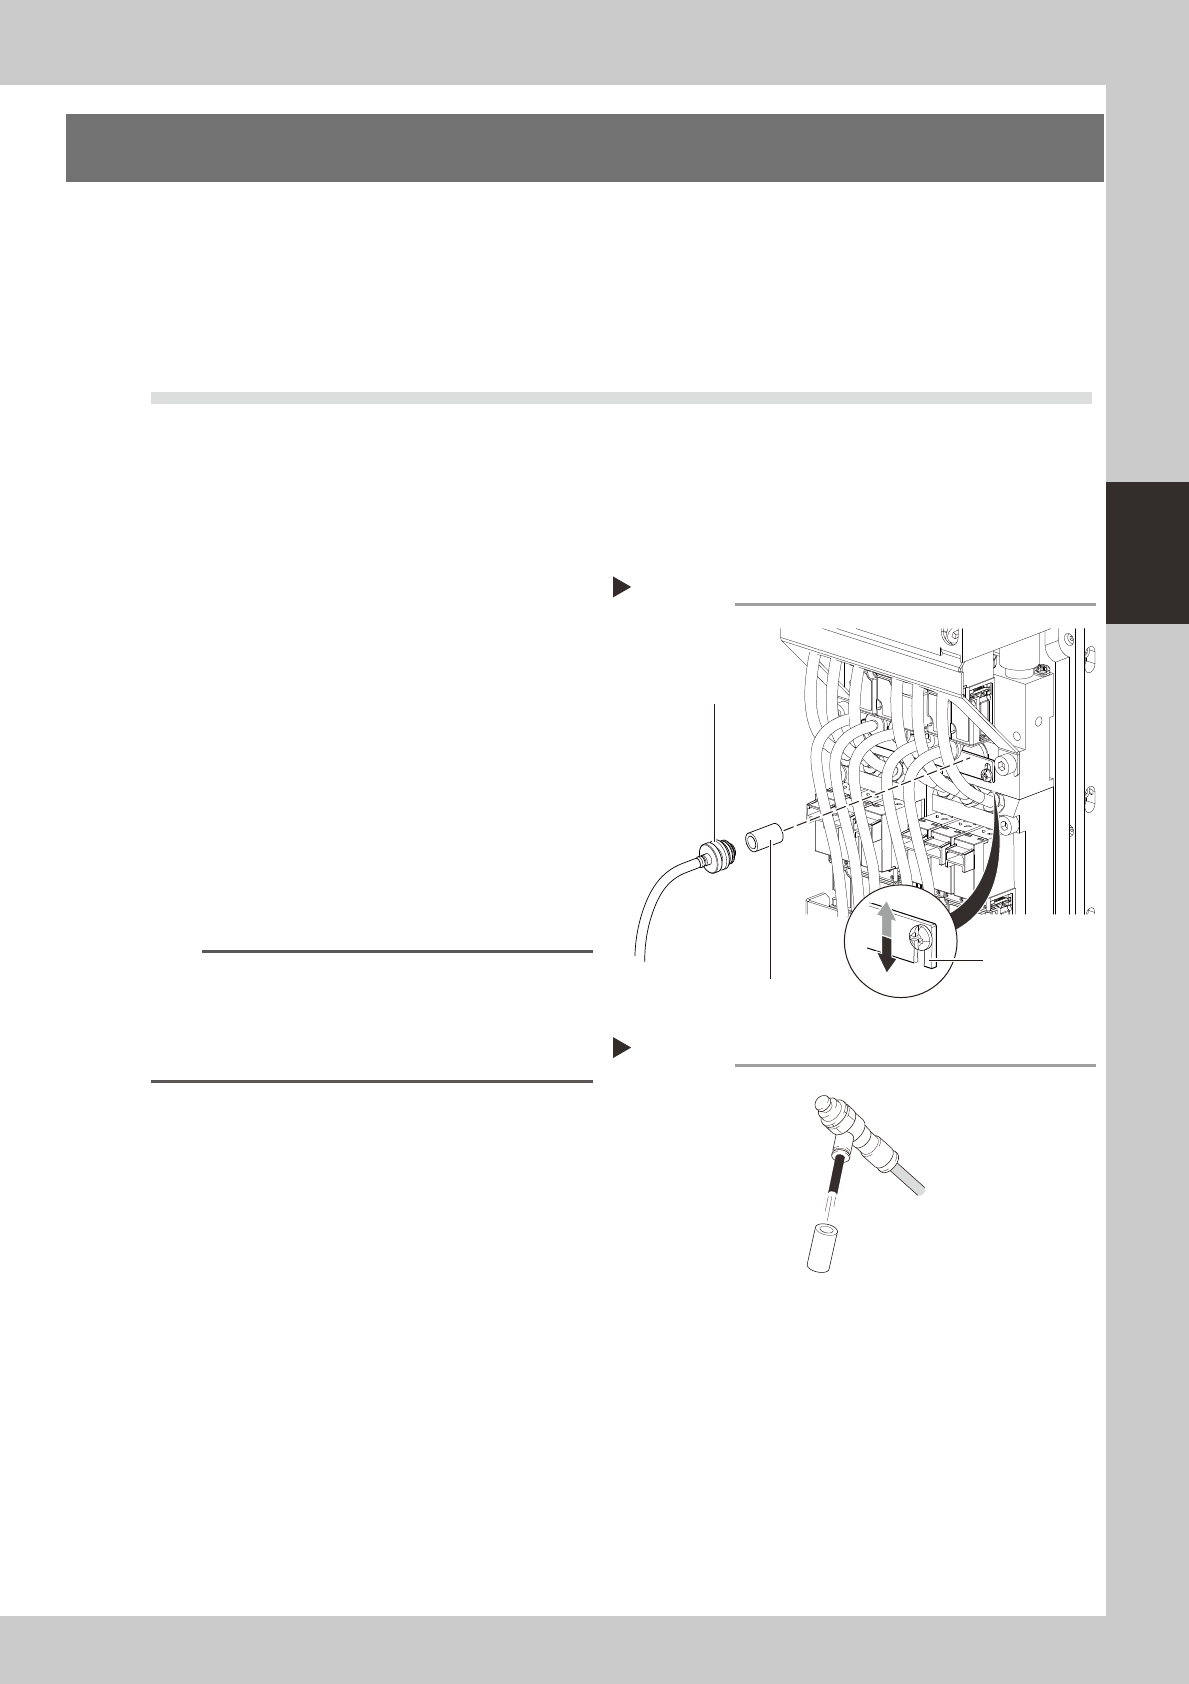
2.4.2 Feeder lift sensor
1
Detach the batch change carriage.
2
Wipe the dust from the sensor.
Use an optical brush to remove any dust
from the sensor area.
53382-N5-00
3
Clean the sensor.
Clean the sensor's surface using a cotton
swab or a cloth dampened with a small
amount of IPA.
c
Avoid using excessive force when cleaning the sensors.
n
NOTE
The cATS is also equipped with a feeder float sensor.
Clean that sensor with the same procedure as used for
the feeder exchange cart.
Cleaning the board sensors
Step 1
IN (OUT) port sensor
Optical brush
Cloth
Transit position sensor (laser beam receiver)
Transit position sensor
(laser beam emitter)
Cleaning the board sensor (laser beam emitter)
Step 3
Optical brush
End hole
Transit position sensor
(laser beam emitter)
Cleaning the feeder lift sensor
Step 2, 3
Feeder lift sensor
Cloth
3-31
3
Periodic maintenance items
3. Three-month inspection
n
When carrying out inspection without removing the head
e
Takethefollowingprecautionstocarryoutinspection.
1.Takeoffthewristwatch,magneticIDcards,andanyitemssusceptibletomagneticfields.
2.Presstheemergencystopbuttontostopthemachine.
3.Placeasquareclothunderthelocationwhereinspectionistobecarriedout.
3.1 MU head
3.1.1 Cleaning and replacing the air filter
Asageneralguideline,thefiltershouldbeinspectedonceevery3months,althoughthismayvarysomewhat
dependingontheairsupplyconditionsandtheoperatingtime.Iflightlysoiled,thefiltercanbecleanbyusing
theairblowtool.Thefiltershouldbereplacedwhenitcannolongerbeadequatelycleanedbyair-blowing.
1
Loosen the filter securing plate.
Use a Phillips screwdriver to loosen the filter
securing plate.
2
Remove the filter cap.
The filter cap and filter can be removed
after the filter securing plate has been
loosened and lowered.
53331-N5-00
3
Clean the filter.
If the filter is only lightly soiled, it can be
cleaned by the air blow tool, and then
reused.
53332-N5-00
n
NOTE
If there are heavy dust deposits in the filter or the filter
has discolored, replace it with a new filter (KLF-M7156-
00X). As a general guide, filters should be replaced
once every 3 months, although this depends on the
actual operating time.
4
Reattach the filter cap.
1. Reattach the filter cap to the filter, and
return the filter to its original position.
2. Place the filter securing plate over the
filter and use a Phillips screwdriver to
secure it.
5
Clean the bottom filter in the same
manner.
Because there are filters at the top and
bottom, clean the bottom filter in the same
manner as described above.
Removing the filter cap
Step 1, 2
Filter cap
Filter
Filter securing
plate
Lock
Release
Cleaning the filter
Step 3
Filter
Air blow tool
3-32
3
Periodic maintenance items
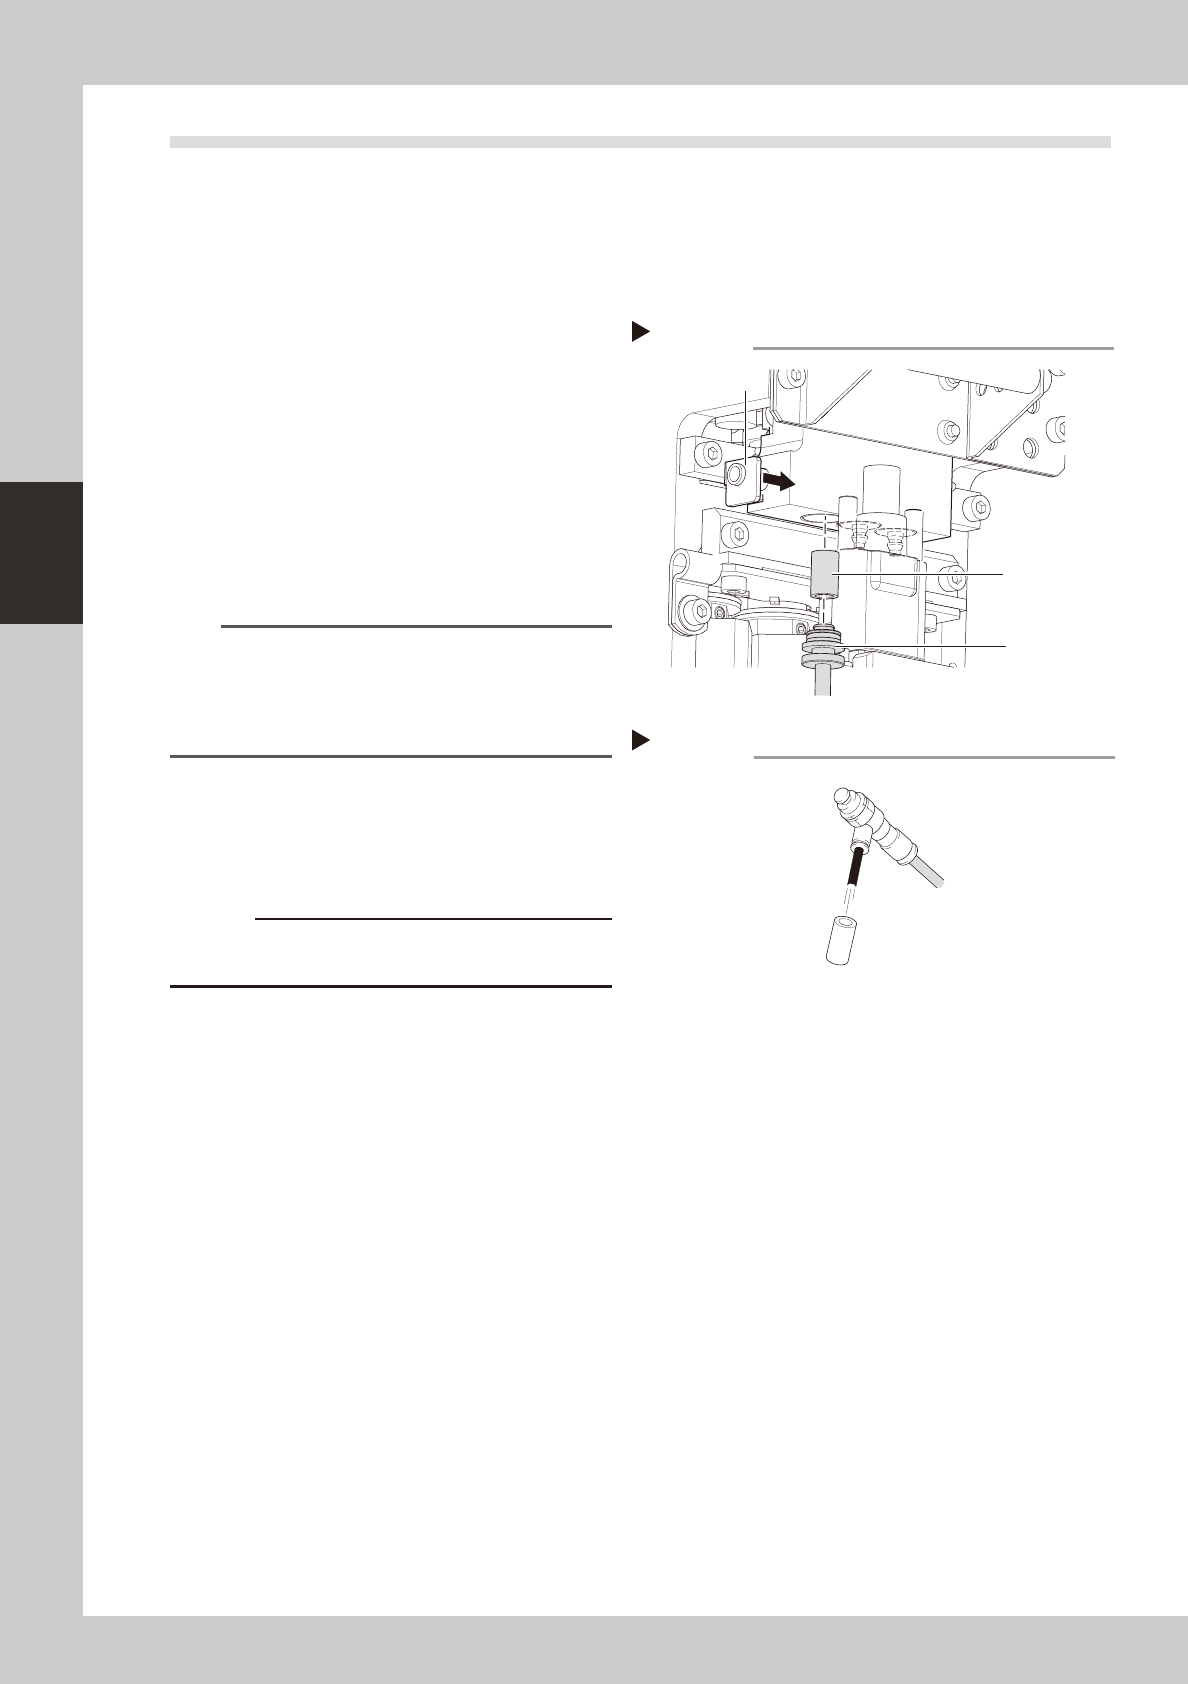
3.2 HS head
3.2.1 Cleaning and replacing the air filter
Asageneralguideline,thefiltershouldbeinspectedonceevery3months,althoughthismayvarysomewhat
dependingontheairsupplyconditionsandtheoperatingtime.Iflightlysoiled,thefiltercanbecleanbyusing
theairblowtool.Thefiltershouldbereplacedwhenitcannolongerbeadequatelycleanedbyair-blowing.
1
Remove the filter.
Pull out the filter cap downward while
pressing the slide part shown in the figure at
right. A filter is fitted in the tip of the filter
cap.
53320-N5-00
2
Clean the filter.
If the filter is only lightly soiled, it can be
cleaned by the air blow tool, and then
reused.
53321-N5-00
n
NOTE
If there are heavy dust deposits in the filter or the filter
has discolored, replace it with a new filter (KLF-M7156-
00X). As a general guide, filters should be replaced
once every 3 months, although this depends on the
actual operating time.
3
Reattach the filter cap.
1. Fit the filter back into the filter cap.
2. Insert the filter cap into its original
position while pressing the slide part.
c
end.
Removing the filter cap
Step 1
Filter cap
Filter
Slide part
Cleaning the filter
Step 2
Filter
Air blow tool