Nordson_EFD_OptiSure_Operating_Manual.pdf - 第61页
OptiSure Automated Optical Inspection 61 www.nordsonefd.com info@nordsonefd.com +1-401-431-7000 Sales and service of Nordson EFD dispensing systems are available worldwide. Using the Laser to Measur e and Recor d Profile…
OptiSure Automated Optical Inspection
60 www.nordsonefd.com info@nordsonefd.com +1-401-431-7000 Sales and service of Nordson EFD dispensing systems are available worldwide.
Using the Laser to Measure and Record Profiles
You can use the Laser Program and Laser Profile commands to measure and record the profile (displacement or
thickness) of a fluid or a workpiece, to display the measurement data in real time, and to make the system check the
laser measurement results against maximum and / or minimum threshold values. When a Laser Profile command is
executed, the resulting graph and measurements are also exported as a *.JPEG image and a *.CSV file, respectively.
NOTE: This section applies to PROPlus/L and PRO/L systems with a confocal laser only.
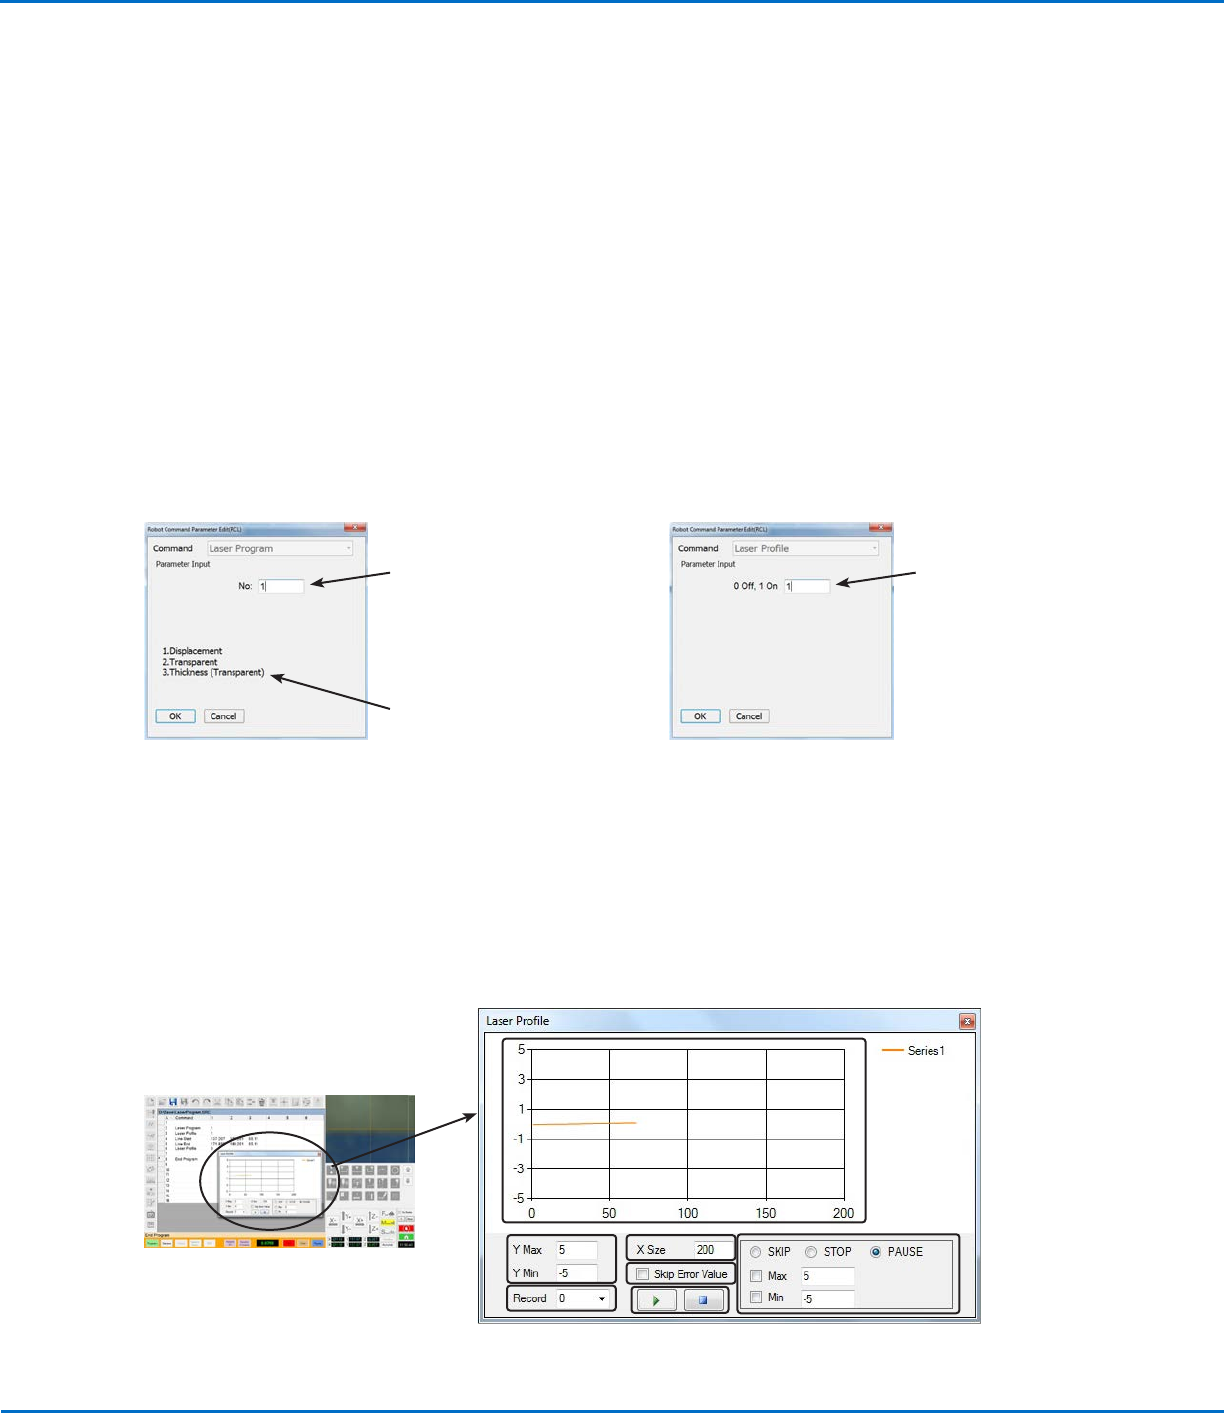
About the Laser Program and Laser Profile Commands
The Laser Program command is used to specify a number setting (from 0–7) that corresponds to a laser
program that contains measurement settings. Laser measurement settings programs are created and saved in
the CL-NavigatorN software. Laser programs 1–3 include default settings for Displacement (Non-Transparent),
Displacement (Transparent), and Thickness (Transparent), respectively. Programs 0 and 4–7 are user-programmable
via the CL-NavigatorN software. For information on using the CL-NavigatorN software, refer to the documentation
supplied with the laser.
NOTE: Laser programs 1–3 can be edited using the CL-NavigatorN software.
The Laser Profile command is used to turn laser measurement on and off in a dispense program. When turned on,
the Laser Profile command also exports the graph and measurement data to a *.JPEG and *.CSV file, respectively.
About the Laser Profile Window
The Laser Profile command causes the system to open the Laser Profile window — this window shows the laser
measurement data in real time. You can also use the settings in this window to make the system check the laser
measurement results against maximum and / or minimum threshold values. Refer to “Laser Profile Window Fields”
on page67 for additional details.
Specifies the number
(from 0–7) of the laser
program to use
Default laser
measurement settings
programs contained in
the “All.cldt” file
Laser Program command
window
Turns laser
measurement ON or
OFF
Laser Profile command
window
The Laser Profile window opens when the system executes a Laser Profile command with a value of 1 (ON)
OptiSure Automated Optical Inspection
61www.nordsonefd.com info@nordsonefd.com +1-401-431-7000 Sales and service of Nordson EFD dispensing systems are available worldwide.
Using the Laser to Measure and Record Profiles
(continued)
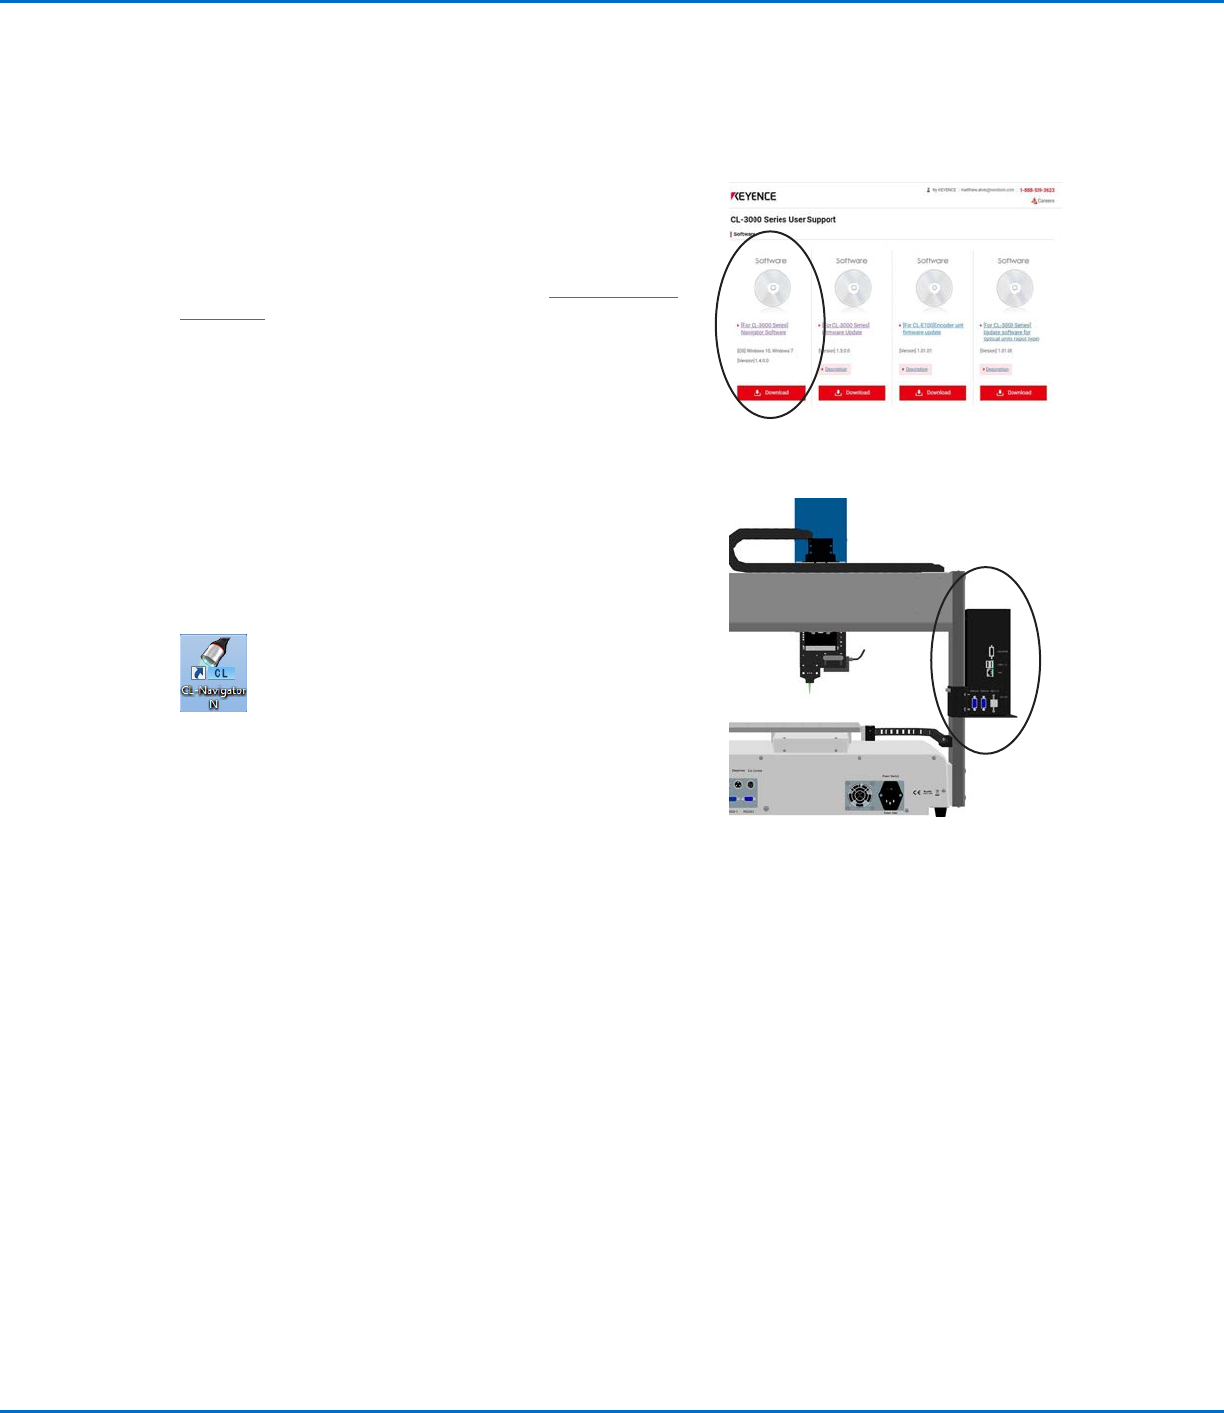
To Install CL-NavigatorN on the DispenseMotion
Controller
The CL-NavigatorN software for the KEYENCE CL-3000 Series
laser is provided on a CD, but can also be downloaded from the
KEYENCE Corporation website as described below.
1. Using an Internet-connected computer, go to KEYENCE.com/
CLsupport.
2. Create a KEYENCE account, or sign in if you already have an
account.
3. Download the latest version of CL-NavigatorN to a USB drive.
NOTE: If you cannot readily find the download link, contact
KEYENCE for technical support.
4. Insert the USB drive into an open USB port on the
DispenseMotion controller.
5. Navigate to the executable file on the USB drive and install the
software.
After the installation completes, the CL-NavigatorN shortcut
appears on the DispenseMotion controller desktop.
USB ports on the DispenseMotion controller
CL-NavigatorN software download link on the
KEYENCE website
To Obtain the All.cldt File
The All.cldt file is required for the laser measurement feature to
work correctly.
1. Contact your Nordson EFD representative to obtain the All.cldt
file.
2. Place the All.cldt file on a USB drive.
3. Insert the USB drive into an open USB port on the
DispenseMotion controller.
NOTE: You can leave All.cldt on the USB drive or copy it
anywhere onto the DispenseMotion controller. Just be sure to
remember where the file is located.
OptiSure Automated Optical Inspection
62 www.nordsonefd.com info@nordsonefd.com +1-401-431-7000 Sales and service of Nordson EFD dispensing systems are available worldwide.
PREREQUISITES
The confocal laser (Laser C) is properly installed and set up using the Laser Setup wizard. Refer to “Setting Up
the Confocal Laser” on page10.
The CL-NavigatorN software has been installed on the DispenseMotion controller. Refer to “To Install CL-
NavigatorN on the DispenseMotion Controller” on page61.
The All.cldt file has been obtained from Nordson EFD and can be located for transfer to the DispenseMotion
conroller. Refer to “To Obtain the All.cldt File” on page61.
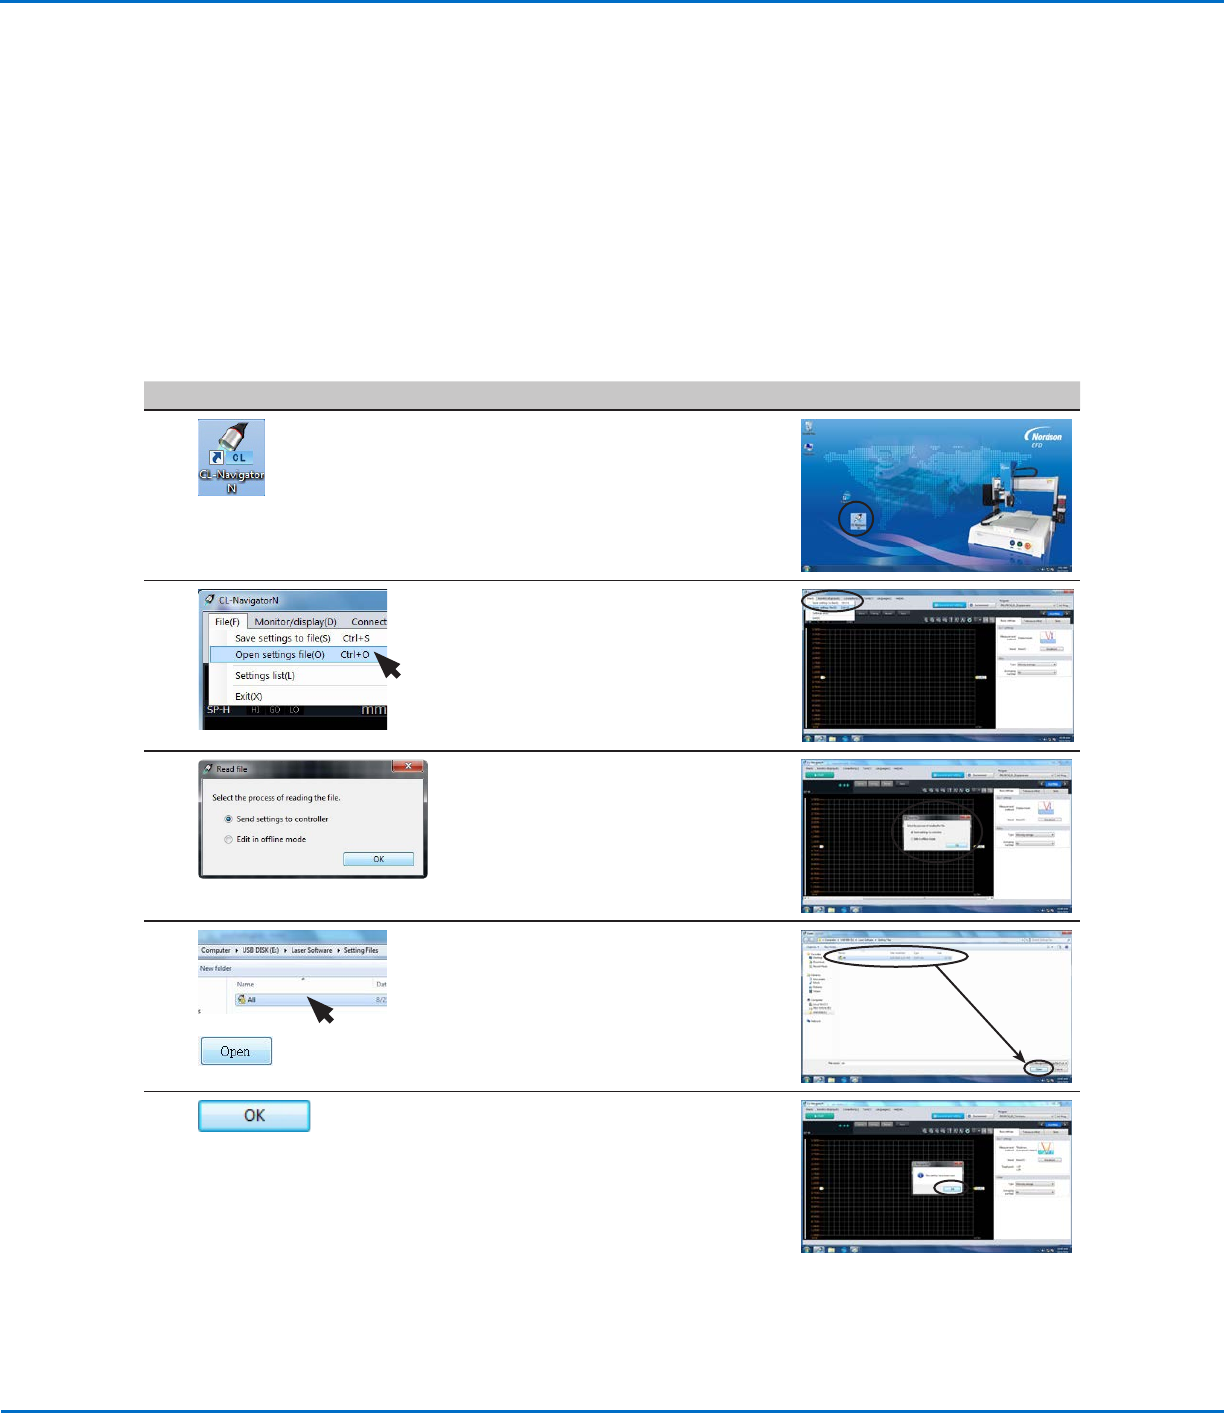
To Send “All.cldt” to the DispenseMotion Controller
# Click Step Reference Image
1
• On the DispenseMotion controller
desktop, open CL-NavigatorN.
2 • Click FILE(F) and select OPEN
SETTINGS FILE(O).
3 • Ensure that SEND SETTINGS TO
CONTROLLER is selected.
• Click OK.
4
>
• Navigate to the location where
“All.cldt” is stored.
• Select “All.cldt” and click OPEN.
5 • Click OK to clear the message.
• Continue to the next procedure to use
the “All.cldt” settings file to measure
and record the profile (displacement or
thickness) of a fluid or a workpiece in
real time.
Using the Laser to Measure and Record Profiles
(continued)