YG100R_Mainte_E.pdf - 第30页
Chapter 2 Daily maintenance items Contents 1 . C h e c k i n g t h e n o z z l e 2 - 1 1 . 1 C h e c k w i t h s o f t w a r e 2 - 1 1 . 2 C h e c k i n g t h e n o z z l e s v i s u a l l y 2 - 3 2 . C h e c k i n g t h…
1-10
1
Maintenance
2.3 Required tools
Prepare the following tools and items necessary for maintenance.
n
Tool list
: Supplied with machine, : Options
Name Description Remarks
Phillips screwdriver Large, small
Slotted (flat-blade) screwdriver Large, small
Phillips precision screwdriver
#0, #1 (Used to replace nozzle leaf springs and air
valves.)
Hex wrench set 1 set
Tweezers Used to replace ejector filters.
Oil syringe for nozzle holder Used to supply turbine oil (VG32).
Grease gun Used to supply grease (K48-M3852-00X)
Air blow gun Used for cleaning (KU4-M8590-00X)
Ultrasonic cleaner Used to clean nozzles.
Nozzle cleaning wire Used to clean nozzle holes (KV8-M8883-A0X)
Other tool list
: Supplied with machine, : Options
Name Description
Grease (lithium-based grease: NSL) Used to lubricate X, Y and W axes.
Turbine oil (VG32) Used to lubricate nozzle holders and nozzles.
Cleaning paper Use lint-free cleaning paper or cloth that does not leave dust or residue.
Cleaning alcohol Use IPA (isopropyl alcohol) or ethanol.
Paper cup or tray Used for cleaning spline shaft.
Film container or the like Used for cleaning nozzle holders.
Marker pen Used for marking when replacing conveyor belt.
Cotton swab stick Used to clean camera lens, half mirror and lighting unit.
Lens cleaner Used to clean camera lens and lighting unit.
Lens blower brush Used to clean camera lens and lighting unit.
Cleaning kit Used for cleaning spline shaft.
n
Safety goggles and mask
Name Description
Dust-proof goggles
Always wear these goggles and mask when using an air blow gun or IPA.
Dust-proof mask

2-1
2
Daily maintenance items
1. Checking the nozzle
Solder sticking to the nozzle tip or a clogged nozzle hole can cause component pickup errors and
recognition errors. Poor nozzle spring action can also cause pickup and mounting errors. To prevent such
problems periodically inspect and clean each nozzle.
1.1 Check with software
n
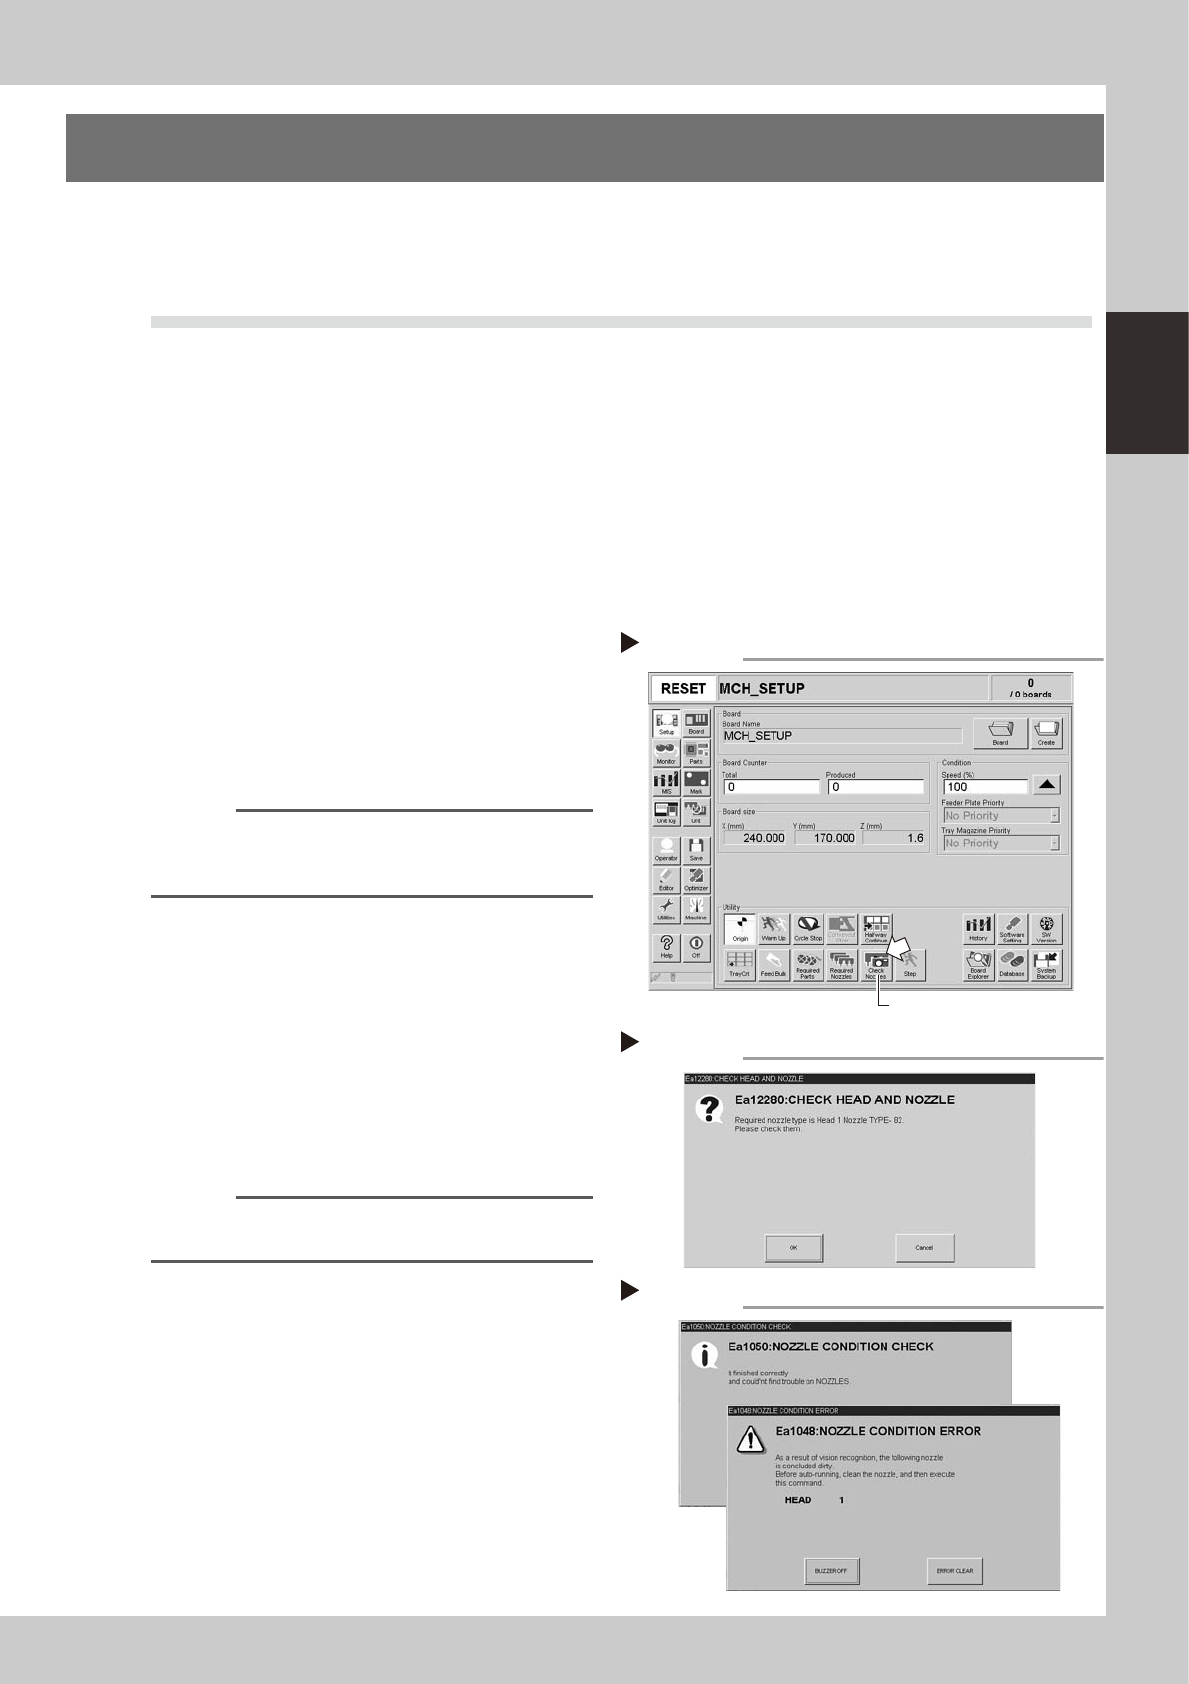
How to check for a dirty nozzle (with the [Check Nozzle] button)
The term "dirty nozzle" as used here indicates shiny material such as solder adhering to the nozzle tip. This
shiny portion might be mistaken for a component and cause recognition errors. To check for this problem, press
the [Check Nozzles] button on the [Setup] screen while the nozzle tip picks up no components. The multi-
vision camera finds the extent of grime or dirt on the nozzle tip.
e
1
Move the head.
Press the emergency stop button and move
the head so the nozzle is at a position where
it can be easily replaced.
2
Press the [Check Nozzles] button as
follows.
1. Cancel emergency stop.
2. Open the [Setup] screen and press the
[Check Nozzles] button in "Utilities".
54201-F9-00
n
NOTE
The machine equipped with a the nozzle station will
automatically change the nozzle and run a check, so
step 3 listed next is not required.
3
Change the nozzle.
Press the [OK] button for nozzle change
while following the message on the screen.
Nozzle change begins after pressing the last
[OK] button.
54202-F9-00
4
Check the message.
Clean the nozzle if the check shows it is dirty.
54203-F9-00
n
NOTE
The "Check Nozzles" function is usually set for "Type 212A
nozzles" before shipment.
Pressing[Check nozzles] button
Step 2
[Check nozzles] button
Message for checking head and nozzle
Step 3
Nozzle check results
Step 4
OK
NG