YG100R_Mainte_E.pdf - 第79页
MAINTENANCE MANUAL Mar . 2008 V ersion 3.00 © Y AMAHA MOTOR CO., L TD. IM Operations All rights reserved. No part of this publication may be reproduced in any form without the permission of Y AMAHA MOTOR CO., L TD. Infor…

4-8
4
How to replace consumable parts
5. Cleaning and replacing the conveyor belts
The conveyor belts are used in three conveyors: board carry-in conveyor, board clamp conveyor and board
carry-out conveyor.
The following explains the procedure for replacing the belts in the board clamp and carry-out conveyors.
When replacing the belt in the board carry-in conveyor, skip steps 4, 5 and 8.
1
Press the emergency stop button.
The machine must be in emergency stop to
ensure safety during work.
2
Slacken the belt.
Loosen the belt tensioner bolt with the M4
hex wrench and slide the bolt fully along the
elongate hole (in the direction of slackening
the belt).
53417-F9-10
3
Detach the belt.
Using the M3 hex wrench, loosen the bolt
securing the belt drive pulley and pull out
the shaft. Then detach the belt from the
pulley and take it out through the space
between the pulley and the shaft.
53418-F9-10
4
Remove the board clamp assembly.
Single type:
Using the M3 hex wrench, remove the two
bolts securing each board clamp assembly
and remove the board clamp assembly (one
assembly per belt).
Double type:
Using the M3 hex wrench, remove the two
bolts securing each board clamp assembly
and remove the board clamp assemblies
(two assemblies per belt).
53419-F9-10
Step 3
Removing the shaft
Shaft
Drive pulley
Loosening the belt tensioner bolt
Step 2
Tensioner bolt
Removing the board clamp assembly
Step 4
Board clamp assembly Board clamp assembly mounting bolt
4-9
4
How to replace consumable parts
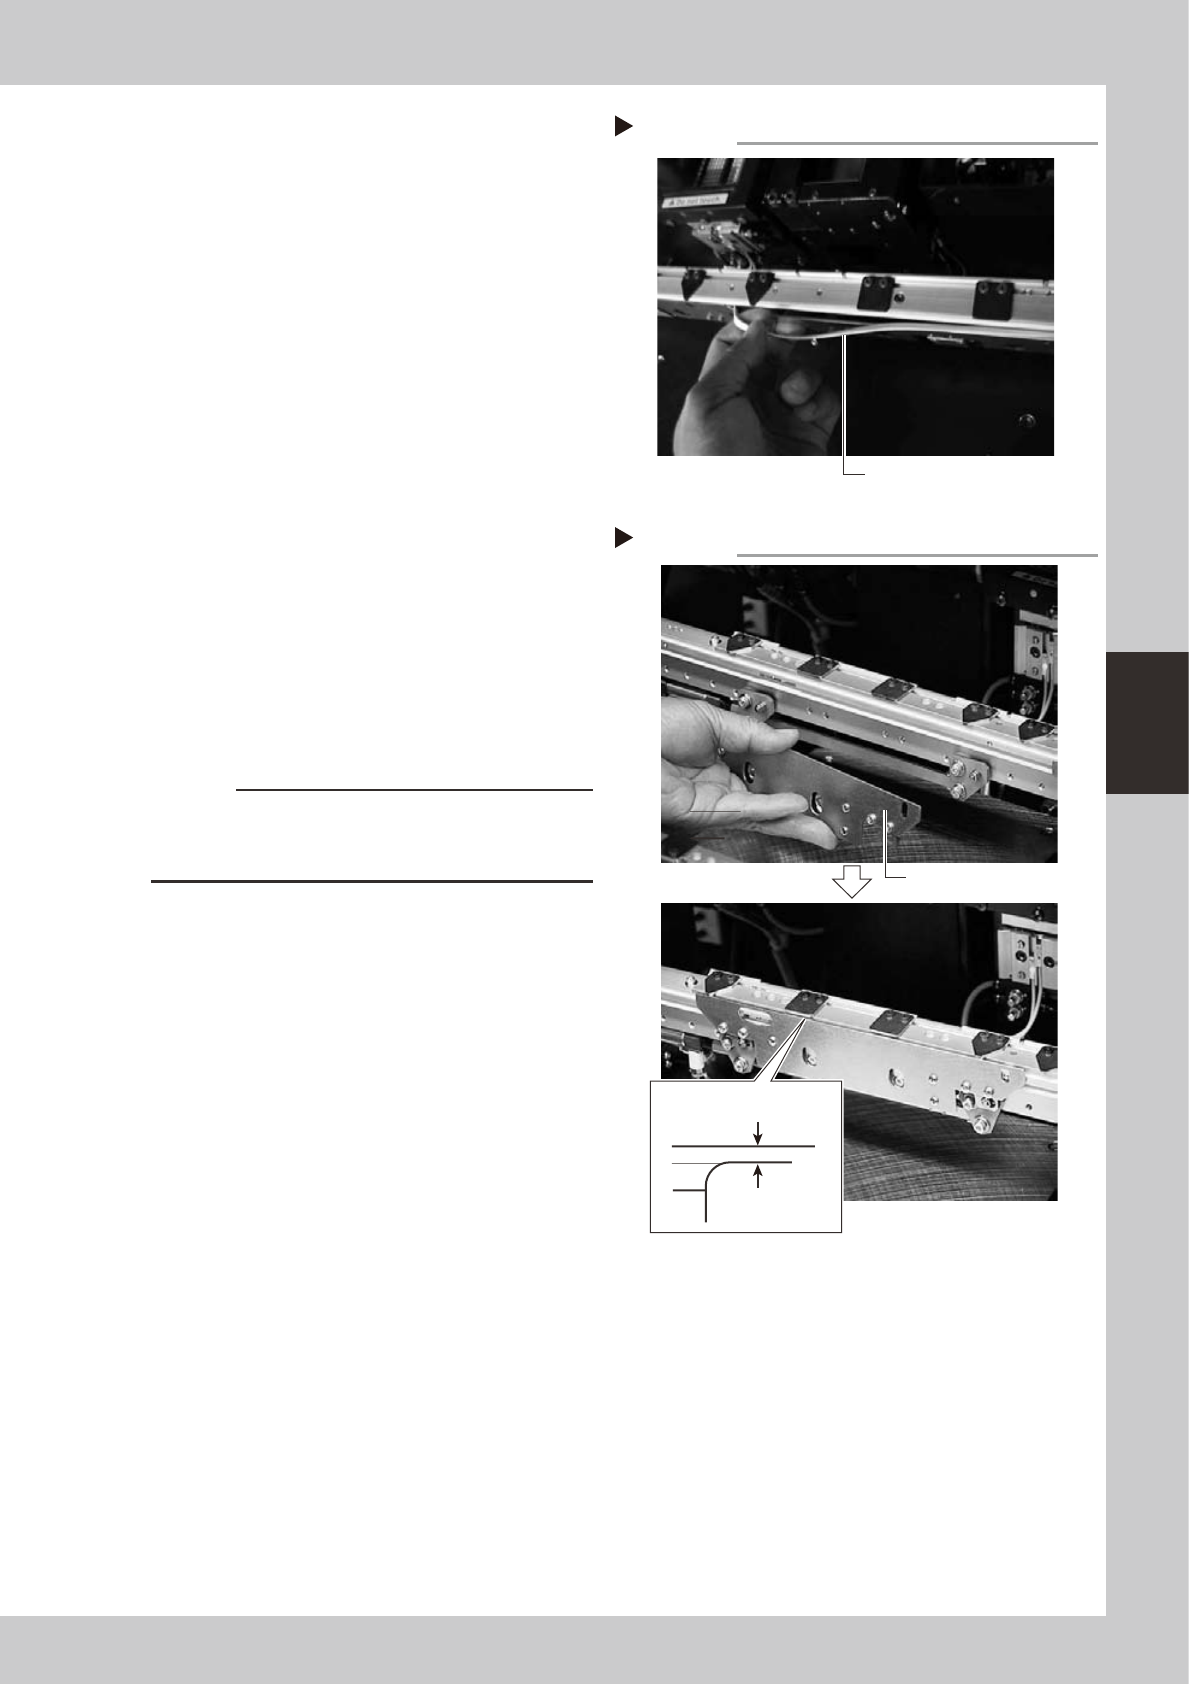
5
Detach the belt from the conveyor.
53421-F9-00
6
Clean the conveyor rail.
Use a fine brush or cleaning cloth to clean
the gap between the conveyor rail and
board guide.
7
Attach a new belt.
1. Temporarily fit a new belt onto the pulley.
2. Reconnect the shaft to the pulley and
tighten the bolt.
3. Move the belt tensioner bolt to apply a
proper tension to the belt. Then tighten
the belt tensioner bolt.
8
Reattach the board clamp assembly.
1. Install the board clamp assembly in the
original position and temporarily tighten
the bolts to secure the board clamp
assembly.
2. On the [Unit] – [Conveyor] tab screen,
press the [Board Clamp] button to raise
the board clamp assembly and tighten
the bolts securely.
53422-F9-10
c
CAUTION
Compressed air must be supplied during adjustment to
actuate the board clamp assembly. Secure the board
clamp assembly while it is in the raised position.
9
Check the belt rotating condition.
1. Open the [Unit]-[Conveyor] tab screen,
and press the [Board Clamp] button
again to unclamp. At this point, make
sure that the top of the board clamp
assembly is 0.5mm lower than the upper
surface of the belt.
2. On the [Unit]-[Conveyor] tab screen,
press the [Conveyor In] button or
[Conveyor Out] button to turn on the
conveyor motor and check the belt
rotation.
3. If the rotation speed fluctuates or there is
slack in the belt, adjust the position of
the tensioner bolt and then check the
rotation again.
Detaching the belt from the conveyor
Step 5
Pull out the belt.
Installing the board clamp assembly
Step 8
Board clamp assembly
0.5 mm
Board clamp

MAINTENANCE MANUAL
Mar. 2008
Version 3.00
© YAMAHA MOTOR CO., LTD. IM Operations
All rights reserved. No part of this publication may be
reproduced in any form without the permission of
YAMAHA MOTOR CO., LTD.
Information furnished by YAMAHA in this manual is believed to
be reliable. However, no responsibility is assumed for possible
inaccuracies or omissions. If you find any part unclear in this manual,
please contact YAMAHA or YAMAHA sales representatives.