SC_450 PreciseCoat Conformal Coating Jet_Rev_04.pdf - 第28页
SC-450 PreciseCoat C onformal C oating J et Maintenance and Service 22 © 2024 Nordson Corporation 5.4 Routine Maintenance Procedures Table 5-1 Routine M aintenance Proced ures Procedure Frequency Instructions Clean needl…
© 2024 Nordson Corporation 21
5 Maintenance and Service
5.1 Overview
Performing the recommended maintenance and service procedures at suggested intervals increases the
life of your SC-450 PreciseCoat Jet and ensures high quality coating performance for every production
run. This section contains the following procedures:
•
Recommended Facility
Items
•
Removing the
SC
-
450
•
Routine Maintenance
Procedures
•
Replacing SC
-
450 Components
• Removal and Cleaning the Fluid
Needle
5.2 Safety First
Operation of your SC-450 PreciseCoat Jet involves air pressure, electrical power, mechanical devices,
and the use of hazardous materials, and sometimes may involve heat. It is essential that every person
servicing the coating system or components fully understands all hazards, risks, and safety precautions.
See Section 2 - Safety for additional information.
WARNING!
Allow only qualified personnel to perform the following tasks. Follow the safety
instructions in this document and all other related documentation.
WARNING!
Ensure the fluid system is completely depressurized prior to loosening any fittings
in the fluid path. Failure to do so may cause serious injury to personnel.
5.3 Recommended Facility Items
In addition to the supplied accessories and tools, it is recommended that the following items be available
at your facility:
• Personal Protective Equipment recommended in applicable SDS
• Bench Lamp and Magnifier Set
• Ultrasonic Cleaning System
• Air-gun and compressed, dry air
• Appropriate fluid collection and disposal container
• Solvent appropriate for the fluid used
• O-ring type lubricant
• Disposable towels, cleaning swabs and brushes
SC-450 PreciseCoat Conformal Coating Jet Maintenance and Service
22 © 2024 Nordson Corporation
5.4 Routine Maintenance Procedures
Table 5-1 Routine Maintenance Procedures
Procedure Frequency Instructions
Clean needle As needed See 5.5 Removal and Cleaning the Fluid Needle.
Flush SC-450 with
appropriate solvent
Monthly
Refer to the applicable coating system Installation,
Operations, and Maintenance Manual.
Replace U-cup seal Monthly
Perform Step 4 in 5.7.1 Removing and Replacing the
Heater Assembly, Fluid Body, and Fluid Seal.
Clean and inspect the
valve
Every 6-12
months
1. Remove the PreciseCoat Jet from the mounting
bracket, see 5.6 Removing the SC-450.
2. Soak the shaft and body module in the solvent used
with the coating material.
3. Clean and dry the shaft and body.
4. Inspect the O-rings, U-cup seal, needle, and seat.
Replace parts that are damaged or worn. If you have
removed the U-cup seal, replace the U-cup seal with a
new one.
5.5 Removal and Cleaning the Fluid Needle
5.5.1 Cleaning and Replacing the Fluid Needle
?
NOTE
It is not necessary to remove the applicator from the coating system to replace or clean
the fluid needle.
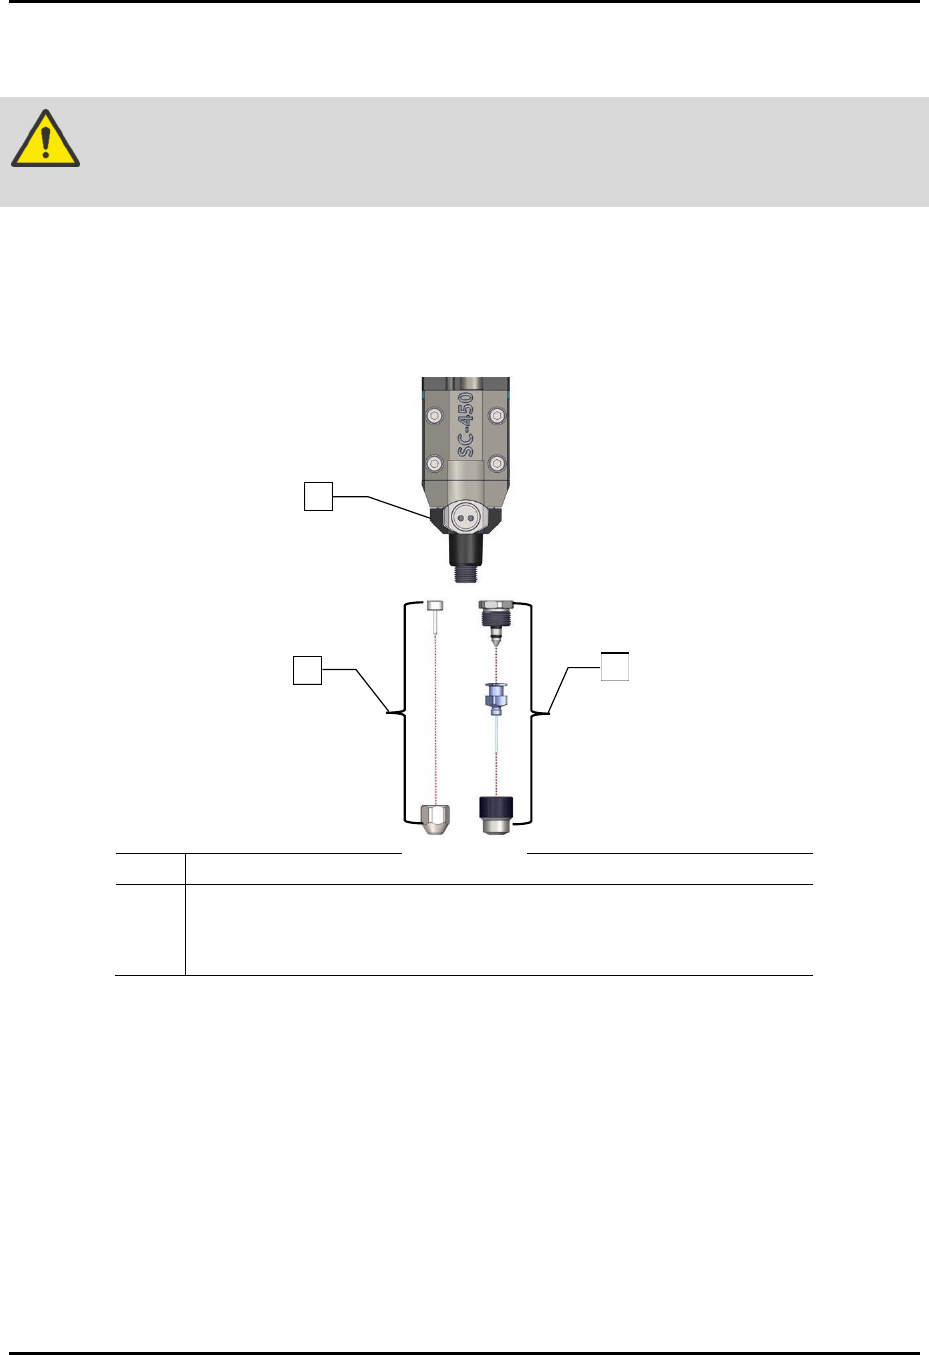
To remove and clean the fluid needle (Figure 5-1):
1. Depressurize the applicator, see 5.6.1 Depressurizing the SC-450 and perform Step1
through Step 11.
2. Wipe the fluid residue from the fluid needle assembly.
WARNING!
Follow the Safety Data Sheet (SDS) recommendations for all fluids used with the
dispensing system. The SDS provides material usage instructions, disposal
instructions, and safety precautions.
3. Remove and separate the needle nut from the fluid body assembly by hand.
?
NOTE
Residual fluid may flow from the SC-450.
SC-450 PreciseCoat Conformal Coating Jet Maintenance and Service
© 2024 Nordson Corporation 23
4. Clean the fluid needle with the appropriate solvent depending on fluid used and inspect
thoroughly for damage before reusing.
WARNING!
Use an Nordson nozzle brush to scrub the needle. Do not use a steel brush or
any other type of brush that will damage the needle tip.
?
NOTE
If the fluid needle orifices are blocked, insert a probe or broach into the orifice against
the direction of fluid flow. If this problem persists, immerse the needle nut in an
appropriate solvent and use an ultrasonic cleaner.
5. Install the fluid needle, see 3.6 Installing the Fluid Needle.
Item Description
1 Assy, Fluid Body, SS (Item 16)
2 DL Needle Kit (Item 21)
3 Iwashita Needle Kit (Item 22)
Figure 5-1 Removing the Needle Assembly (all configurations shown)
2
1
3