SC_450 PreciseCoat Conformal Coating Jet_Rev_04.pdf - 第32页
SC-450 PreciseCoat C onformal C oating J et Maintenance and Service 26 © 2024 Nordson Corporation 5.6.2 Disconnec ting the Pneumatic, Electrical, and Fluid Connec tions WARNING! Protect the s olenoid valve and other no n…
SC-450 PreciseCoat Conformal Coating Jet Maintenance and Service
© 2024 Nordson Corporation 25
5. Depressurize the fluid system using the fluid pressure switch located at the back of the
coating system. Refer to the applicable coating system Installation, Operations, and
Maintenance Manual.
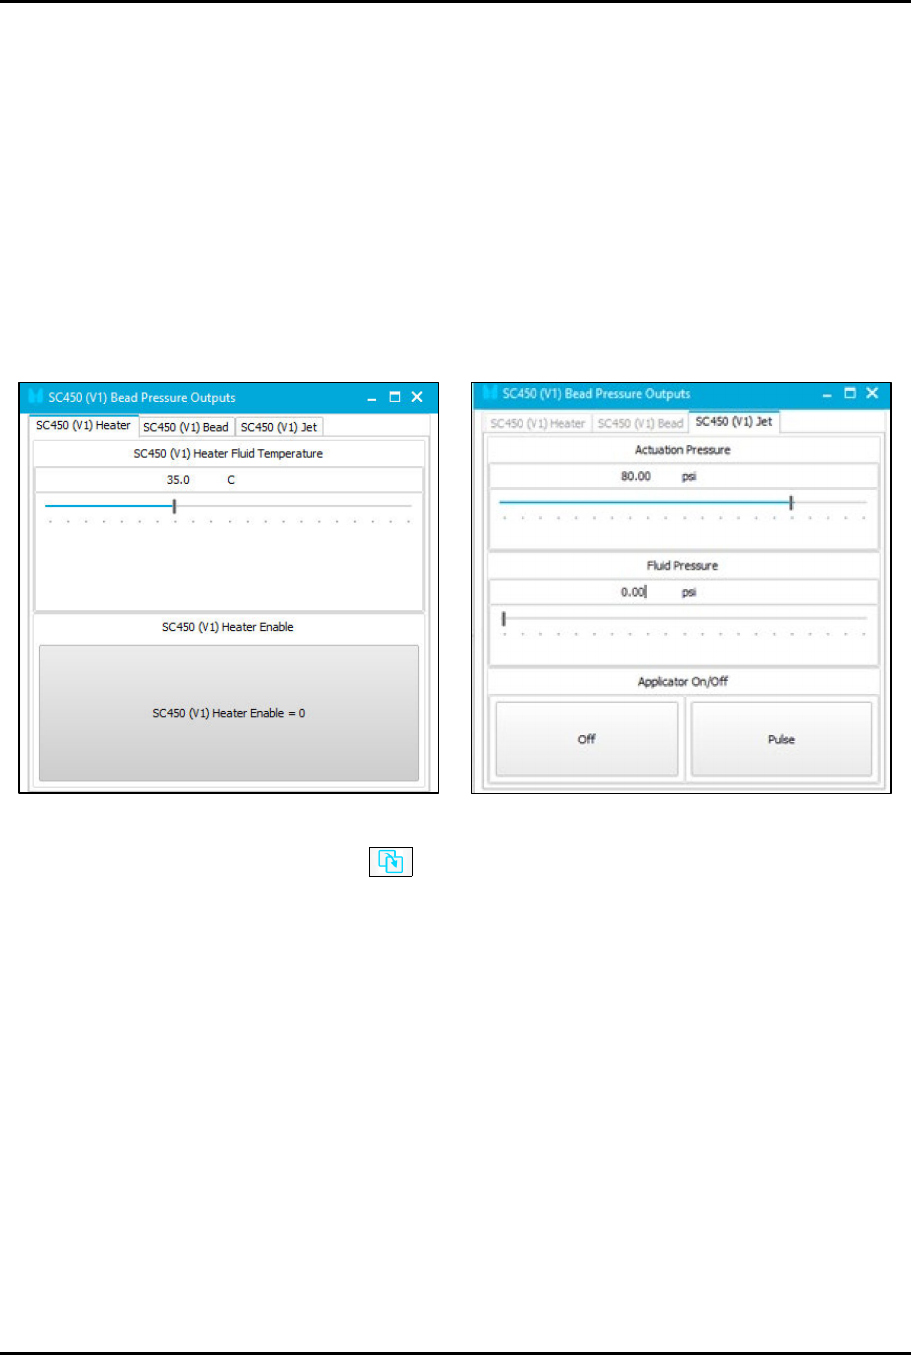
6. Disable the SC450 Heater on the SC450 Heater tab (Figure 5-3).
7. Slide the fluid pressure bar to the left to reduce the SC-450 fluid pressure to zero (0) psi
prior to fluid needle inspection, removal, cleaning, or replacement.
8. Position the SC-450 at the purge cup by running the appropriate macro or manually moving
the SC-450 to the purge cup.
9. Toggle the Applicator Off button in the EasyCoat software to turn off the pressure.
> No fluid should dispense. If fluid does dispense, continue to dispense until all residual
pressure is relieved.
Figure 5-3 Pressure Outputs
10. Use the Go To Front button to move the SC-450 to the front center of the dispensing
area.
11. Open the front hood of the conformal coating system.
12. Lay towels or a cup under the SC-450 to collect fluid spills.
13. Disconnect the pneumatic, electrical, and fluid connections, see 5.6.2 Disconnecting the
Pneumatic, Electrical, and Fluid Connections.

SC-450 PreciseCoat Conformal Coating Jet Maintenance and Service
26 © 2024 Nordson Corporation
5.6.2 Disconnecting the Pneumatic, Electrical, and Fluid Connections
WARNING!
Protect the solenoid valve and other non-wetted parts from contact with fluid. Do
not immerse in solvent.
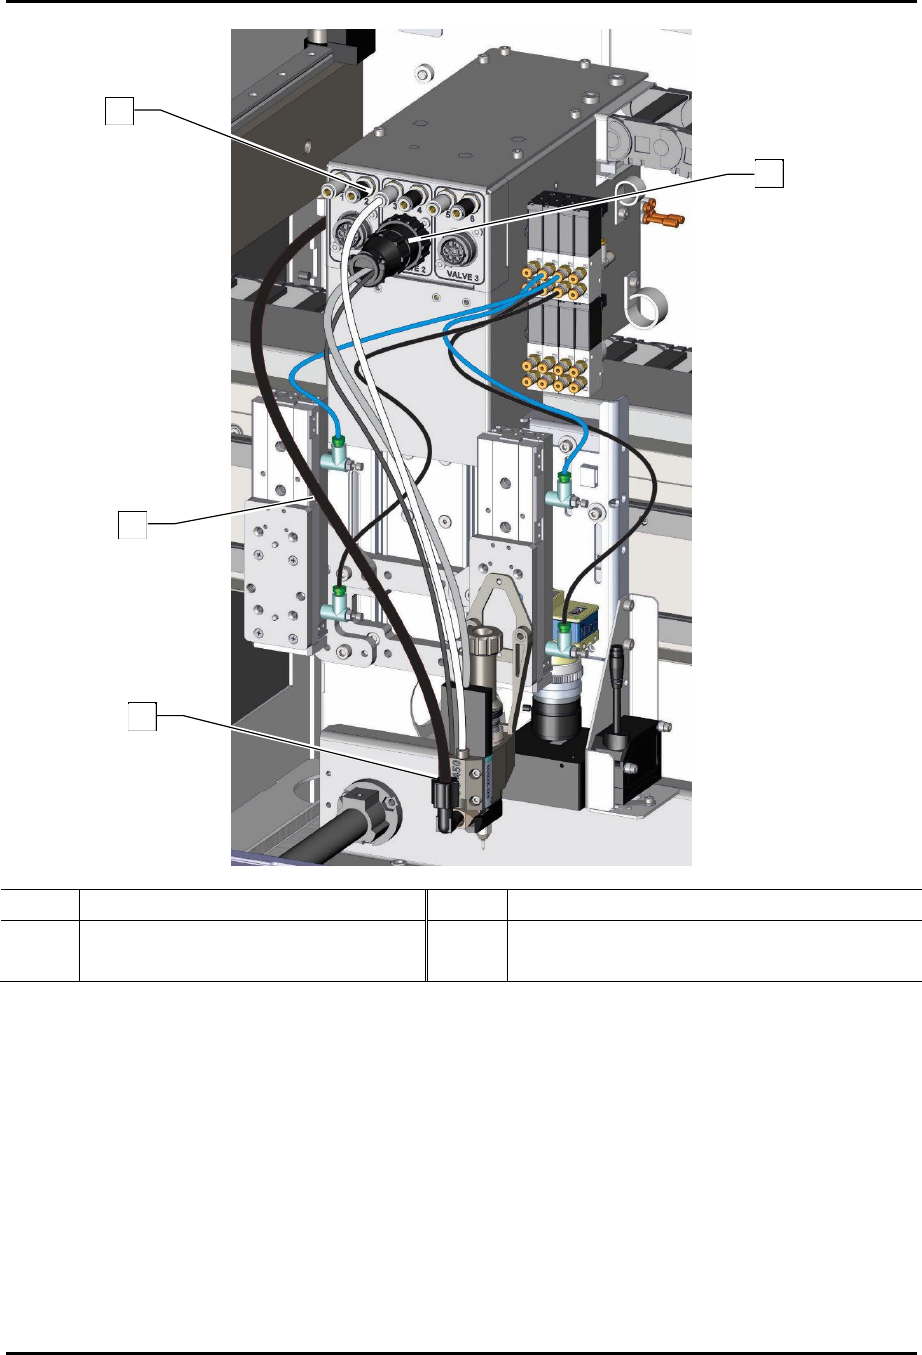
To disconnect the pneumatic, electrical, and fluid connections (Figure 5-4):
1. Depressurize the SC-450, see 5.6.1 Depressurizing the SC-450.
2. Perform a service shutdown. Refer to the applicable coating system Installation,
Operations, and Maintenance Manual.
3. For the SL-940:
a. Disconnect the valve solenoid cable from the SC-450 to the V2 position.
b. Disconnect fluid line (red tubing) from the fluid fitting and place the fluid line over the
purge cup for residual fluid.
?
NOTE
If only the SC-450 is to be removed, seal the fluid system immediately using the
appropriate cap or plug. Plugging the fluid lines prevents fluid curing due to air
exposure.
c. Disconnect Valve air from the Valve air connection on the dispense head.
4. For the SL-1040:
a. Disconnect the valve solenoid cable from the SC-450 to the valve connection on the
dispense head.
b. Disconnect fluid line (black tubing) from the fluid fitting and place the fluid line over the
purge cup for residual fluid.
?
NOTE
If only the SC-450 is to be removed, seal the fluid system immediately using the
appropriate cap or plug. Plugging the fluid lines prevents fluid curing due to air
exposure.
c. Disconnect Valve air from the Valve air connection on the dispense head.
SC-450 PreciseCoat Conformal Coating Jet Maintenance and Service
© 2024 Nordson Corporation 27
Item Description Item Description
1 Valve Air Connection 3 Fluid Fitting (Elbow)
2 Fluid Line 4 Valve 2 Electrical Connection
Figure 5-4 Disconnecting the Pneumatic and Fluid Connections
(Valve 2 Configuration Shown on SL-1040)
2
1
3
4