SC_450 PreciseCoat Conformal Coating Jet_Rev_04.pdf - 第35页
SC-450 PreciseCoat C onformal C oating J et Maintenance and Service © 2024 Nordson Corporation 29 5. If the muffler re quires replac ement, follow the b elow steps (Figure 5- 6): a. Verify the coa ting system is turned o…

SC-450 PreciseCoat Conformal Coating Jet Maintenance and Service
28 © 2024 Nordson Corporation
5.6.3 Removing the SC-450 from the Mounting Bracket
To remove the SC-450 from the mounting bracket:
1. Depressurize the SC-450, see 5.6.1 Depressurizing the SC-450.
2. Disconnect the pneumatics, electrical, and fluid connections, see 5.6.2 Disconnecting the
Pneumatic, Electrical, and Fluid Connections.
3. If the fixed bracket is installed, remove two (2) screws securing the mounting bracket to the
applicator bracket. If the four position tilt and rotate bracket is installed, remove two (2) set
screws securing the applicator to the applicator bracket (Figure 5-5).
4. Remove the SC-450 from the applicator bracket.
Fixed Option
Four Position Tilt and Rotate Option
Item Description
1 Triple Applicator Bracket
2 Four Position Tilt and Rotate Bracket
3 Set Screws (2)
4 SC-450
5 Screws (2)
Figure 5-5 Removing the SC-450
1
4
5
2
3
4

SC-450 PreciseCoat Conformal Coating Jet Maintenance and Service
© 2024 Nordson Corporation 29
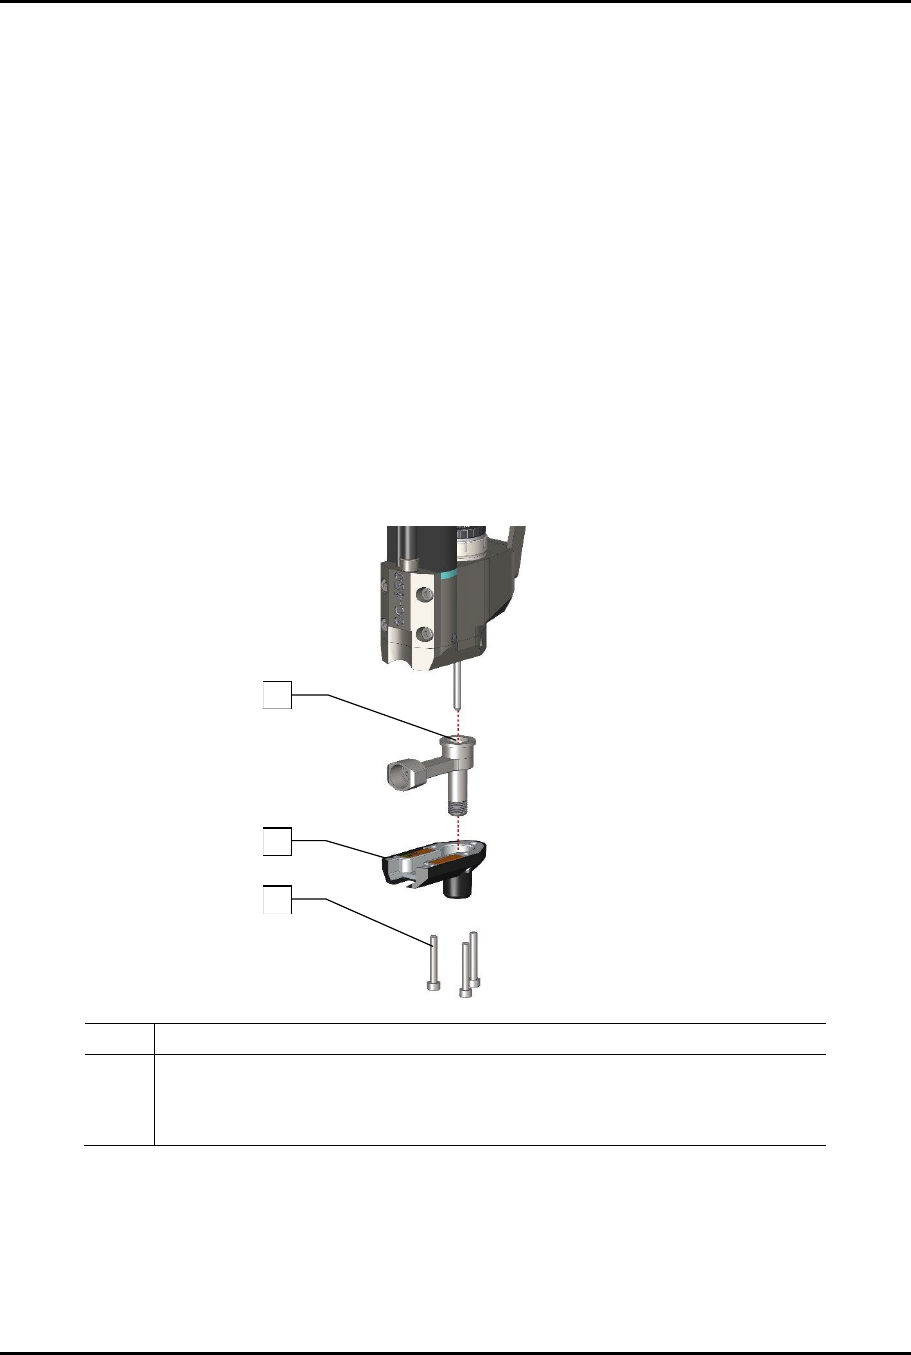
5. If the muffler requires replacement, follow the below steps (Figure 5-6):
a. Verify the coating system is turned off. Press the Stop button on the front panel.
b. Open the front hood of the coating system.
c. Manually move the dispense head to the front of the coating system.
d. Remove one (1) screw securing the bracket to the SC-450.
e. Remove the bracket from the SC-450.
f. Discard the muffler disc.
g. Install a new muffler disc.
h. Install one (1) screw securing the bracket to the SC-450.
?
NOTE
Ensure the muffler is installed into the valve body assembly of the SC-450.
i. Torque the screw to 2.82 Nm (25 in-lbs).
6. Install SC-450, see 3.4 Installing the SC-450 PreciseCoat Jet.
Fixed Option
Tilt and Rotate Option
Item Description
1 Bracket, Mounting (Item 4)
2 Screw, M5 x 10 mm, FSHC, Alloy
3 Muffler, 40 um, Disc, .5in OD, .125in THK (Item 8)
4 Bracket, Mounting, T&R (Item 7)
Figure 5-6 Installing the SC-450 to the Bracket
3
2
1
3
2
4
SC-450 PreciseCoat Conformal Coating Jet Maintenance and Service
30 © 2024 Nordson Corporation
5.7 Replacing SC-450 Components
Tools and Materials Needed:
•
Metric Allen Wrench Set
•
Shipping Kit (
Item 23
)
•
Dry Film Paste
Lubricant (
Item 23
)
•
Torque Wrench (0
-
5
0 in
-
lbs)
5.7.1 Removing and Replacing the Heater Assembly, Fluid Body, and Fluid Seal
To remove the heater assembly:
1. Remove the needle assembly, see 5.5.1 Cleaning and Replacing the Fluid Needle and
perform Step 1 through Step 6.
2. Remove three (3) screws securing the heater assembly to the valve body assembly
(Figure 5-7).
?
NOTE
When the screws are removed from the valve body, the fluid body will be loose
and may separate.
3. Remove the heater assembly.
Item Description
1 U-Cup, VSPG, 2 LIP, PI-PTFE, 1/8 Rod (Items 19 and 23) (U-cup is inside)
2 Assy, Heater, 24W (Item 17)
3 Screw, M3 x 0.5 x 16, SHCS, SS (Items 18 and 23)
Figure 5-7 Replacing the Heater Assembly
3
2
1