SC_450 PreciseCoat Conformal Coating Jet_Rev_04.pdf - 第46页
© 2024 Nordson Corporation 40 6 Troublesh ooting 6.1 Overview To quickly ident ify problems, look for ob vious s igns such as burnt, missing, damaged, or loose parts, as well as obstructio ns and spills. Recurr i ng prob…
SC-450 PreciseCoat Conformal Coating Jet Maintenance and Service
© 2024 Nordson Corporation 39
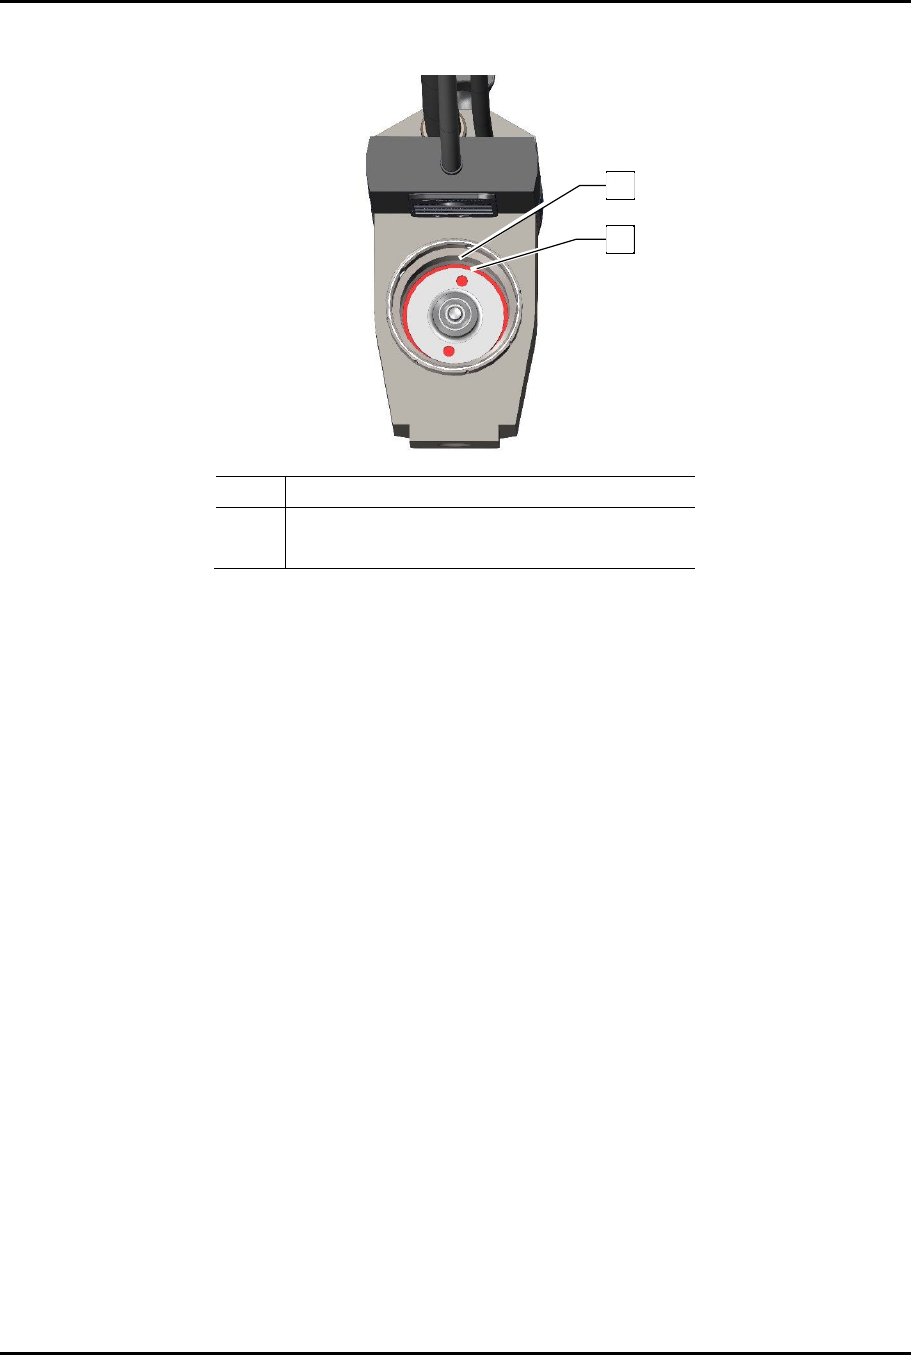
11. Ensure that the flange is below the internal threads of the valve body (Figure 5-16).
Item Description
1 Internal Threads
2 Flange
Figure 5-16 Needle and Flange Fully Seated
12. Install the stroke adjustment assembly, see 5.7.4 Replacing the Stroke Adjustment
Assembly.
13. Install the heater insulation, see 5.7.2 Replacing Heater Insulation and Interconnect PCA.
14. Install the heater assembly and fluid body, see 5.7.1 Removing and Replacing the Heater
Assembly, Fluid Body, and Fluid Seal.
15. Install the fluid needle, see 3.6 Installing the Fluid Needle.
16. Install the SC-450 to the coating system, see 3.4 Installing the SC-450 PreciseCoat Jet.
2
1
© 2024 Nordson Corporation 40
6 Troubleshooting
6.1 Overview
To quickly identify problems, look for obvious signs such as burnt, missing, damaged, or loose parts, as
well as obstructions and spills. Recurring problems indicate there may be other root causes. Table 6-1
through Table 6-3 identify troubleshooting symptoms, recovery procedures, hierarchy, and setup
variables. These procedures cover only the most common problems that you may encounter. If you
cannot solve the problem with the information given here, contact Technical Support.
?
NOTE
Refer to the EasyCoat User Guide or EasyCoat Help for recovery procedures pertaining
to EasyCoat.
6.2 Safety First
Operation of your SC-450 PreciseCoat Jet involves air pressure, electrical power, mechanical devices,
and the use of hazardous materials, and sometimes may involve heat. It is essential that every person
servicing the dispensing system or components fully understands all hazards, risks, and safety
precautions. See Section 2 - Safety for additional information.
WARNING!
Allow only qualified personnel to perform the following tasks. Follow the safety
instructions in this document and all other related documentation.
WARNING!
Ensure the fluid system is completely depressurized prior to loosening any fittings
in the fluid path. Failure to do so may cause serious injury to personnel.
WARNING!
DO NOT hot swap connections when working with electrical and pneumatic power
supplies. Turn the main circuit breaker off before disconnecting the external power
plug from the facility.

SC-450 PreciseCoat Conformal Coating Jet Troubleshooting
© 2024 Nordson Corporation 41
6.3 Troubleshooting Procedures
Table 6-1 SC-450 Troubleshooting - Symptom Based
Symptom Possible Cause Recovery
No Fluid Jetted
Empty or Old (expired) fluid Replace fluid.
Clogged Nozzle Clean or replace fluid needle.
Fluid temperature too low/off
Verify heater is turned on and set at the
correct temperature. Verify electrical power
at the Jet connector. Verify proper heater
element/RTD resistance.
Fluid pressure too low/off
Verify the proper air pressure is delivered
to the fluid syringe.
Solenoid not actuating
Verify electrical signal to valve. Valve air
pressure low or off - set to proper value.
Electrical cable or pneumatic line
damaged. Repair/replace.
Blocked pneumatic path
Check jet body. Remove the stroke
adjustment assembly, spring, button and
needle assembly.
Needle assembly not actuating
Stroke set to zero - set stroke to proper
value. Remove stroke adjustment
assembly, remove fluid chamber, manually
verify needle assembly slides in the
bearings. Verify spring is installed. Valve
air pressure low or off - set to proper value.
Valve On/Off time set too low -
set to
proper value (Minimums of 3 ms ON and
3 ms OFF).
Stroke adjust was not properly
adjusted when first dispensed on
machine (Needle Hat Seal
inverted)
Remove the stroke adjustment assembly
and needle. Reinstall using the proper tool.
Poor Quality Jetting
Any of the causes above As above.
Changed software settings Check timing values.
Dirty, worn, or damaged wetted
parts (fluid chamber, fluid seal,
chamber O-ring, seat, nozzle,
needle assembly)
Thoroughly clean. Inspect all sealing and
mating surfaces for scratches and traces of
fluid. Check seat, nozzle, needle, and
seals for wear. Replace as necessary.
Air Leak
Broken pneumatic line Replace line.
Improper assembly
Verify all O-rings are installed. Verify
gaskets are installed under solenoid end
caps.
Stroke adjust was not properly
adjusted when first dispensed on
machine (Needle hat seal
inverted)
Remove the stroke adjustment assembly
and needle. Reinstall using the proper tool.