00196378-0102_UM X-Feeder_EN.pdf - 第71页
Operating Tape Feeder Modules Setting the Pitch Using the Operator Panel User Manual X Feeder M odules SIPLACE Family 71 4.3.3 Setting the Pitch The pitches shown in the table can be set for the different X f eeder modul…
Operating Tape Feeder Modules
Using the Operator Panel Adjusting the Pickup Positions
70 User Manual X Feeder Modules SIPLACE Family
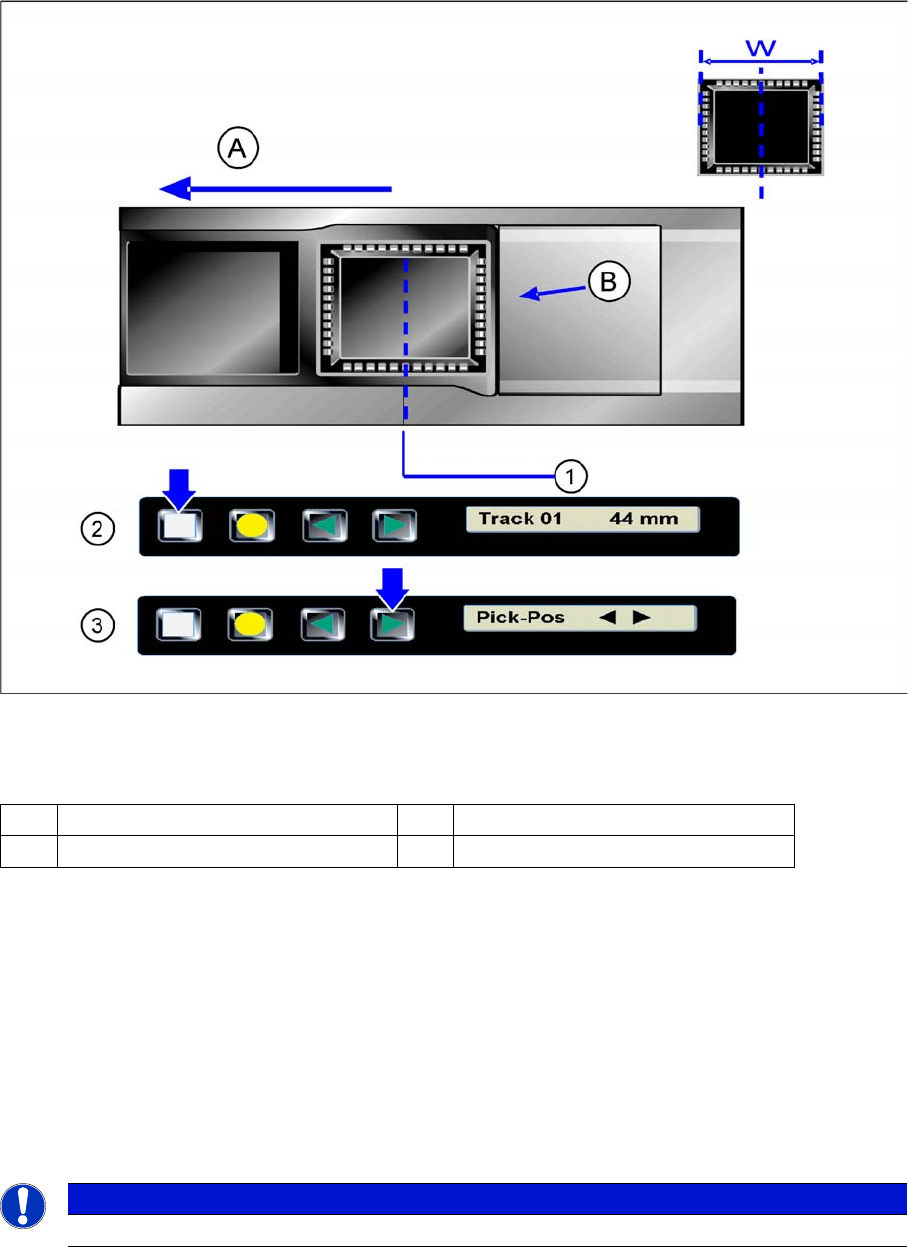
4.3.2.4 Pick-Up Positions for 16 - 88 mm X Feeder Modules
There is only one pickup position for 16 - 88 mm feeder modules. The tape material must be inserted or
set in such a way, that the center of the components to be processed is positioned in the center of the
pickup position.
Pickup position for 16 - 88 mm X feeder modules
Legend
Setting the Pickup position
►(1) Pickup position
►(2) The display shows the start screen ("Track")
.Press the Set button until the display shows "Pickup pos."
►(3) Press the Forwards button.
The tape is moved forwards in 2 mm steps. Press the key several times, until the component center
has reached the pickup position.
Repeatedly press the Set button to return to the start screen.
The setting is retained automatically.
A Direction of tape movement W Width of the components
B Foil removal edge
NOTICE
The feeder will also return to the start screen, if no button is pressed for 1 minute.
Operating Tape Feeder Modules
Setting the Pitch Using the Operator Panel
User Manual X Feeder Modules SIPLACE Family 71
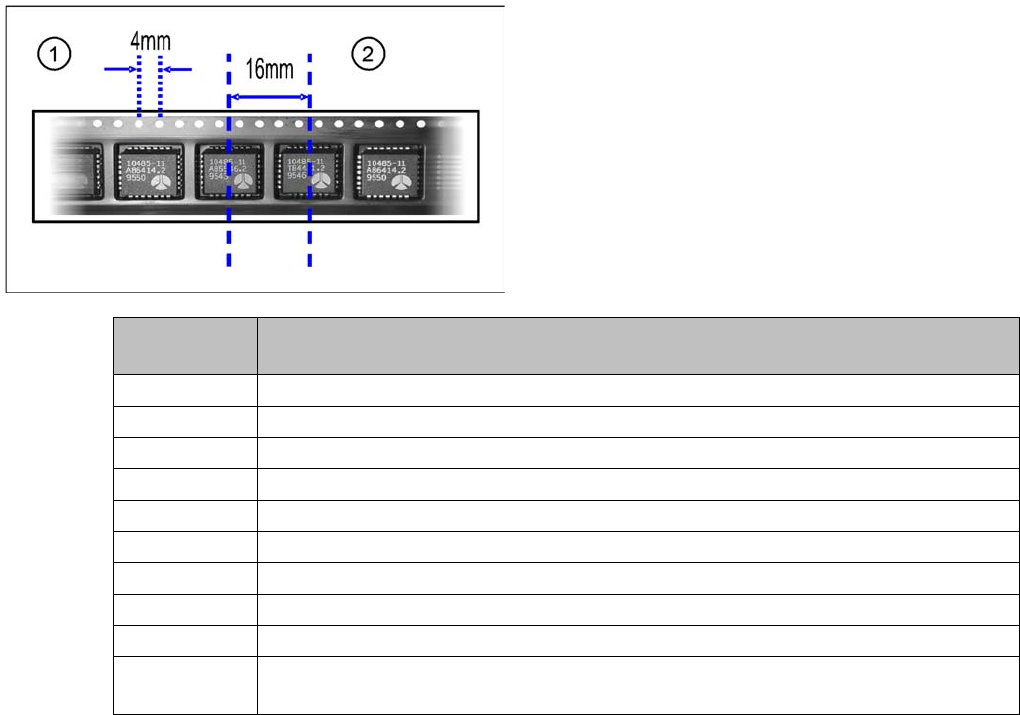
4.3.3 Setting the Pitch
The pitches shown in the table can be set for the different X feeder module types. The pitch corresponds
to the distance between the centers of two adjacent components and must be set according to the size
of the components to be processed. The tape is moved by the set pitch in each step.
Legend
1. Hole distance
2. Pitch
Feeder mod-
ule
Possible pitches
8 mm 1, 2, 4, 8 mm
2x8 mm 1, 2, 4, 8 mm
12 mm 4, 8, 12, 16 mm
16 mm 4, 8, 12, 16, 20 mm
24 mm 4, 8, 12, 16, 20, 24, 28, 32 mm
32 mm 4, 8, 12, 16, 20, 24, 28, 32, 36, 40 mm
44 mm 4, 8, 12, 16, 20, 24, 28, 32, 36, 40, 44. 48, 52 mm
56 mm 4, 8, 12, 16, 20, 24, 28, 32, 36, 40, 44. 48, 52, 56, 60, 64 mm
72 mm 4, 8, 12, 16, 20, 24, 28, 32, 36, 40, 44. 48, 52, 56, 60, 64, 68, 72, 76, 80 mm
88 mm 4, 8, 12, 16, 20, 24, 28, 32, 36, 40, 44. 48, 52, 56, 60, 64, 68, 72, 76, 80, 84, 88, 92,
96 mm
Operating Tape Feeder Modules
Using the Operator Panel Setting the Pitch
72 User Manual X Feeder Modules SIPLACE Family
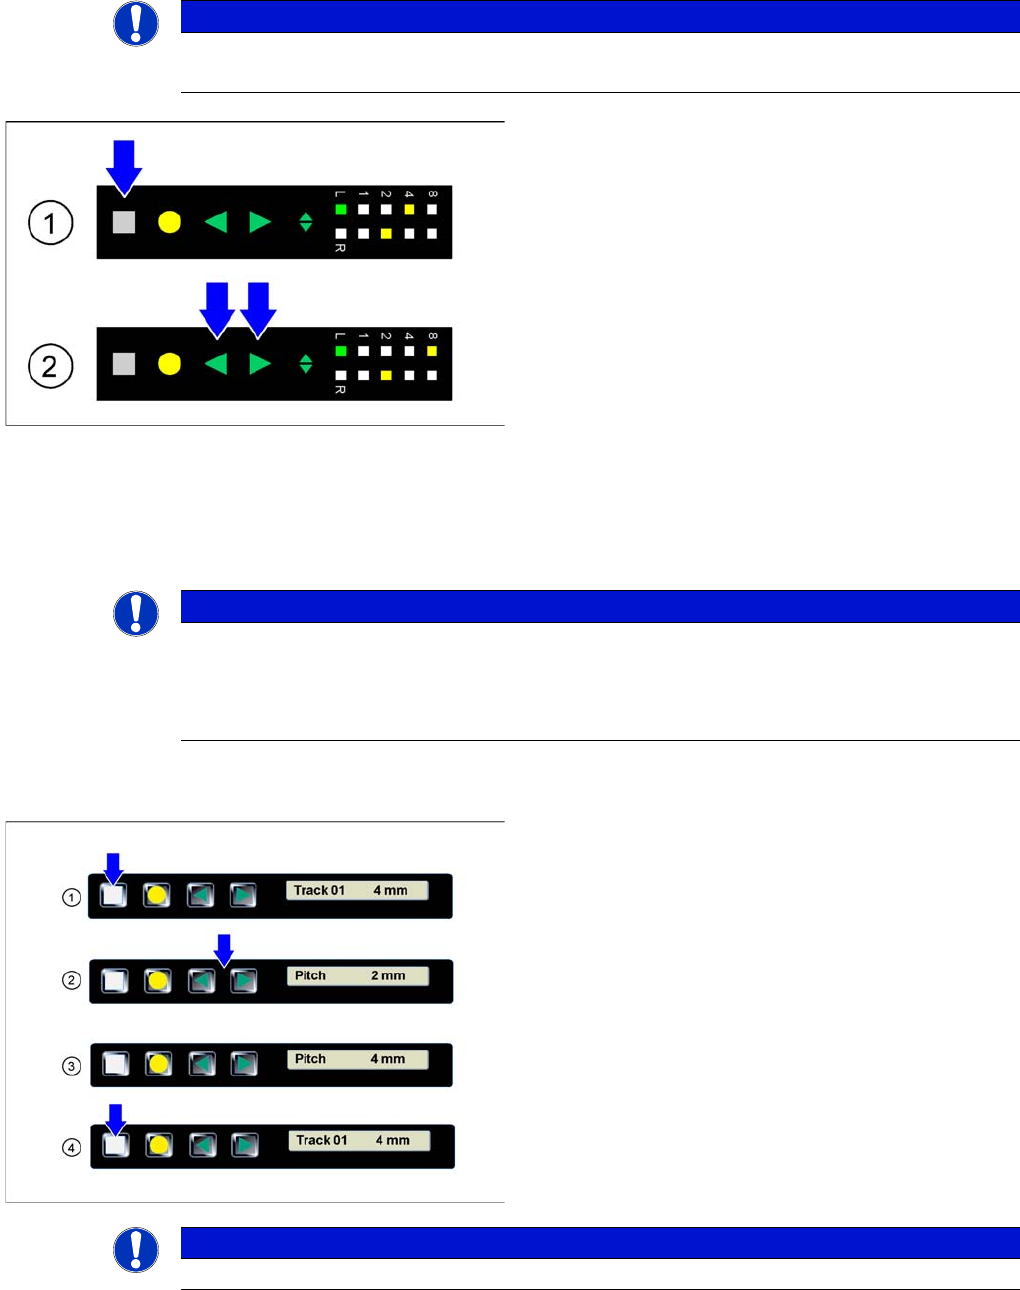
4.3.3.1 Setting the Pitch on 2x8 mm Feeder Modules
On 2x8 mm feeder modules 4 different pitches are available: 1 mm, 2 mm, 4 mm und 8 mm
The currently set pitch is indicated at the operator panel for both tracks by the corresponding LED 1, 2,
4 or 8.
The pitch can be changed as follows:
4.3.3.2 Setting the Pitch on 8 - 88 mm Feeder Modules
NOTICE
Before the adjustment it may be necessary to select the desired track using the Track change
button.
►(1) Initial status: To change the pitch of the selected
track, press the Set button first. This button must be
pressed during the whole adjustment process.
►(2) Changing the pitch: In addition to the Set button
briefly press the Forwards or Backwards button.
After releasing the Forwards or Backwards button,
the pitch display of the selected track changes
accordingly (increases or decreases). As long as the
Set button is pressed, the pitch can be changed
further by briefly re-pressing the Forwards or Back-
wards button.
►Completing the adjustment: If the desired pitch is set,
release the Set button. The changed pitch of the se-
lected track is now saved by the feeder module. If re-
quired, the feeder module will automatically change
the position of the sprocket wheel.
NOTICE
The adjustment is automatically cancelled, if the feeder module receives a request or conveyor
command from the machine or if the Set button is being pressed more than 30 seconds.
In these cases any modification made is cancelled and the previously set pickup position is
retained.
►(1) The display shows the start screen ("Track")
.Press the Set button until the display shows "Pitch."
►(2) Press the Forwards or Backwards button until
the display shows the value for the desired pitch.
►(3) Repeatedly press the Set button to return to the
start screen.
The setting is retained automatically.
NOTICE
The feeder will also return to the start screen, if no button is pressed for 1 minute.