SA_3214_en.pdf - 第12页
12 12 4 Error Messages 4.1 Error Messages of the Printer For detailed information about printer errors (e.g. 'Paper out', 'Ribbon out', etc.) Operator's manual of the printer Error treatment: …
11
1
1
2
2
6
7
3
4
5
3 Operation
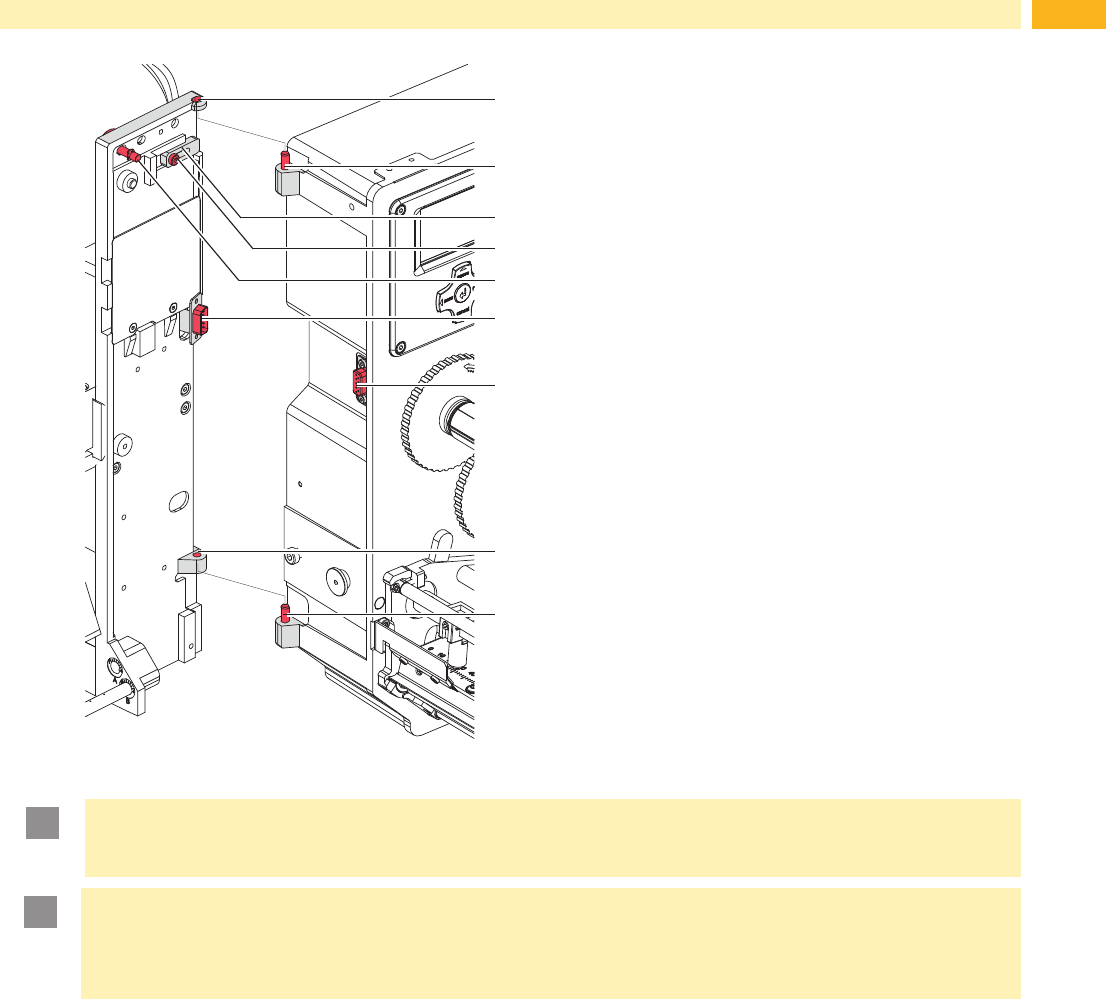
Fig. 7 Mounting applicator to printer
!
Attention!
Initiation,adjustmentsandchangingofpartsistobeperformedbyqualiedservicepersonalonly.
Initiation/Service Manual Applicators
!
Attention!
Disconnect the printer from the power supply before mounting the applicator!
Ensure that the printer is positioned stably and securely.
Connect the compressed air only after mounting the applicator to the printer!
To clean the applicator and printer it is sometimes necessary to turn away or even dismount the applicator from the
printer.
Take care not to adjust the setting screws, throttle valves or other alignment elements. This will enable use of the
applicator directly after cleaning.
Pivot away/dismount the applicator
1. To turn away the applicator loosen thumbscrew (5) and swing the applicator aside.
2. Disconnect SUB-D 15 male connector (6) from the female connector (7) of the printer.
3. Loosen screw (4) and slide the locking plate (3) off.
4. Lift the applicator off the hinges.
Mount the applicator
1. Mount the applicator to the printer via the female hinges (1) to the printer via the male hinges (2).
2. Connect SUB-D 15 male connector (6) to the female connector (7) of the printer.
3. To secure the applicator from slipping out of hinges loosen screw (4) and move the locking plate (3) under the
hinges and tighten screw (4).
4. Swing the applicator to the printer and tighten the thumbscrew (5).

12 12
4 Error Messages
4.1 Error Messages of the Printer
For detailed information about printer errors (e.g. 'Paper out', 'Ribbon out', etc.) Operator's manual of the printer
Error treatment:
Clear the error results
Press the feed key to synchronize the label feed, remove the peeled labels manually
Press the pause key to quit the error state.
After error correction, the printing of the label causing the error will be repeated.
4.2 Error Messages of the Applicator
The following table contains an overview of error messages and their possible causes. It also suggests methods to
resolve the problem:
Error Message Possible Cause
Air pressure ins.
Compressed air is switched off
Pressure to low < 4 bar
Pressure to high > 6 bar
Label not depos.
Label has not been placed onto the product; after the pad has moved back the label is
still on the pad.
Lower position
Pad is not in start position when the printer was switched on.
Pad has not reached the labelling position within 2s after the movement of the pad was
started
Padhasundenedleavingthestartposition.
Process Error
Process of labeling was interrupted via the I/O interface of the printer with the XSTP
signal.
Re. sensor blk.
There has been no change in state at the upper sensor at the cylinder between the start
of the labelling process and the signal from the labelling position sensor.
Vac. plate empty
Label has not been picked up properly by the pad; or label fell off the pad before it could
be placed onto the product.
Upper position
Pad has not reached the starting position within 2s after the pad has left the labelling
position; or pad has left the starting position unauthorized
Table 2 Error messages of the applicator
Error treatment:
Clear the error results
Press the pause key to quit the error state.
i
Note!
In fault check adjustments and settings with help of the Service Manual.
!
Warning!
The pad will immediately be moved in the starting position!
Dangerofcrushinghandsandngersbythemovingpad!
Do not reach into the zone of the moving pad and keep long hair, loose clothes, and jewelry away.
After error correction, the print of the label causing the error cannot be repeated without re-start of the print job.
Except at the error " Vac. plate empty" . In this case, the latest label will print again after quit the error with the
pause key and then press the Enter button
.
Intheapplicationmode"Apply/Print"sendthesignal"Printrstlabel"orpressthebutton to send a printed
label to the pad.
13
5 Licences
5.1 Declaration of Incorporation
cab Produkttechnik
GmbH & Co KG
Wilhelm-Schickard-Str. 14
D-76131 Karlsruhe
Deutschland
Declaration of Incorporation
We declare herewith that the following „partly completed machinery“ as a result of design, construction and the version
put in circulation complies with the essential requirements of the Directive 2006/42/EC on machinery:
Annex I, Article 1.1.2, 1.1.3, 1.1.5, 1.1.6, 1.2.1, 1.3.2, 1.5.2, 1.5.8, 1.6.3, 1.7
In the event of any alteration which has not been approved by us being made to any device as designated below, this
statement shall thereby be made invalid.
Device: Swing Applicator
Type: 3214
Applied EU Regulations and Norms:
Directive 2006/42/EC on machinery
• EN ISO 12100:2010
• EN ISO 13849-1:2008
• EN 60950-1:2006
+A11:2009+A12:2011+A1:2010+A2:2013
Personauthorisedtocompilethetechnicalle: Erwin Fascher
Am Unterwege 18/20
99610 Sömmerda
Signed for, and on behalf of the Manufacturer:
cab Produkttechnik Sömmerda
Gesellschaft für Computer-
und Automationsbausteine mbH
99610 Sömmerda
Sömmerda, 19.06.2017
Erwin Fascher
Managing Director
Theproductmustnotbeputintoserviceuntilthenalmachineryintowhichitistobeincorporatedhasbeendeclaredin
conformity with the provisions of the Directive on machinery
The documents according annex VII part B from the incomplete machinery are created and will commit to state agencies
on request in electronic kinds.