00195044-22_UM_VisionTeachStation_5.x.x_DE_EN.pdf - 第158页
8 Starting the vision teach station Visi on Teach Station 5.x.x User Manual 8.5 Installing the interface cards 05/2019 Edition 66

Vision Teach Station 5.x.x User Manual 8 Starting the vision teach station
05/2019 Edition 8.5 Installing the interface cards
65
8.5 Installing the interface cards
If an interface card has to be replaced, you will then have to install the drivers as follows:
8.5.1 CAN card
When the computer is restarted, Windows indicates that a new hardware component was detec-
ted. Follow the dialog.
If the driver is not automatically detected, follow the instructions in section 8.3.5
, page 63.
8.5.2 Camera interface card
When you install the card, remember to plug in the floppy power supply connector again. When
the computer is restarted, Windows indicates that a new hardware component was detected.
Follow the dialog.
If the driver is not automatically detected, insert the "Software Vision Teach Station" installation
CD and enter the path for the boifcxdrv.inf file manually:
\CameraDriver. 8
Reboot the computer after installing the driver.
8 Starting the vision teach station Vision Teach Station 5.x.x User Manual
8.5 Installing the interface cards 05/2019 Edition
66
Vision Teach Station 5.x.x User Manual 9 Using the vision teach station on the SIPLACE LAN
05/2019 Edition 9.1 Connecting the computer to the SIPLACE LAN
67
9 Using the vision teach station on the SIPLACE
LAN
From vision teach station version 3.51 onwards, the software is able to access the databases on
other SIPLACE Pro computers. For this to be possible, the computers concerned must be running
SIPLACE Pro 5.0 SP1 or later.
9.1 Connecting the computer to the SIPLACE LAN
Connect the LAN connection on the network card (see Fig. 4.3 - 2, page 27) using a switch on the
SIPLACE LAN. If the computer does not have a separate network card, please read section 9.4
,
page 69
.
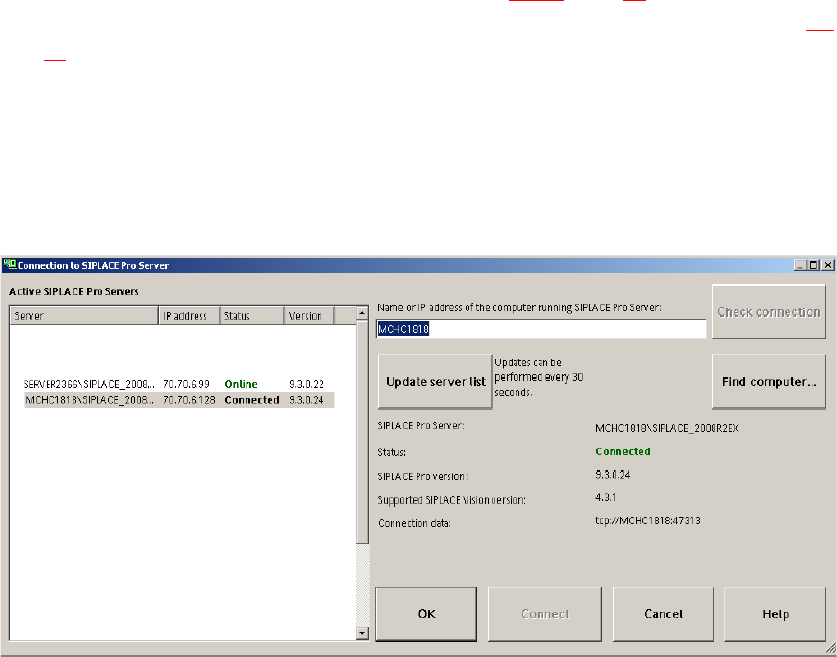
9.2 Accessing other SIPLACE Pro computers from the VTS computer
From the "SIPLACE Pro SIPLACE Pro Connection …" menu start the following dialog:
Fig. 9.2 - 1 Dialog: SIPLACE Pro Connection data