00195044-22_UM_VisionTeachStation_5.x.x_DE_EN.pdf - 第160页
9 Using the vision teach station on the SIPLAC E LAN Vision Teach Station 5.x.x User Manual 9.3 Running multiple VTSs on a SIPLACE LAN 05/2019 Edition 68 The current connection data is displayed: T ab. 9.2 - 1 Current co…
Vision Teach Station 5.x.x User Manual 9 Using the vision teach station on the SIPLACE LAN
05/2019 Edition 9.1 Connecting the computer to the SIPLACE LAN
67
9 Using the vision teach station on the SIPLACE
LAN
From vision teach station version 3.51 onwards, the software is able to access the databases on
other SIPLACE Pro computers. For this to be possible, the computers concerned must be running
SIPLACE Pro 5.0 SP1 or later.
9.1 Connecting the computer to the SIPLACE LAN
Connect the LAN connection on the network card (see Fig. 4.3 - 2, page 27) using a switch on the
SIPLACE LAN. If the computer does not have a separate network card, please read section 9.4
,
page 69
.
9.2 Accessing other SIPLACE Pro computers from the VTS computer
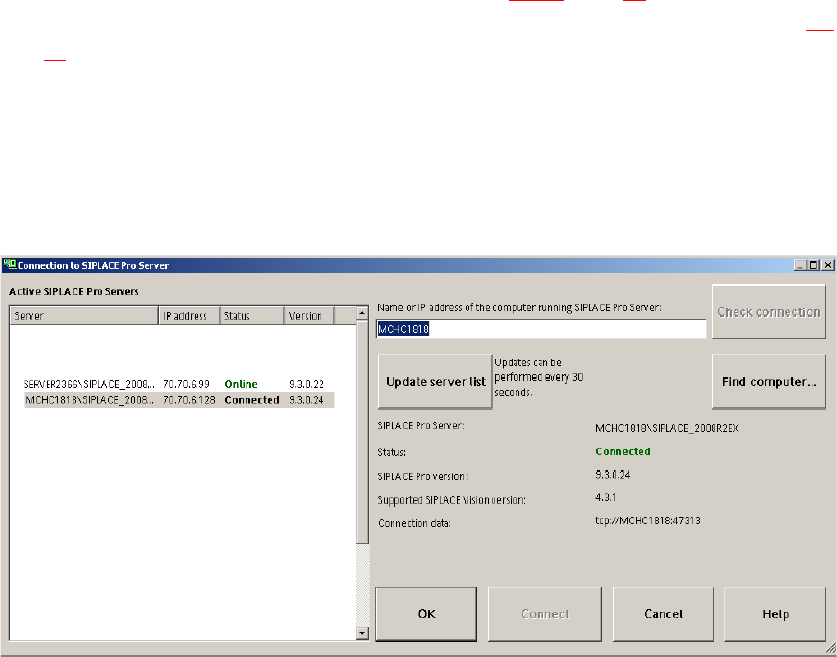
From the "SIPLACE Pro SIPLACE Pro Connection …" menu start the following dialog:
Fig. 9.2 - 1 Dialog: SIPLACE Pro Connection data

9 Using the vision teach station on the SIPLACE LAN Vision Teach Station 5.x.x User Manual
9.3 Running multiple VTSs on a SIPLACE LAN 05/2019 Edition
68
The current connection data is displayed:
Tab. 9.2 - 1 Current connection data
9
To set a new SIPLACE Pro server, either enter the IP address or the computer name in the input
box or select a server from the server list.
Via the "Update server list" button a broadcast is sent in the local network. All servers that are
online respond to it and the server list gets updated.
If you click on the "Check connection" button a check is performed, whether it is possible to
connect to the specified computer.
If you click on the "Connect" button, an attempt is made to establish a connection. Once you have
successfully established a connection, the data is displayed.
If an error occurs while the connection is being established, it is signaled with a dialog. Click the
"Find Computer..." button to display a Windows standard dialog in which you can look for com-
puters on the network.
Click on the "OK" button to accept the currently selected connection. If you do not want to change
the SIPLACE Pro server, click the "Cancel" button.
9.3 Running multiple VTSs on a SIPLACE LAN
When it is supplied, a VTS with software version 3.51/ SIPLACE Pro 5.0 SP1 has the SIPLACE
LAN network configuration shown in line 1 of table 9.3 - 2
.
Tab. 9.3 - 2 Network parameters for further vision teach stations on a SIPLACE LAN
SIPLACE Pro server: Name of the current SIPLACE Pro server
SIPLACE Pro version: Version of the current SIPLACE Pro server
SIPLACE Vision version:
(Highest) SIPLACE Vision version that the SIPLACE Pro server supports
with its package form data.
Connection data: Connection data for the current SIPLACE Pro server
IP address
Workgroup
Name
Host name
Default
Gateway
Subnet
Mask
SN no. or
comment
172.22.172.187 SIPLACE PLK1395A empty 255.255.0.0 VTS1
172.22.172.186 SIPLACE PLK1396A empty 255.255.0.0 VTS2
172.22.172.185 SIPLACE PLK1397A empty 255.255.0.0 VTS3
172.22.172.184 SIPLACE PLK1398A empty 255.255.0.0 VTS4
172.22.172.183 SIPLACE PLK1399A empty 255.255.0.0 VTS5
Vision Teach Station 5.x.x User Manual 9 Using the vision teach station on the SIPLACE LAN
05/2019 Edition 9.4 Handling computers without an additional network card
69
If you want to run two or more VTSs on a SIPLACE LAN, you will have to assign a separate IP
address and computer (host) name to each further VTS. To do this, take the data from table 9.3 -
2. As you have changed the host name, you will have to reinstall the computer (otherwise the
SIPLACE Pro installation will no longer start on a separate computer). Follow the description in
section 7.3
, page 59.
If you are using the old range of numbers (139.10.x.x) for the SIPLACE LAN, please ask
SIPLACE Service to assign an IP address.
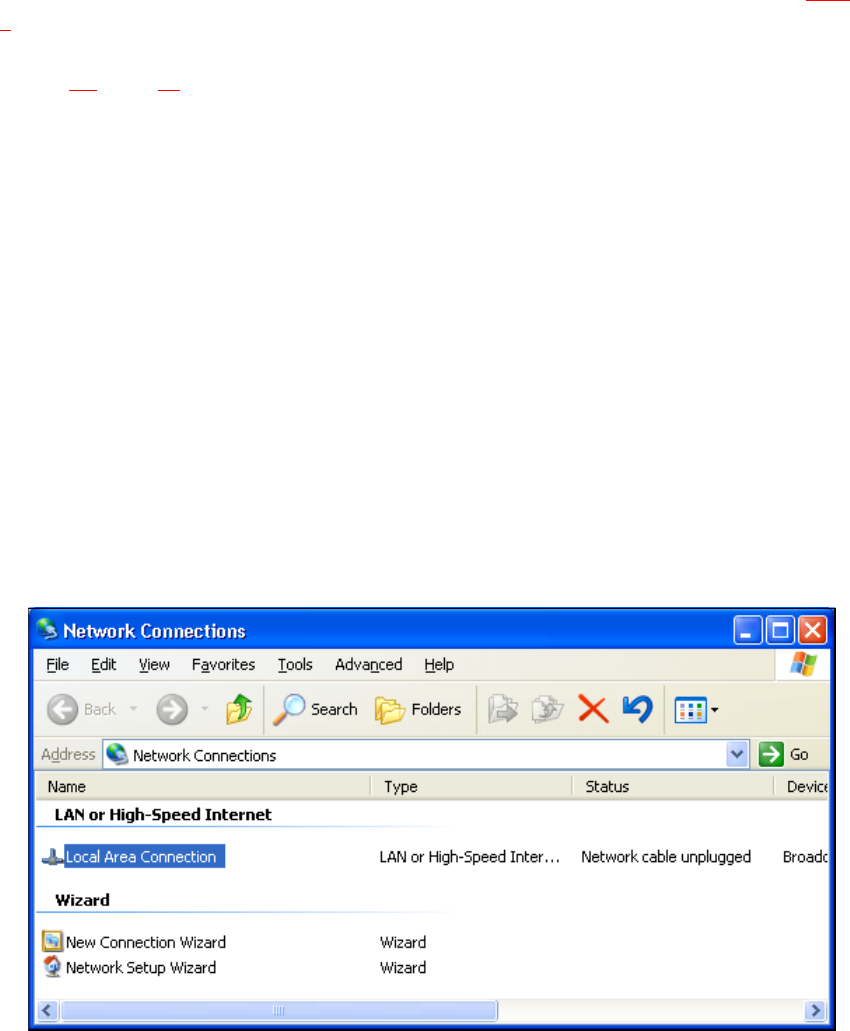
9.4 Handling computers without an additional network card
A SIPLACE Pro computer has two network connections as standard. The onboard connection
allows the user to connect the computer to his company network; the network card is then used
to connect to the SIPLACE LAN.
With the first series of the vision teach station, computers were supplied without a network card.
If you have such a computer, configure the onboard network connection for use on the SIPLACE
LAN.
Follow these steps:
Open the "Network Connections" dialog (Start menu Settings Network Connections).
Right-click to select the "Local Area Connection" entry and click "Properties".
Fig. 9.4 - 2 Entry for the onboard network card
9
Select the "Internet Protocol (TCP/IP)" entry from the Properties dialog and click the
"Properties" button.