00197728-12_IM_SE3.11_EN.pdf - 第36页
3 Installing SIPLACE Explorer Installation and Configuration Gui de SIPLACE Explorer 3.5 Microsoft SQL Server Configuration Edition 11/2020 EN 36 3 Fig. 3 - 14 Microsoft SQL Server Properties Select Processors . Enab…

Installation and Configuration Guide SIPLACE Explorer 3 Installing SIPLACE Explorer
Edition 11/2020 EN 3.5 Microsoft SQL Server Configuration
35
These additional applications and tools can also be started via the Programs SIPLACE
Explorer menu in Windows. 3
The following options are available: 3
– Archive Browser
–Console
– Documentation
– Error Reporting
– Factory Configuration Utility
– Line Configuration
– Modify-Uninstall
– Performance Analyzer
– SE Manager
– SE Security Manager
SIPLACE Explorer Factory Configuration Utility
Start the Factory Configuration Utility via the Programs SIPLACE Explorer Factory
Configuration Utility menu in Windows. 3
Or click on the Factory Configuration Utility icon on your desktop.
3.5 Microsoft SQL Server Configuration
You can configure the system database with the Line Configuration. See “Step 5 - Configure
System Database” on page 49. 3
If you want to configure the maintenance of the system database it is required to configure the
Microsoft SQL Server: 3
Start Microsoft SQL Server Management Studio.
Open the Server Properties dialog box. Select the server instance which contains the
SIPLACE Explorer system database. Select Properties from the context menu. The Server
Properties dialog box will open:
3 Installing SIPLACE Explorer Installation and Configuration Guide SIPLACE Explorer
3.5 Microsoft SQL Server Configuration Edition 11/2020 EN
36
3
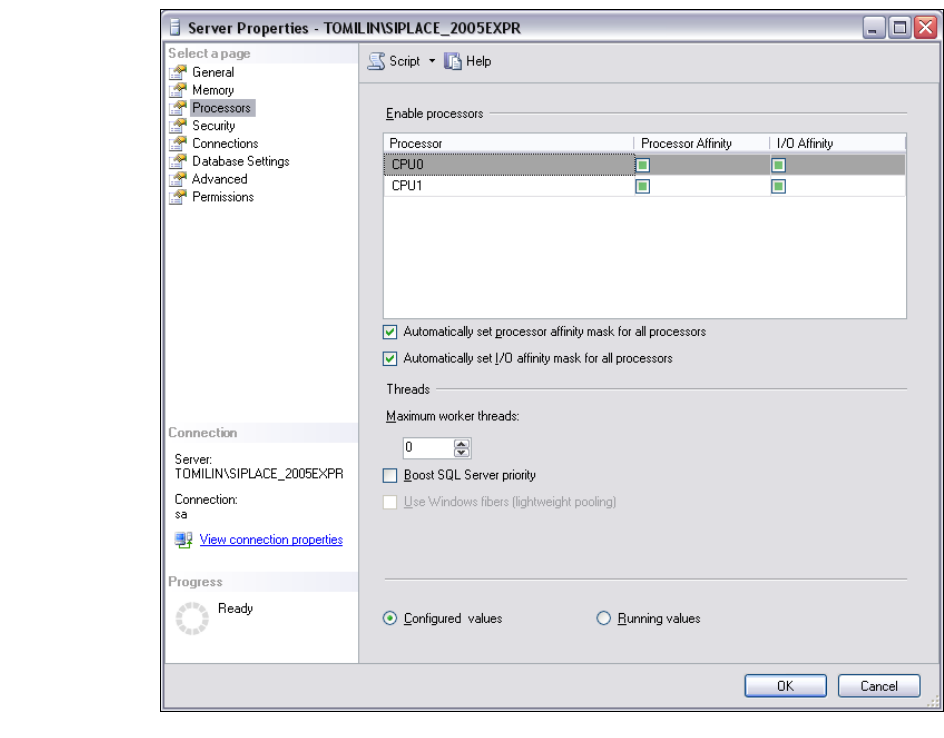
Fig. 3 - 14 Microsoft SQL Server Properties
Select Processors.
Enable the following check boxes:
– Automatically set processor affinity mask for all processors
– Automatically set I/O affinity mask for all processors
Confirm with OK.
Start the Microsoft SQL Server again.

Installation and Configuration Guide SIPLACE Explorer 3 Installing SIPLACE Explorer
Edition 11/2020 EN 3.6 Port Configuration after Changing Tomcat Port Number
37
3.6 Port Configuration after Changing Tomcat Port Number
NOTE
By default, Tomcat is installed on port 8080. This means that your users will access your website
as follows: http://yourServerName:8080/yourWebsite. 3
The Tomcat port number needs to be changed (as described below) in the following cases: 3
– When the port is changed to generate a website e.g. via line configuration.
– If the default port number 8080 is already otherwise occupied and you do not want to
additionally use it for this purpose (access to the websites).
To change the port number, find the following lines in the file
<Tomcat-location>\conf\server.xml
Change the port number and change 8080 to your choice of port number as shown below:
<!-- Define a non-SSL Coyote HTTP/1.1 connector on the port specified 3
during installation --> 3
<Connector port="8080" maxThreads="150" minSpareThreads="25" maxSpa-
reThreads="75" enableLookups="false" redirectPort="8443" accept-
Count="100" debug="0" connectionTimeout="20000"
disableUploadTimeout="true" /> 3
3
Change the specified port number 8080 (Connector port="8080") to the required port
number (Connector port="YourPort"). For further information about the port number,
please contact your system administrator.
To make Tomcat your default web server, set the port number to 8080.
NOTE
The port number specified in this xml file needs to be added to the URL address each time you
generate a website: http://yourServerName:yourPort/yourWebsite. 3