TS5622VU-DVD.pdf - 第4页
4 2. UNPACKING AND INSPECTION Carefully unpack the valve and examin e the items contain ed in the carton. These will include: • Valve Assembly • User Guide • Valve Air Hose Inspect the unit for any damaged which may have…
3
1. SPECIFICATIONS
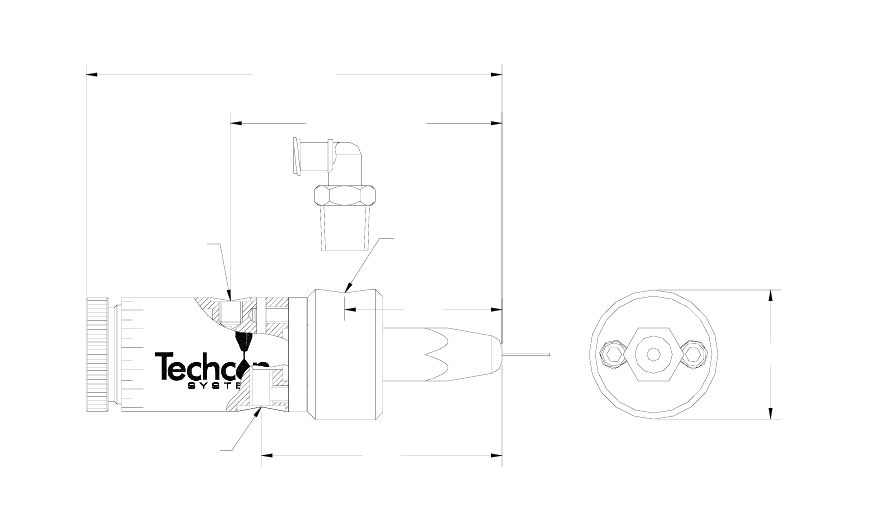
Size: 3.45” (88mm) length X 1.06”(27mm) diameter
Weight: 0.268 lb (120 g)
Fluid inlet port: 1/8 NPT female
Fluid outlet port: Luer lock connection
Air inlet port: 10-32 UNF
Mounting port: 10-32 UNF
Maximum fluid pressure: 70 psi (4.8 bars)
Operating air pressure range: 70 – 90 psi (4.8 – 6.2 bars)
Wetted parts: Ultra High Molecular Weight Polyethylene and 303 Stainless steel
Operating frequency: exceeds 500 cycles/min.
Flow rate at 70 psi (water) 3000 ml/min.
Material viscosity range: Up to 50,000 Cps
1.29"
3.45"
(87.6mm)
(32.8mm)
Ø1.06" (26.9mm)
1.98"
(50.3mm)
1/8 NPT PORT
(FLUID INLET)
10-32 PORT
(AIR INLET)
10-32 PORT
(MOUNTING HOLE)
2.23" (56.6mm)
Figure 1.0
4
2. UNPACKING AND INSPECTION
Carefully unpack the valve and examine the items contained in the carton.
These will include:
• Valve Assembly
• User Guide
• Valve Air Hose
Inspect the unit for any damaged which may have occurred in transit. If such damage has occurred,
notify the carrier at once.
Claim for damage must be made by the consignee to the carrier, and should be reported to the
manufacturer.
3. DESCRIPTION
The TS5622VU-DVD Diaphragm valve is designed to dispense low to medium viscosity fluids. An
internal spring return makes the valve fully adaptable for use with any time/pressure controllers. A short
opening stroke provides extremely fast, positive shut-off. An external stroke control adjustment makes
it easy to fine tune shot sizes. The valve compact design allows for mounting flexibility and easy
integration into automated applications.
4. THEORY OF OPERATION
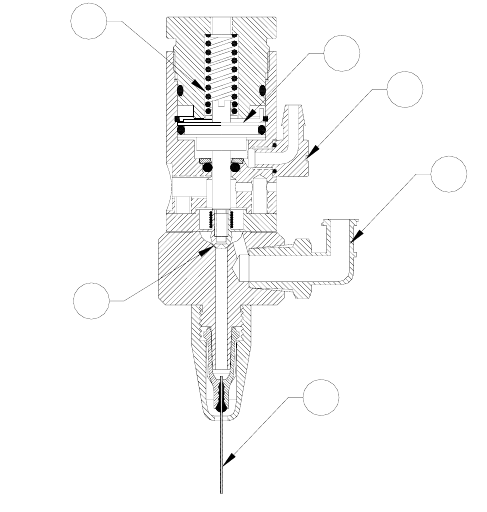
The TS5622VU-DVD is a normally closed, adjustable stroke valve. Input air pressure of 70-90 psi (4.8
to 6.2 bars) through port (1) drives the piston assembly (2) back, opening the material path, allow fluid
flow from the material inlet (4) to the dispense needle (5).
Relieving the input air pressure allows the piston return spring (6) to close the diaphragm, ensuring rapid
“fail-safe” shut-off of fluid flow.
2
3
5
6
4
1
Figure 3.0
5
5. SET UP INSTRUCTIONS
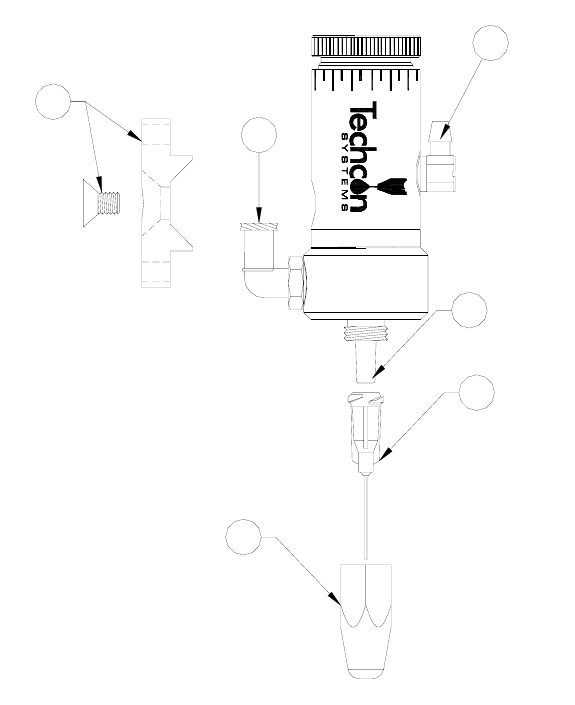
Refer to figure 4.0
1. Install the bracket (1) to the valve if needed.
2. Connect the fluid reservoir feed tube to the valve inlet port (2).
3. Connect the one end of the valve airline to the air inlet port (3) and the other end to the valve
controller or other pneumatic device that is used to control the valve.
4. Connect appropriate dispensing tip (5) to the fluid outlet port (4) then secure it with the needle
cap (6).
5. Set the valve controller pressure at 70 psi (4.8 bars)
6. Set the fluid reservoir pressure. Do not exceed 70 psi (4.8 bars)
7. Make sure all connections are tight
8. Place container under the valve outlet and activate the valve until the fluid flows steady.
The amount of fluid that flows through the valve is determined by:
• Valve open time
• Fluid reservoir pressure
• Dispensing tip size
1
2
3
4
5
6
Figure 4.0