TS5622VU-DVD.pdf - 第7页
7 7. TROUBLE SHOOTING PROBLEM POSSIBLE CAUSE CORRECTION Fluid pressure too low Increase fluid pressure Operating pressure too low Increase air pressure to 70 psi (4.8 bars) Dispense tip clogged Replaced tip Fluid cured i…
6
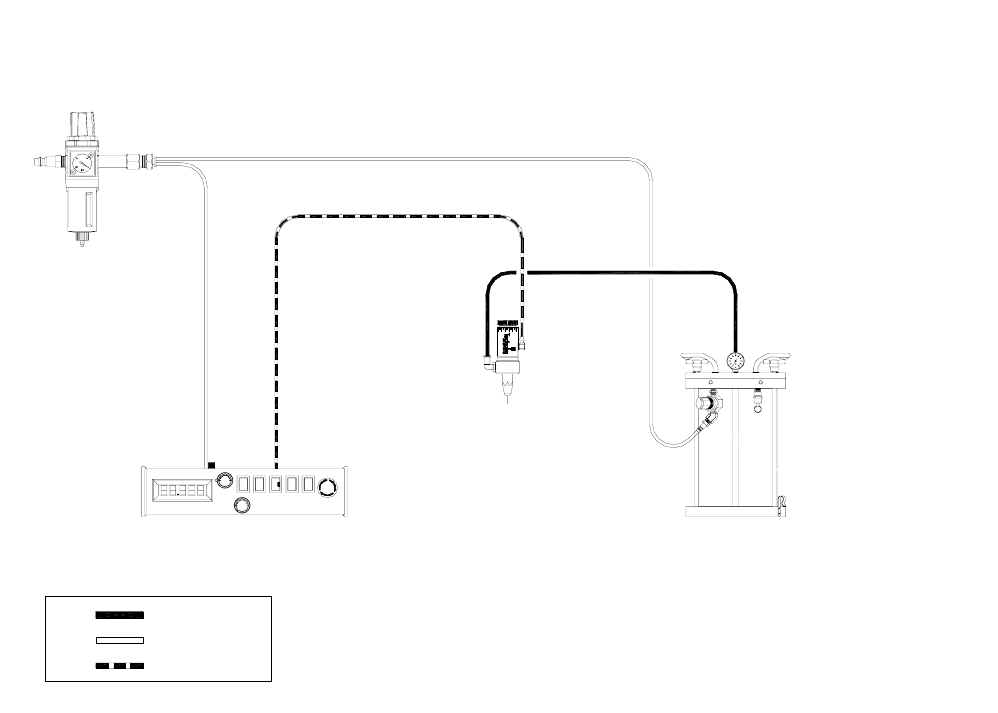
6. TYPICAL SYSTEM SET UP
TECHCON SYSTEMS TS5130
CONTROLLER OR EQUIVALENT
FLUID FEED SYSTEM
TS1258 OR EQUIVALENT
TS5622VU-DVD
DIAPHRAGM VALVE
PLANT AIR MUST BE PROPERLY
FILTERED AND DRY. IF NOT, SPECIFY
A 5-MICRON FILTER REGULATOR.
MATERIAL
CONSTANT AIR
PULSED AIR
Figure 5.0

7
7. TROUBLE SHOOTING
PROBLEM POSSIBLE CAUSE CORRECTION
Fluid pressure too low Increase fluid pressure
Operating pressure too low Increase air pressure to 70 psi (4.8 bars)
Dispense tip clogged Replaced tip
Fluid cured in valve chamber Clean valve thoroughly
No Fluid Flow
The stroke adjustment is fully
closed
Open stroke adjustment
counterclockwise. One full turn max.
Fluid pressure fluctuating
Make sure fluid pressure is constant
Valve operating pressure is too
low
Increased valve pressure to 70 psi (4.8
bars)
Valve open time is not consistent
Check to make sure the valve controller
is providing a consistent output
Inconsistent
Fluid Flow
Air trapped in fluid housing Purge valve
Fluid drools after the valve
closes, eventually stopping
Air trapped in fluid housing Purge valve
Worn diaphragm Replace diaphragm
Material build up in fluid
housing
Clean fluid housing
Fluid pressure exceeds 70 psi
(4.8 bars)
Lower fluid pressure
Steady Drip
Valve re-assembled incorrectly
after cleaning
Refer to Maintenance section
Fluid leaks between
diaphragm and fluid housing
Mounting screws loose Tighten screws
Fluid leaks out of bleed hole Diaphragm ruptured Replace diaphragm

8
8. MAINTENANCE AND CLEANING
Normally, purging the valve with appropriate flush material or solvent after use is sufficient for
cleaning. However some material may cause a buildup in the valve chamber, in this case periodic and
thorough cleaning will be required.
8.1 CLEANING
Refer to figure 6.0
1. Release fluid pressure
2. Disconnect fluid line
3. Disconnect valve air line
4. Remove needle retaining cap (12) then remove the dispense needle.
5. Remove the two socket head cap screws (7) from the fluid housing (6)
6. Pull the fluid housing away from the air cylinder assembly (10)
7. Clean Diaphragm (5) and fluid housing (6)
8. Reinstall the fluid housing (6).
9. Align the fluid housing mounting holes with diaphragm and air cylinder holes.
10. Reinsert the two socket head cap screws (1) and hand tightens them only. Do not exceed 14 in lb
(1.58 N-m) torque.
CAUTION: Make sure the fluid pressure is released before disassemble the valve.
NOTE: Avoid using sharp probes for cleaning. Any nicks or scratches on the
diaphragm or the sealing area of the fluid housing may cause leakage.