Nordson_EFD_RV_Series_Operating_Manual.pdf - 第46页
RV Series Automated Dispensing Systems 46 www.nordsonefd.com info@nordsonefd.com +1-401-431-7000 Sales and service of Nordson EFD dispensing systems are available worldwide. Setting the Optional Tip Aligner Selection IMP…
RV Series Automated Dispensing Systems
45www.nordsonefd.com info@nordsonefd.com +1-401-431-7000 Sales and service of Nordson EFD dispensing systems are available worldwide.
Verifying the Robot Model, Tip Detection, and Set Z to Focus Selections
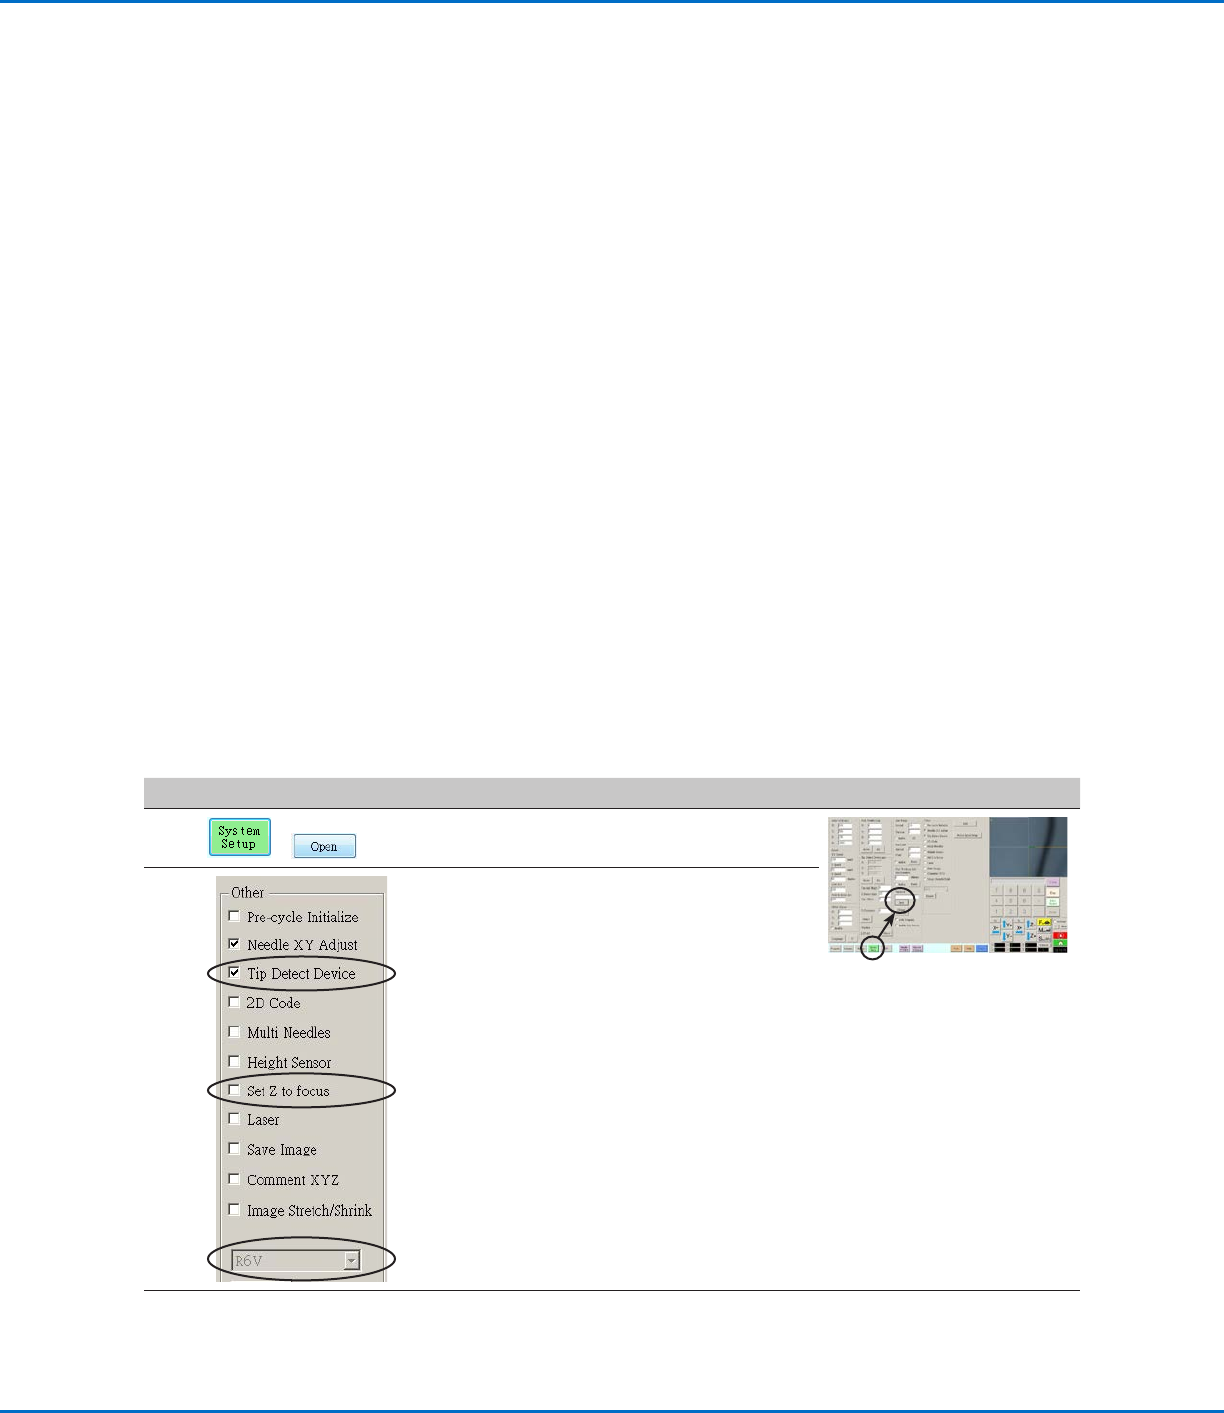
#
Click Step Reference Image
1
>
• Click SYSTEM SETUP > OPEN.
2 • Under Other, verify the following:
- If your system includes a tip detector or
tip aligner, Tip Detect Device is checked.
- Set Z to Focus is unchecked (not
checked).
- The correct robot model is shown. If
the robot model is not correct, go to
“Changing the Robot Model Selection”
on page57 to select the correct model.
Return here to continue.
• If you made changes, close and reopen the
DispenseMotion software for the changes to
take effect.
3
• Continue to “Setting the Optional Tip Aligner
Selection” on page46.
Setting Up and Calibrating the System (Required)
Before creating any programs or using the automatic offset update capabilities of the system, you must properly set
up and calibrate the system. Correct system setup and calibration are critical for proper system operation.
The Robot Initial Setup wizard guides you through the complete setup and calibration process. This process must
be performed at initial startup and also after any change to the system.
Examples of system changes include the following:
• Any time a component installed on the Zaxis (such as the syringe barrel or camera) is moved.
• Any time a dispensing tip or nozzle is changed.
Setup and calibration includes the following tasks:
• Verifying the robot model, tip detection, and Set Z to Focus selections
• Setting the optional tip aligner selection (if applicable)
• Setting up the tip detector* or tip alignment device
• Verifying the 4-axis selection
• Opening the robot initial setup wizard and setting the angle of rotation
• Setting up tip detection and tool centering calibration
• Setting the camera-to-tip offset
• Setting a mark
• Setting the camera scale*
• Setting the tip-to-workpiece offset*
• Testing the system setup and calibration
*All required setup and calibration tasks are guided by the Robot Initial Setup wizard. However, the tasks shown above with
an asterisk (*) can be performed individually as needed. Refer to “AppendixB, Non-Wizard Setup Procedures” on page124
for the procedures.
NOTE: Refer to “About Offsets” on page23 for an explanation of offsets.
RV Series Automated Dispensing Systems
46 www.nordsonefd.com info@nordsonefd.com +1-401-431-7000 Sales and service of Nordson EFD dispensing systems are available worldwide.
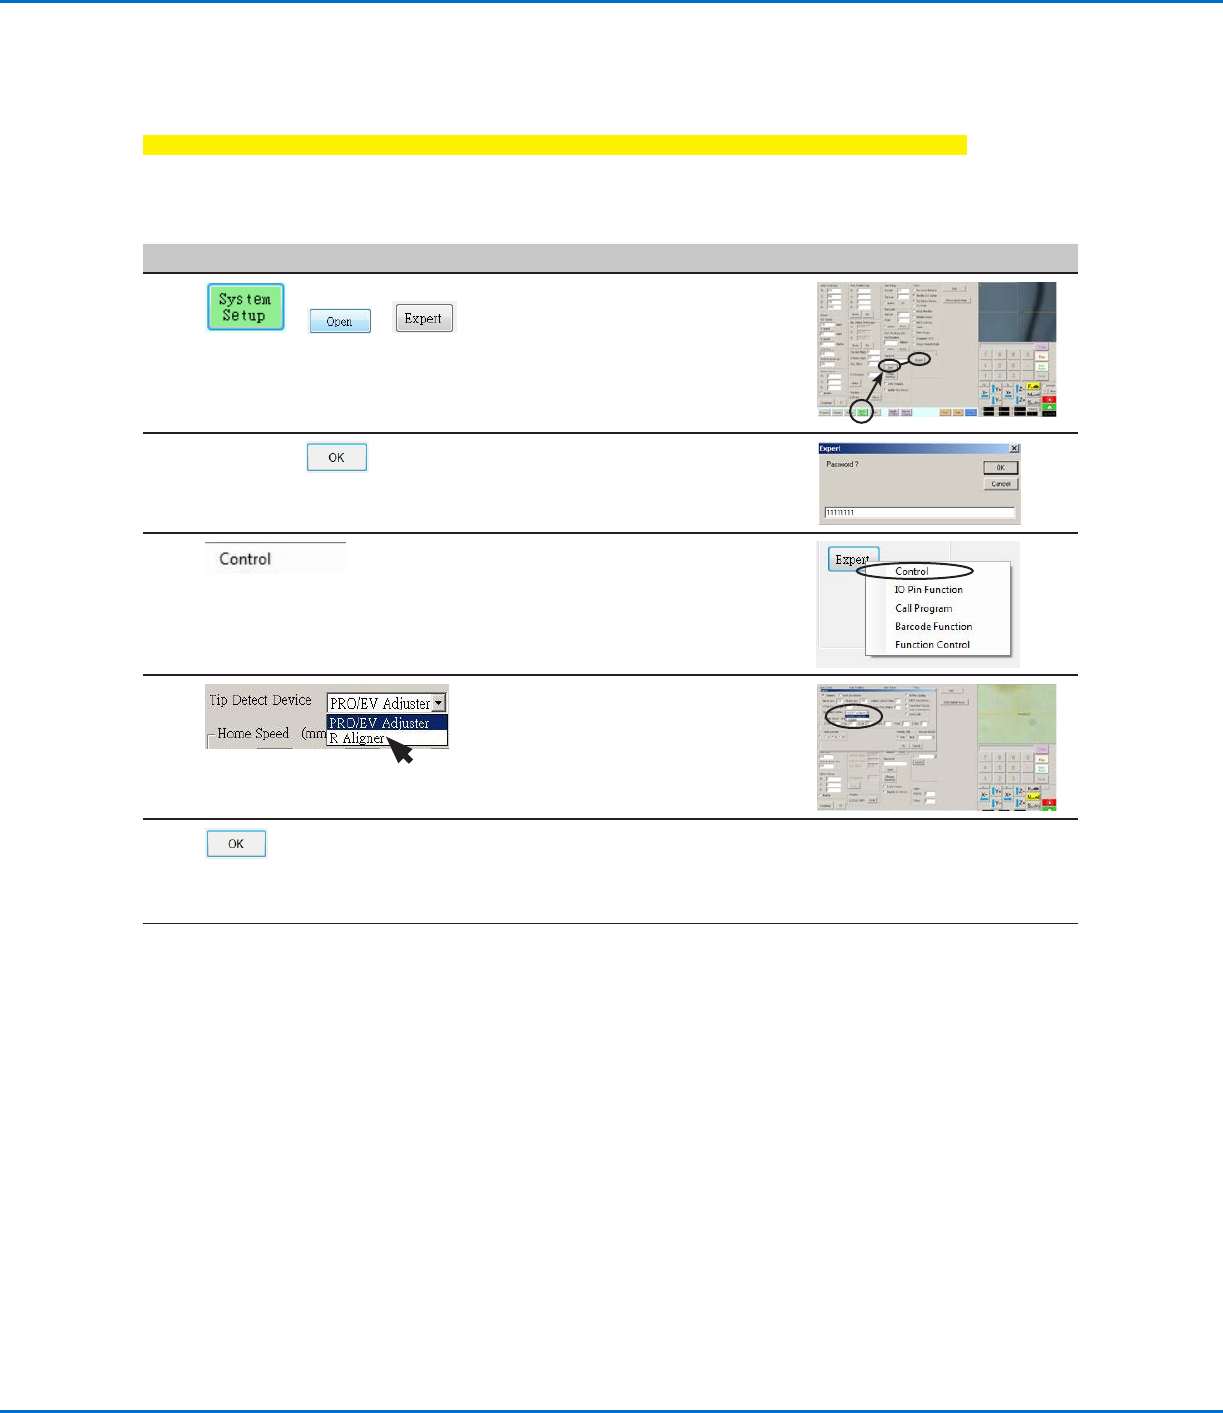
Setting the Optional Tip Aligner Selection
IMPORTANT: If your system does not include this optional tip aligner, skip to the next procedure.
If you installed the optional tip aligner, follow this procedure to specify the kit in the Expert window. A tip aligner
allows tip-to-workpiece offset setup, or tip height calibration, without the need for the tip to physically touch the
sensor. Refer to “Accessories” on page91 for the optional tip aligner part number.
# Click Step Reference Image
1
> >
• Click SYSTEM SETUP > OPEN >
EXPERT.
2
11111111 >
• Enter 11111111, then click OK.
3 • Click CONTROL.
4 • In the Expert window, select
RALIGNER.
• Click OK to save the setting, then
click OK again to confirm.
5 • Click OK to save the setting.
The system automatically exits the
software to allow the change to take
effect.
6
• Continue to “Verifying the 4-Axis
Selection” on page47.
Setting Up and Calibrating the System (Required) (continued)
RV Series Automated Dispensing Systems
47www.nordsonefd.com info@nordsonefd.com +1-401-431-7000 Sales and service of Nordson EFD dispensing systems are available worldwide.
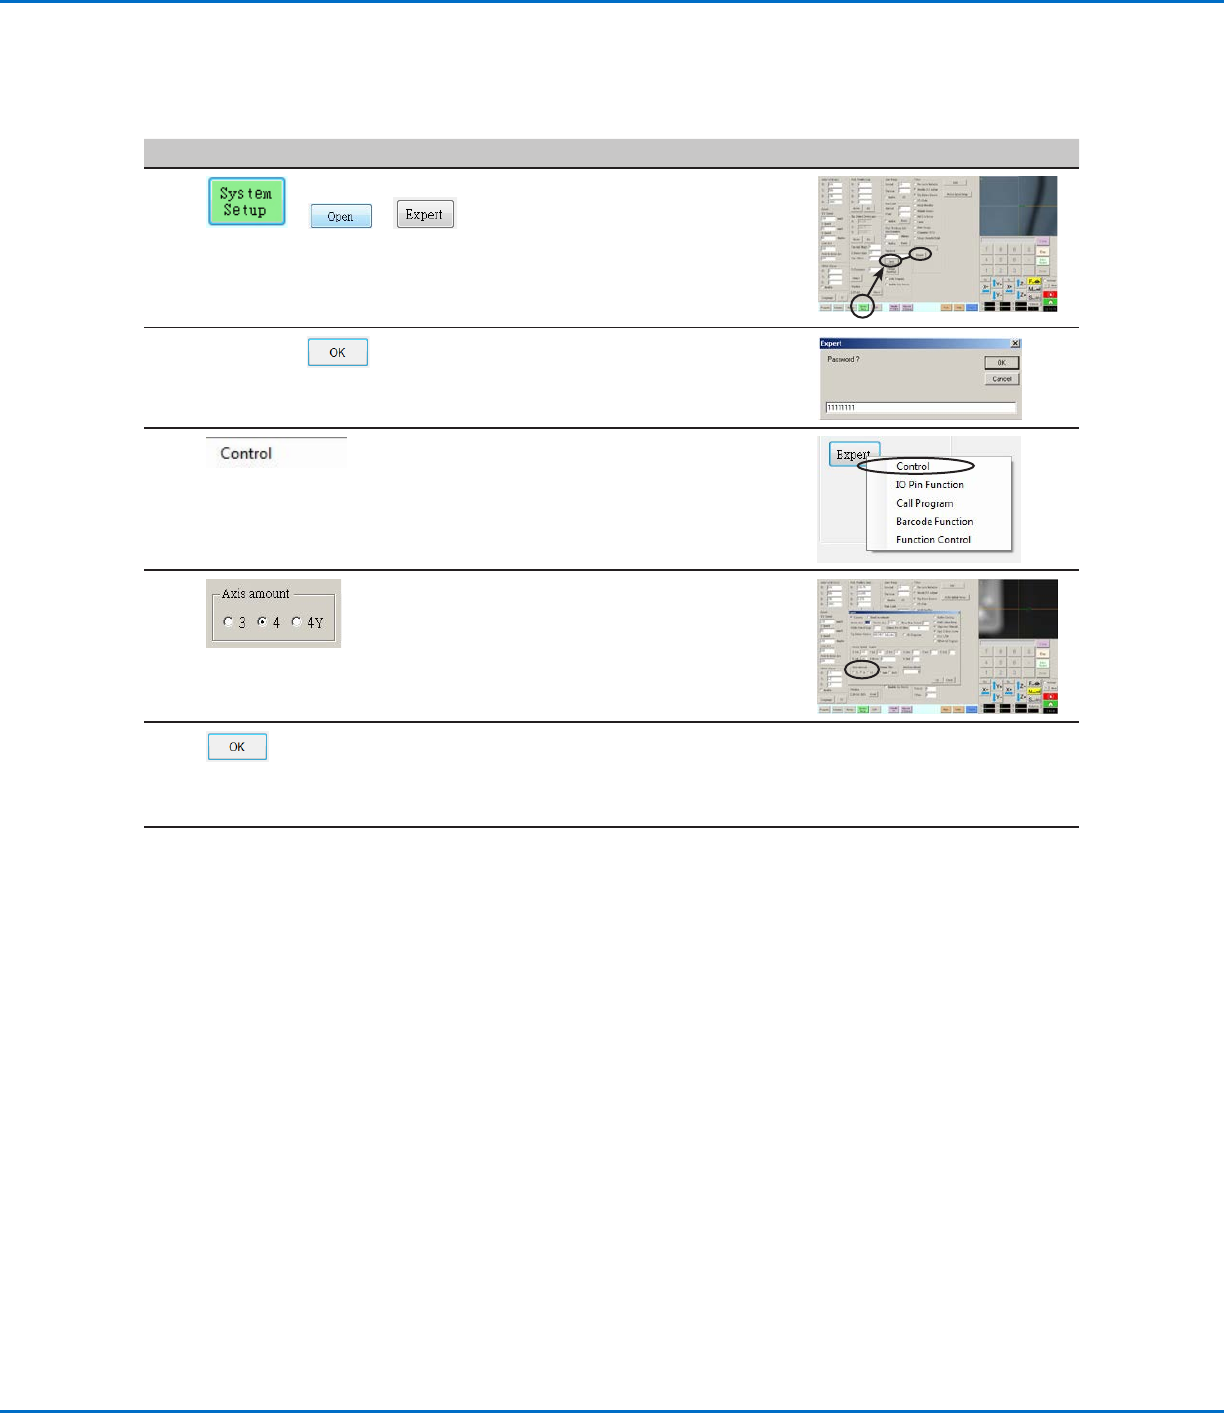
Verifying the 4-Axis Selection
# Click Step Reference Image
1
> >
• Click SYSTEM SETUP > OPEN >
EXPERT.
2
11111111 >
• Enter 11111111, then click OK.
3 • Click CONTROL.
4
• In the Expert window, select 4 under
AXIS AMOUNT.
5 • Click OK to save the setting.
The system automatically exits the
software to allow the change to take
effect.
6
• Continue to “Setting Up the System
Using the Robot Initial Setup Wizard”
on page48.
Setting Up and Calibrating the System (Required) (continued)