Nordson_EFD_RV_Series_Operating_Manual.pdf - 第88页
RV Series Automated Dispensing Systems 88 www.nordsonefd.com info@nordsonefd.com +1-401-431-7000 Sales and service of Nordson EFD dispensing systems are available worldwide. T o Use the PicoT ouch Parameter Update Comman…
RV Series Automated Dispensing Systems
87www.nordsonefd.com info@nordsonefd.com +1-401-431-7000 Sales and service of Nordson EFD dispensing systems are available worldwide.
PICO Toµch Controller settings editable through the DispenseMotion software
To Edit an Existing PICO File
# Click Step Reference Image
1
>
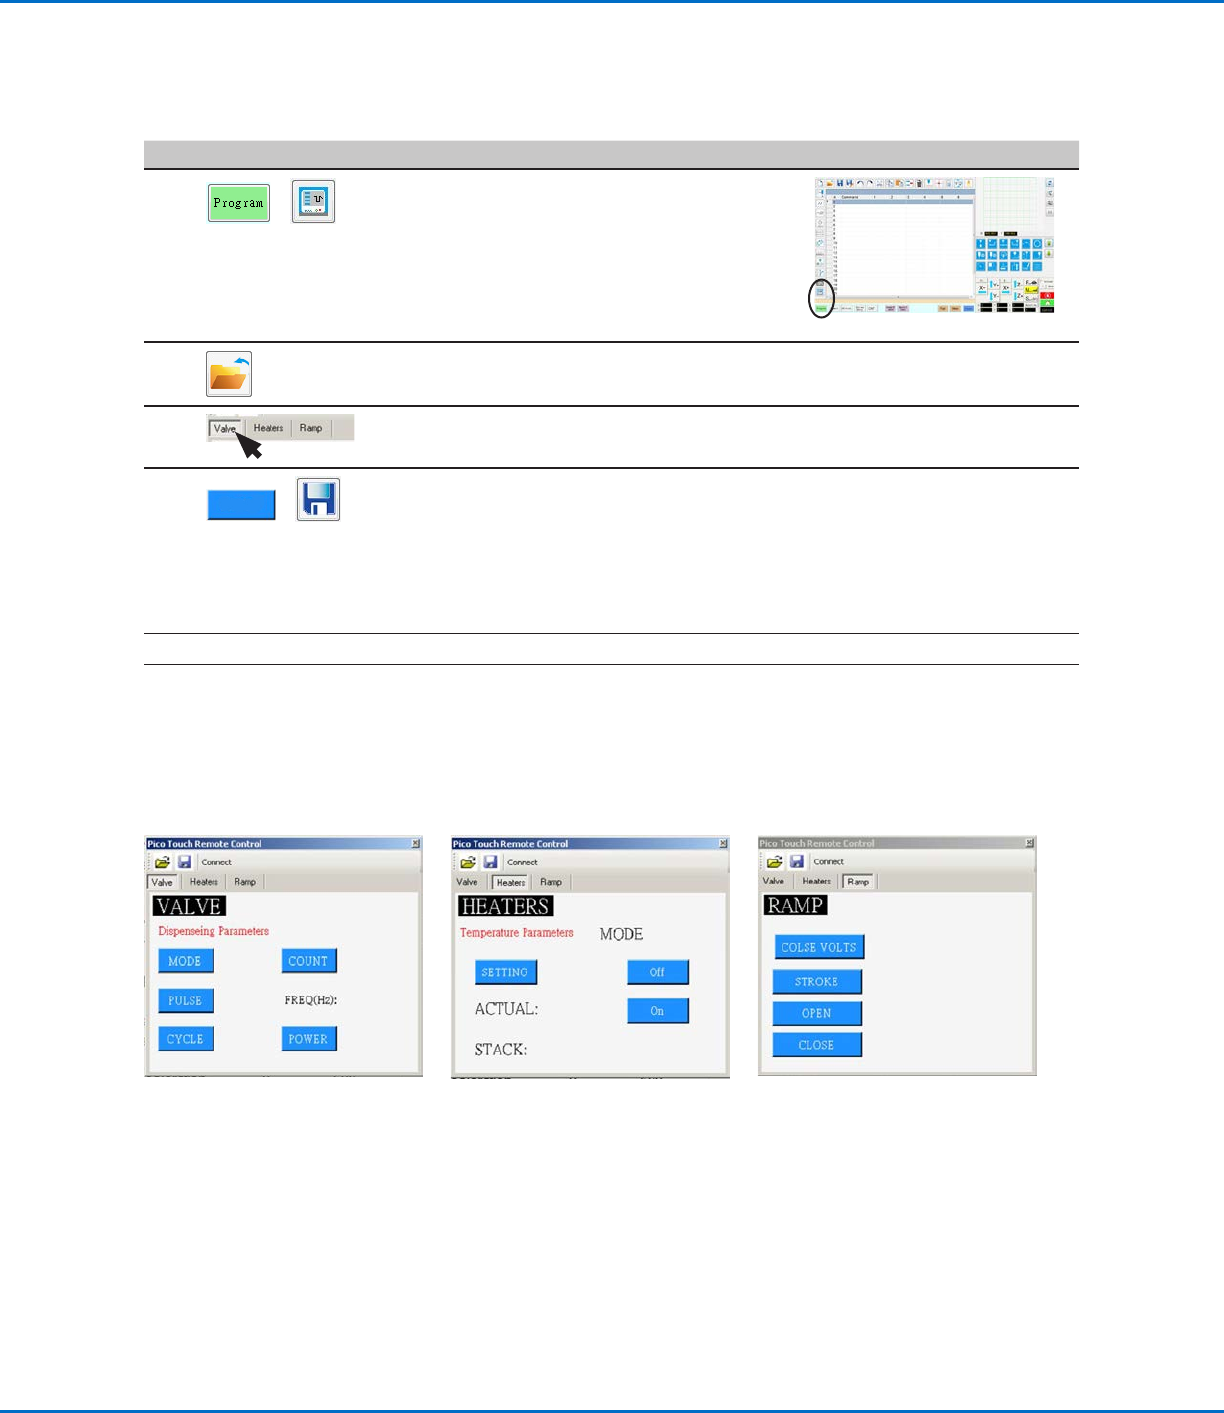
• Click PROGRAM > PICO TOUCH to open the
Pico Touch Remote Control window.
2 • Click OPEN and then open the file you want to edit.
3
• Click the tab for the settings you want to edit (Valve, Heaters, or Ramp).
4
>
• Click the button for the parameter you want to edit and enter the desired setting.
Refer to the Toµch Controller Operating Manual for details on settings.
• Click SAVE AS.
NOTE: Every time you make a change and click SAVE AS, you will have to overwrite
the existing file or create a new file.
• Continue making selections and saving until all desired settings are entered.
5
X
• To exit, close the Pico Touch Remote Control window.
6
• To use the PICO Toµch settings in a program, continue to “To Use the PicoTouch
Parameter Update Command in a Program” on page88.
How to Adjust PICO Parameters Using DispenseMotion (continued)
RV Series Automated Dispensing Systems
88 www.nordsonefd.com info@nordsonefd.com +1-401-431-7000 Sales and service of Nordson EFD dispensing systems are available worldwide.
To Use the PicoTouch Parameter Update Command in a Program
PREREQUISITES
A PICO Toµch Controller is properly installed and connected to the automated dispensing system.
The PICO Toµch parameters are saved in a *.PICO file as described in the previous two procedure.
# Click Step Reference Image
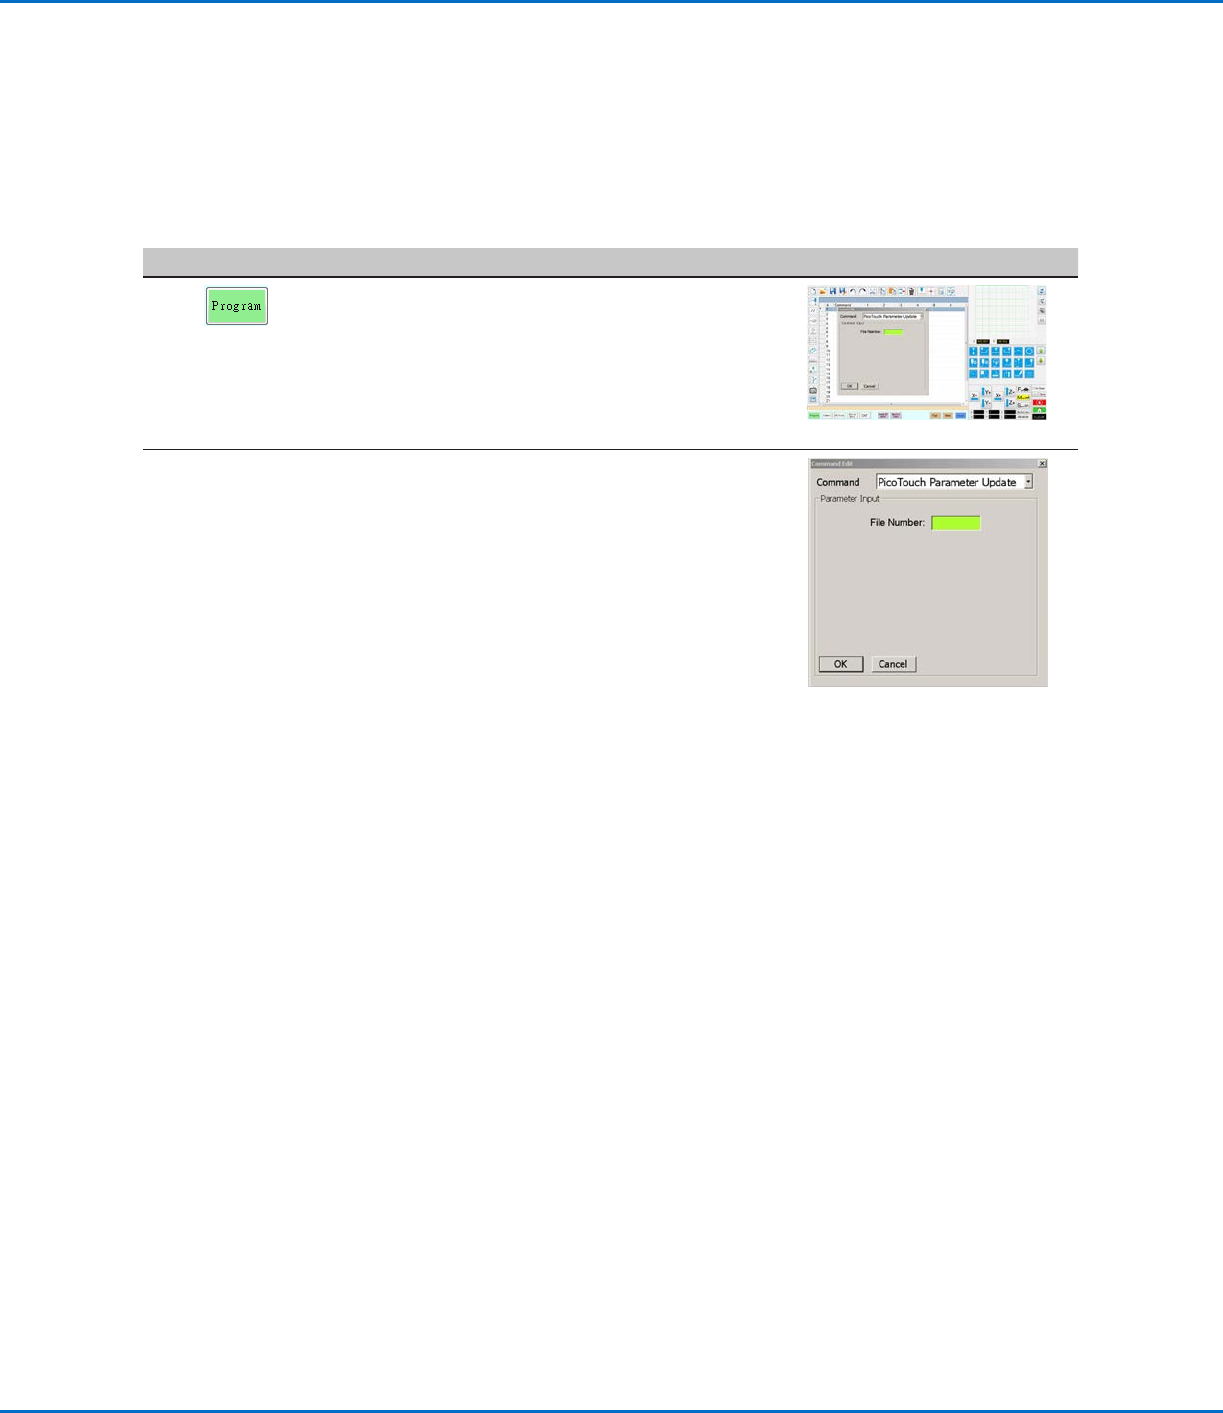
1
>
PICOTOUCH
PARAMETER
UPDATE
• Click the PROGRAM tab
• Double-click the address row where you want
to implement the saved PICO Toµch Controller
settings and select PICOTOUCH PARAMETER
UPDATE.
2 xxxxxxxx • In the FILE NUMBER field, enter the *.pico file
name that contains the PICO Toµch parameters
you want the system to use.
NOTE: The data entered for File Number must
exactly match the *.pico file name.
• Click OK to save.
NOTE: Multiple PicoTouch Parameter Update
commands can exist in the same program. When
the system switches to a new update command,
the Toµch Controller screen updates as well.
Note that delays can occur when switching
programs, for both the running program and the
update of the Toµch Controller screen.
How to Adjust PICO Parameters Using DispenseMotion (continued)
RV Series Automated Dispensing Systems
89www.nordsonefd.com info@nordsonefd.com +1-401-431-7000 Sales and service of Nordson EFD dispensing systems are available worldwide.
Operation
After the system is installed and programmed, the only actions required
from the operator are to switch on the system, run the program for the
workpiece, and shut down the system at the end of the work period.
Starting the System and Running a
Program
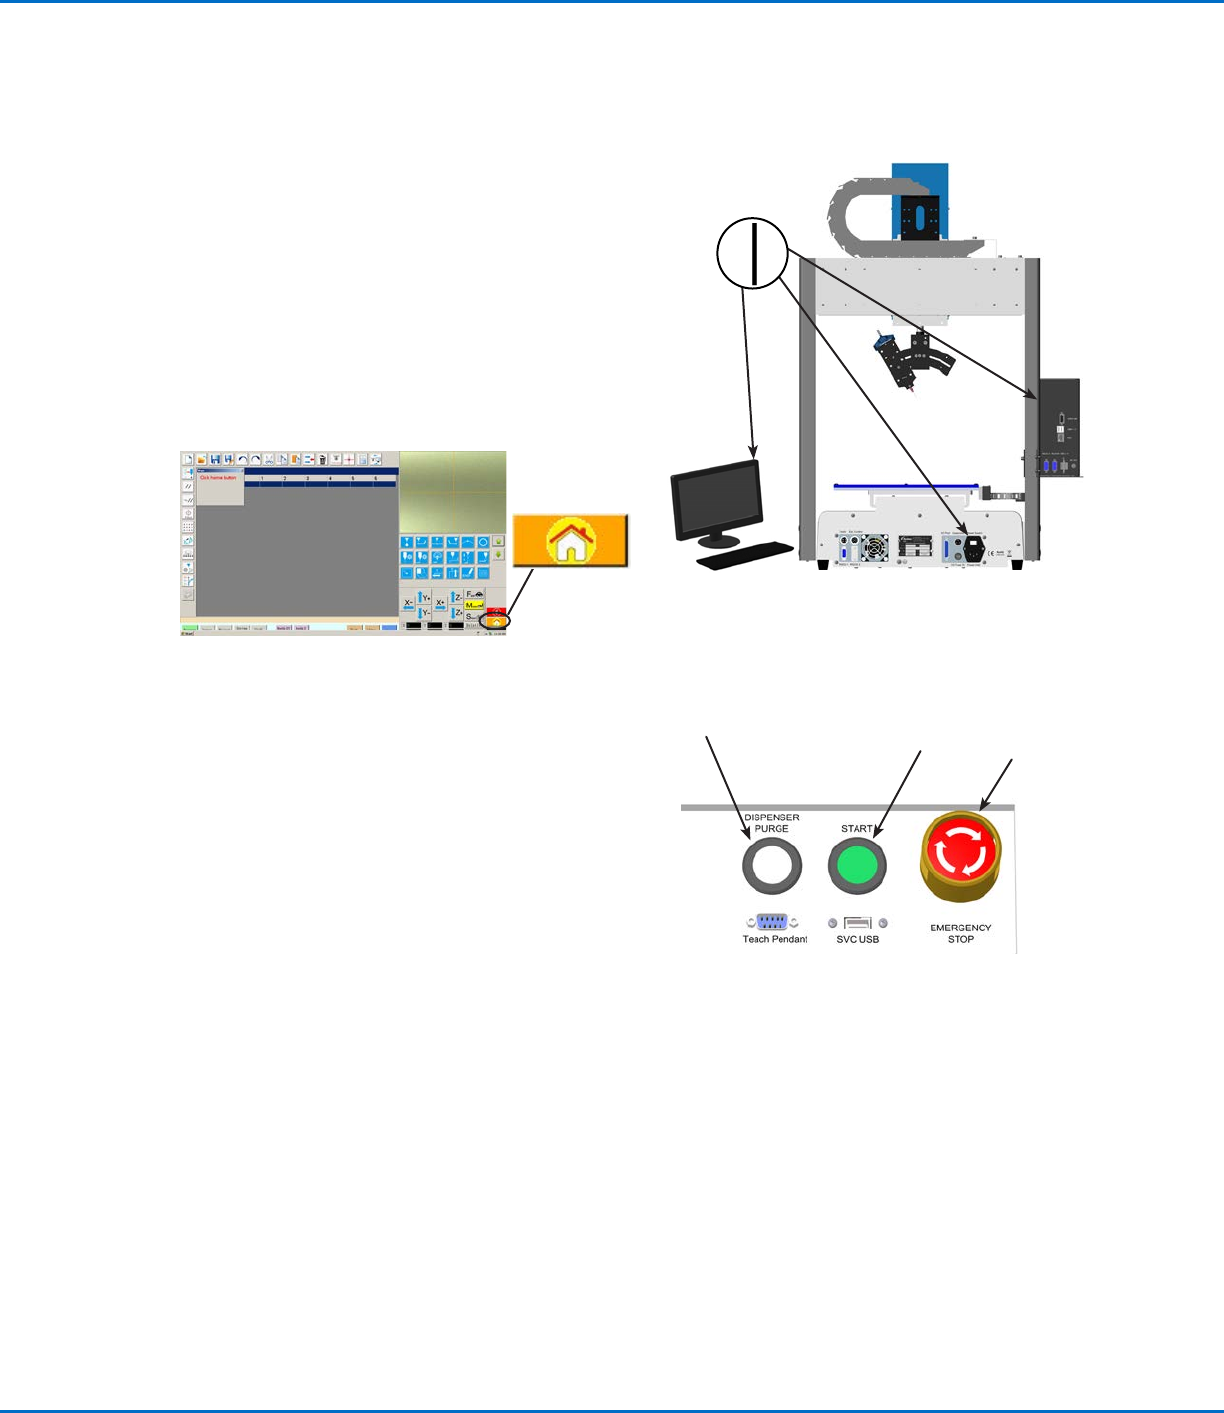
1. Switch on the DispenseMotion controller, monitor, and
robot.
2. Double-click the DispenseMotion icon to open the
dispensing software.
3. Click HOME.
The robot moves the camera to the home position (0, 0, 0)
and the system is ready.
4. Enable the dispensing system, including the valve controller. Refer to
the dispensing equipment manuals as needed.
5. Open the program file for your application.
6. Place the workpiece in the correct location on the fixture
plate.
7. Press the START button on the front of the robot, or click
RUN on the monitor.
8. When necessary, refer to the dispensing system manuals
to refill the dispenser.
9. If an emergency occurs, press the EMERGENCY STOP
button.
EMERGENCY
STOP button
START button
DISPENSER
PURGE button
Running a Program by Scanning a QR Code
PREREQUISITES
QR code scanning is enabled. Refer to “AppendixD, QR Code Scanning Setup” on page134 to enable QR
code scanning.
A QR code is present on the robot work surface and is associated with a program. Refer to “AppendixD, QR
Code Scanning Setup” on page134 to associate a QR code with a program.
1. Position the workpiece on the fixture plate.
2. Press the START button on the front of the robot, or click RUN on the monitor.
The system jogs to the predefined location where a QR code is located, scans the QR code, opens the
associated program, and executes the program.