Nordson_EFD_RV_Series_Operating_Manual.pdf - 第72页
RV Series Automated Dispensing Systems 72 www.nordsonefd.com info@nordsonefd.com +1-401-431-7000 Sales and service of Nordson EFD dispensing systems are available worldwide. How to Cr eate a Mark Refer to “About Marks” o…
RV Series Automated Dispensing Systems
71www.nordsonefd.com info@nordsonefd.com +1-401-431-7000 Sales and service of Nordson EFD dispensing systems are available worldwide.
How to Disable Dispensing for Specific Workpieces in an Array
You can use the Step & Repeat Block icon to disable or enable dispensing for specific workpieces in an array.
NOTE: Use the Step & Repeat commands to create a program that dispenses the same pattern on multiple
workpieces in an array. Refer to “How to Dispense on Multiple Workpieces in an Array” on page70.
PREREQUISITES
The system is properly set up. Refer to “Setting Up and Calibrating the System (Required)” on page45.
The system is in the CCD Mode.
Multiple workpieces are properly positioned on the fixture plate.
The correct Step & Repeat program for the array on the fixture plate is open.
#
Click Step
1
• Make sure the Program screen is open.
2
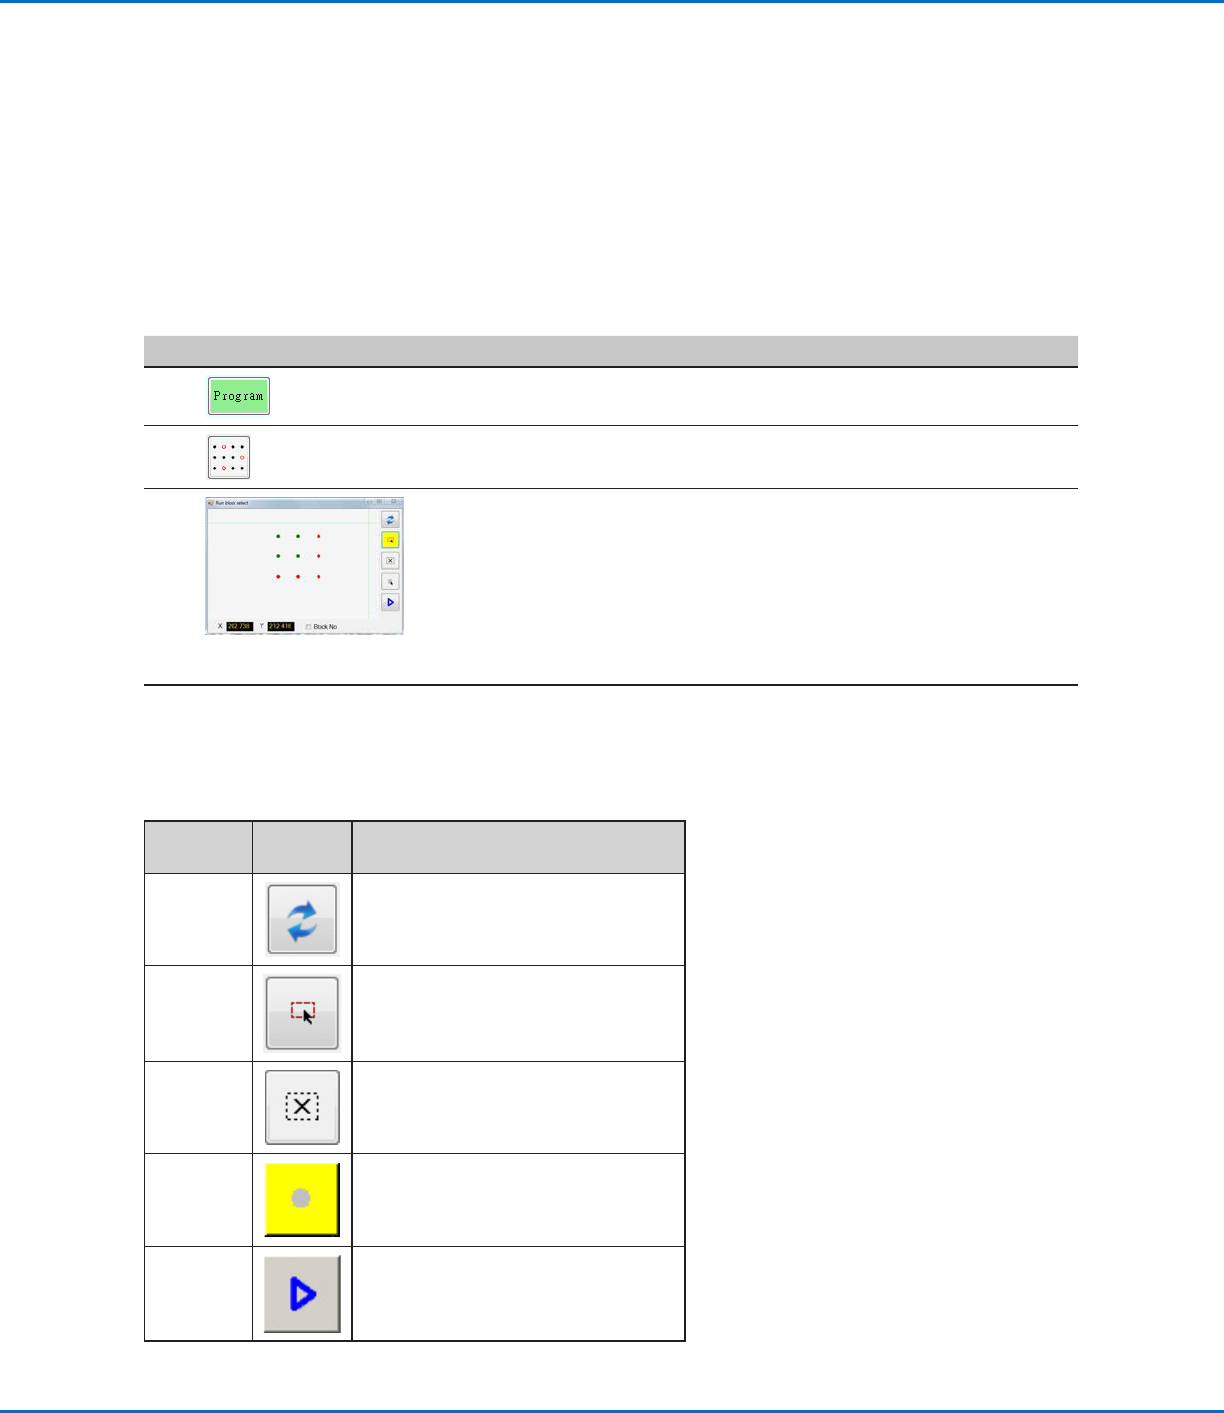
• Click the STEP & REPEAT BLOCK icon.
The Run Block Select window appears.
3
• To disable dispensing for specific workpieces, click the workpiece locations
in the window. Selections turn red when disabled.
- Green: Enabled
- Red: Disabled
• Leave the Run Block Select window open during dispensing.
NOTE: Refer to “Function of the Icons in the Run Block Select Window”
below for the function of the Run Block Select window icons.
4
• When dispensing is complete, close the Run Block Select window. The
system clears all disabled selections.
Function of the Icons in the Run Block Select Window
Icon
Name
Icon Function
Refresh
Refreshes the window.
Select
Entity
Selects a group of blocks.
Cancel
Select
Cancels any selections
Toggle
Select
Toggles a selected block between
enabled and disabled.
Run Block
Select
Runs the currently selected and
enabled blocks.
RV Series Automated Dispensing Systems
72 www.nordsonefd.com info@nordsonefd.com +1-401-431-7000 Sales and service of Nordson EFD dispensing systems are available worldwide.
How to Create a Mark
Refer to “About Marks” on page24 for an explanation of marks. If you want to use fiducial marks in a program to
check workpiece orientation, create at least two marks.
PREREQUISITES
The system is properly set up. Refer to “Setting Up and Calibrating the System (Required)” on page45.
If the tip or any element of the Zaxis head was changed, repeat system setup and calibration using the Robot
Initial Setup wizard. Refer to “Setting Up the System Using the Robot Initial Setup Wizard” on page48.
The system is in the CCD Mode.
# Click Step Reference Image
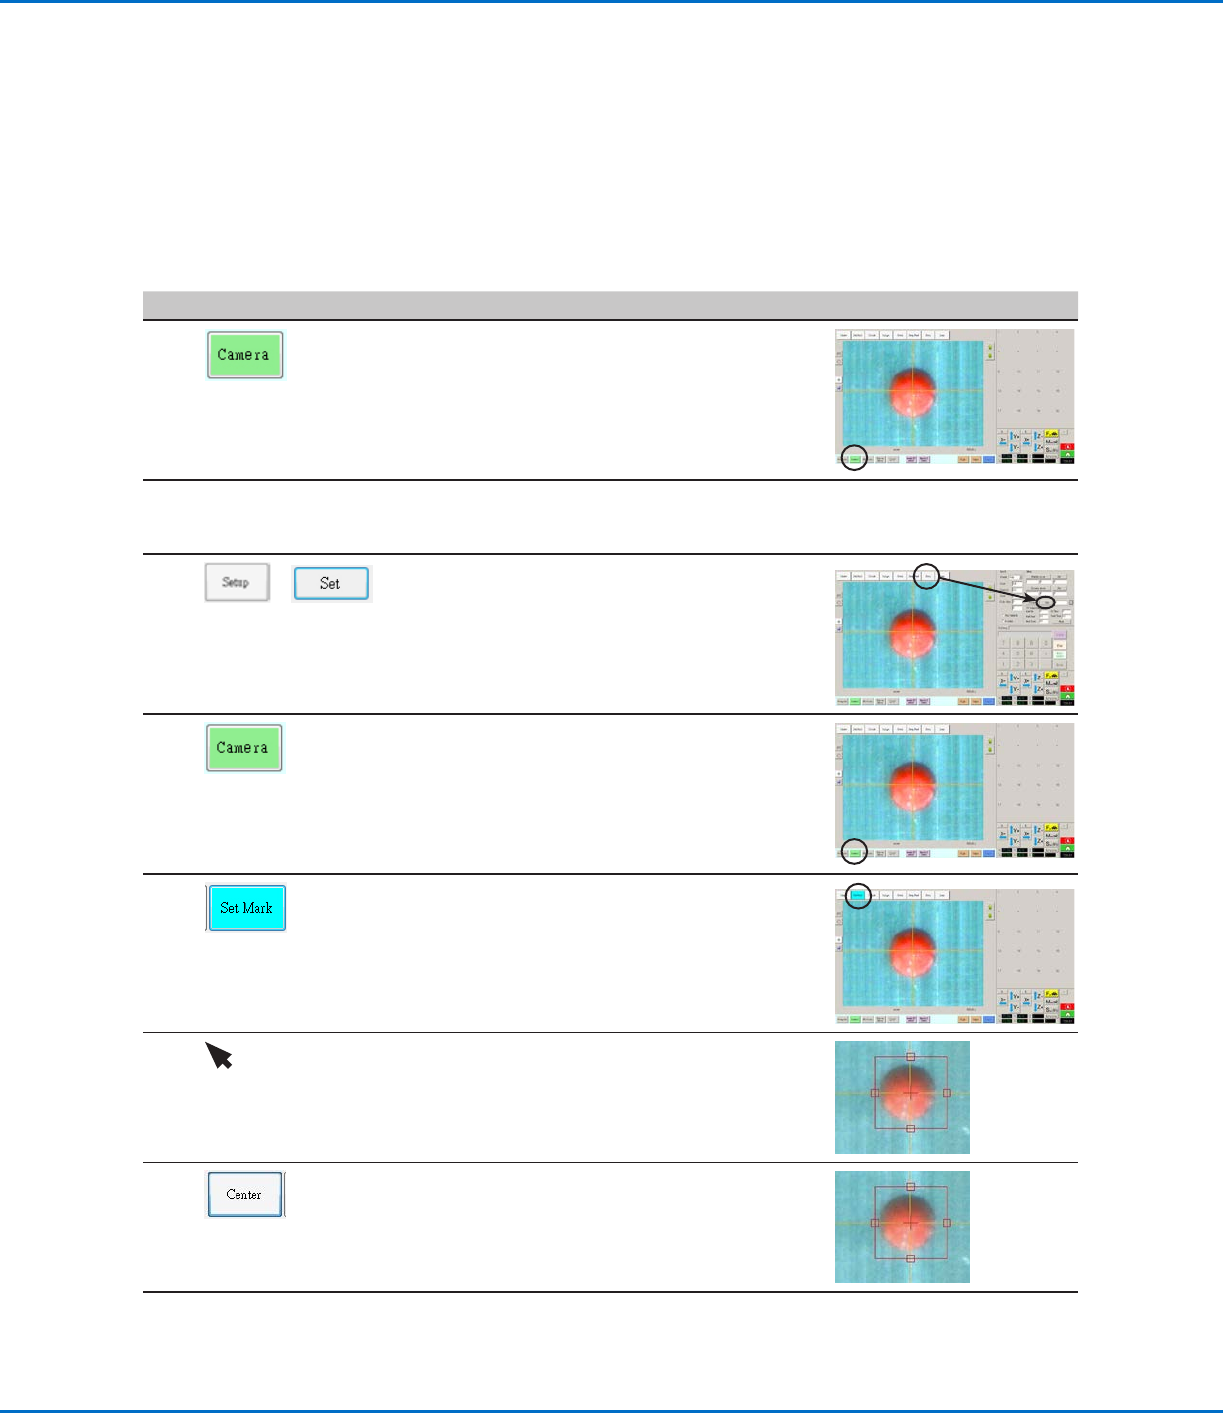
1
• Click CAMERA to go to the camera screen.
2 • Bring the image into focus. Refer to “Camera” on
page16 as needed for instructions on focusing
the camera.
3
>
• Click SETUP to go back to the Camera window
Offset fields.
• Click SET next to Focus in the Offset portion of
the Camera Setup screen.
4
• Click the CAMERA tab.
5 • Click SET MARK.
A red box appears.
6 • Click and hold the center of the red box, drag it
over the dispense dot, and then click and drag the
four box handles such that they outline the dot.
7
• Click CENTER to center the red cross mark on the
target.
Continued on next page
RV Series Automated Dispensing Systems
73www.nordsonefd.com info@nordsonefd.com +1-401-431-7000 Sales and service of Nordson EFD dispensing systems are available worldwide.
How to Improve the Accuracy of Mark Searches
If there are many areas on a workpiece that resemble a mark you saved, you can use the Area function of the
Template Match window to fine-tune how the camera evaluates these areas against the saved mark image. Doing
so increases the find-mark accuracy of the system.
NOTE: Advanced features for manipulating saved mark images to allow the system to find them faster and more
accurately are available in the optional OptiSure software add-on. Refer to “OptiSure Software Key” on page93
for the OptiSure kit part number. Refer to the OptiSure manual for operating instructions.
PREREQUISITES
The system is in the CCD Mode.
The mark you want to fine-tune is saved in the Mark Library.
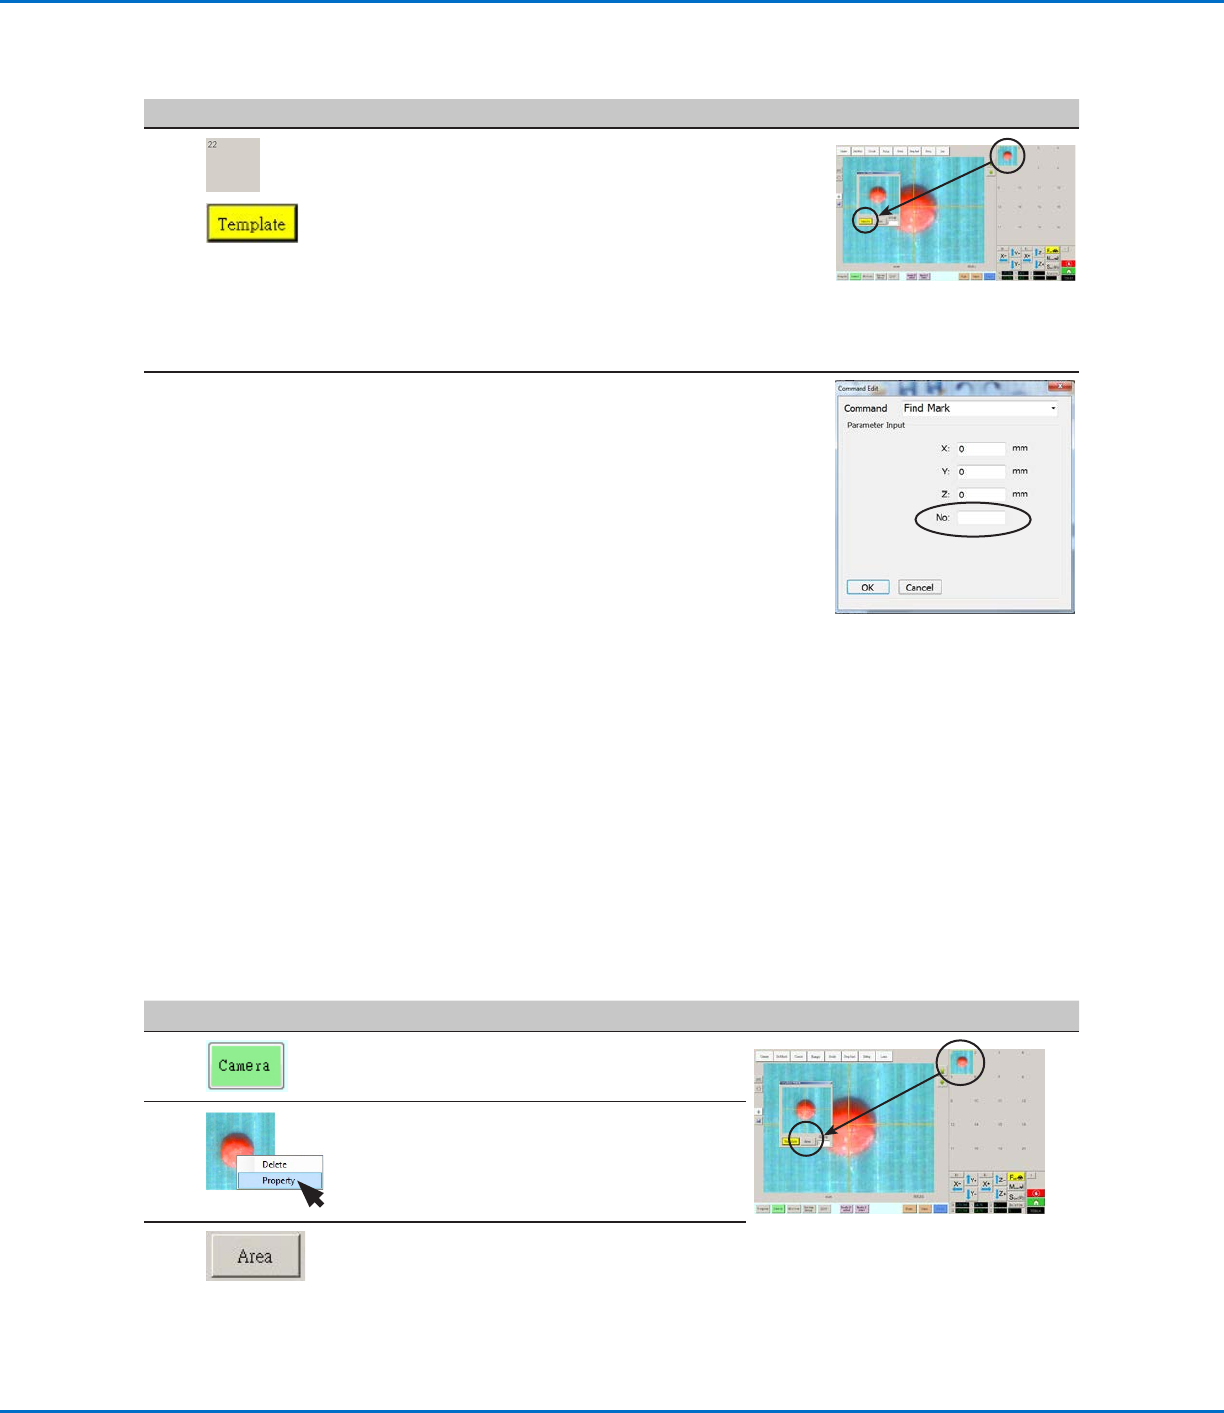
#
Click Step Reference Image
1 • Click CAMERA to go to the camera screen.
2 • Right-click any image in the Mark Library, then
select PROPERTY.
The Template Match window appears.
3
• Click AREA.
• Refer to “Template Match and Area Windows”
on page39 to use the Area window to
fine-tune how the camera searches for and
evaluates the image against other similar areas
on the workpiece.
# Click Step Reference Image
8
>
• Click a socket in the Mark Library to save the
mark, then click TEMPLATE when the Template
Match window appears.
The system saves the image in the Mark Library.
NOTE: If there are many areas on the workpiece
that resemble the mark you saved, you can fine-
tune how the camera finds and evaluates the
mark. Click AREA and refer to “How to Improve
the Accuracy of Mark Searches” below for
detailed information.
You can specify any mark in the Mark Library
within a Find Mark or Fiducial Mark command by
entering the mark number (No.) in the Parameter
Input window. Refer to “How to Use Marks or
Fiducial Marks in a Program” on page74.
How to Create a Mark (continued)