00193437-03_AI_PowerSupplyConversion_DE+EN.pdf - 第233页
Assembly Instructions, Converting the Power Supp ly 7 Conv erting the power supply on the HS-60 / D4 / D1/D2 machine 12/2013 Edition 7.5 Converting the power supply from 3 x 400 VAC to 3 x 208 VAC 231 7.5 Converting the …

7 Converting the power supply on the HS-60 / D4 / D1/D2 machine Assembly Instructions, Converting the Power Supply
7.4 Modules to be converted 12/2013 Edition
230
7.4 Modules to be converted
The following table lists those modules that have to be converted in order to adapt them to the
power supply network.
The connections for the station computer, LCD screens, uninterruptible power supply and compo-
nent tables need not be changed since they are connected to the placement machine's own 230
VAC system.
Module Sub-module Ratings
Power supply
00336145-xx
Transformer T1
00345634-xx
3 x 415 VAC ± 5%
3 x 400 VAC ± 5%
3 x 380 VAC ± 5%
3 x 230 VAC ± 5%
3 x 208 VAC ± 5%
Inrush current limiter
TG 31033-01
00341831-xx
3 x 415 VAC ± 5%
3 x 400 VAC ± 5%
3 x 380 VAC ± 5%
3 x 230 VAC ± 5%
3 x 208 VAC ± 5%
Motor protection trip block
ZM-16-PKZ2
00342495-xx
3 x 415 VAC ± 5%
3 x 400 VAC ± 5%
3 x 380 VAC ± 5%
Motor protection trip block
ZM-32-PKZ2, USA option
00342496-xx
3 x 230 VAC ± 5%
3 x 208 VAC ± 5%
BU1 service socket
Teddy socket guard,
6310 series, white,
00357871-01
1 x 115 VAC (USA)
Main power cable, 4 mm²
3 x 415 VAC ± 5%
3 x 400 VAC ± 5%
3 x 380 VAC ± 5%
Main power cable (USA), 6 mm²
00345937-xx
3 x 230 VAC ± 5%
3 x 208 VAC ± 5%
Tab. 7 - 1 Modules to be converted

Assembly Instructions, Converting the Power Supply 7 Converting the power supply on the HS-60 / D4 / D1/D2 machine
12/2013 Edition 7.5 Converting the power supply from 3 x 400 VAC to 3 x 208 VAC
231
7.5 Converting the power supply from 3 x 400 VAC to 3 x 208 VAC
RISK OF DEATH 7
Disconnect the machine correctly as described in section 1, page 145.
Disconnect the machine from the main power supply.
Take suitable action to ensure that the machine cannot be connected to the power supply dur-
ing the conversion work.
Put up warning signs to indicate that work is being carried out on the electrical system.
7 Converting the power supply on the HS-60 / D4 / D1/D2 machine Assembly Instructions, Converting the Power Supply
7.5 Converting the power supply from 3 x 400 VAC to 3 x 208 VAC 12/2013 Edition
232
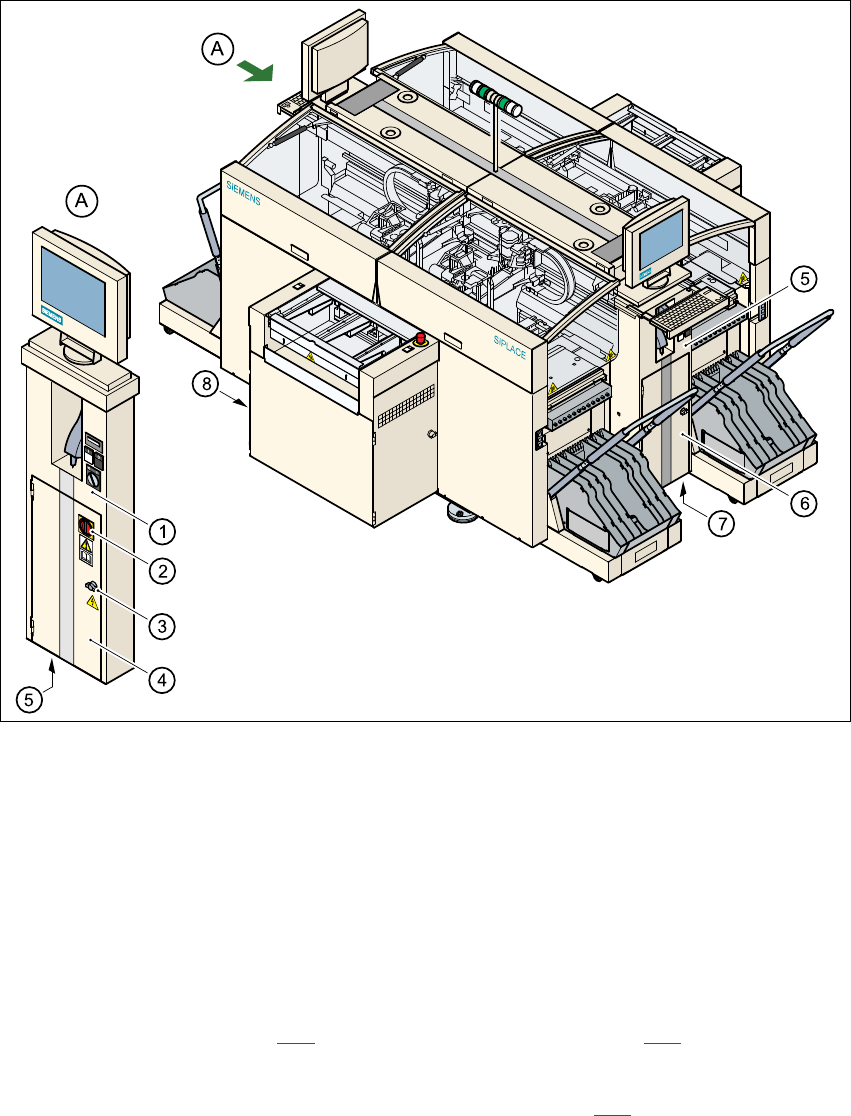
7.5.1 Removing the power supply unit
Fig. 7 - 1 Accessing the power supply unit
(1) Operator panel, left-hand side
(2) Main switch
(3) Door lock
(4) Protective doors to power supply unit
(5) Hole for power cable
Open the lock (item 3 in Fig. 7 - 1) on the protective door (item 4 in Fig. 7 - 1 using the machine
key.
Use the Allen key to loosen the M8 locking screw (item M8 in Fig. 7 - 2) on the lower front panel.
Pull the power supply unit out as far as the stop.