00196578-03_AI_Pipettenwechsler_SX12_DE_EN.pdf - 第54页
1 Introduction 1.4 Staff qualifications and training 54 Assembly Instructions / Montageanleitung SIPLACE SX1/SX2 Nozzle Changer Pipettenwechsler 06/2020 The work described in this manual is divided into modules and is la…

1 Introduction
1.3 Other instructions
Assembly Instructions / Montageanleitung SIPLACE SX1/SX2 Nozzle Changer Pipettenwechsler 06/2020 53
1.3.3.2 Important measures to protect against static charging
► Most plastics can easily become charged and must therefore be kept away from at-risk com-
ponents.
► Always ensure that people, the workplace and packaging are safely earthed when handling
electrostatic sensitive components.
1.3.3.3 Handling ESD modules
As a general rule: Only touch electronic modules if you must carry out work on the modules. In that
case, make sure that you do not touch the pins or printed conductors when you pick up flat mod-
ules.
Only touch components if you are earthed by one of the following measures:
●
You are wearing an ESD wristband.
●
You are wearing ESD shoes.
●
You are wearing ESD shoe earthing strips on an ESD floor.
Immediately before you touch an electronic module, discharge your own body by touching a con-
ductive and earthed object (such as unpainted parts of a switch cabinet, a water pipe, etc.).
Do not allow modules with chargeable and highly insulating materials to touch one another, e.g.
plastic films, insulating table surfaces or items of clothing made from synthetic fibers.
Always place the modules on a conductive surface (table with an ESD coating, conductive ESD
foam, ESD bag or container).
Do not move the assemblies near to data view devices, monitors or television units. Keep a min-
imum distance of 10 cm to monitors.
1.3.3.4 Measurements and modifications to ESD modules
Only perform measurements on modules if one of the following conditions is fulfilled:
●
You are using an earthed measuring device (e.g. via PE conductors).
●
You are using a potential-free measuring device and discharge the measuring head before
the measurement (e.g.by touching an unpainted metal part of the controller casing).
► Always use an earthed soldering iron if you carry out any soldering work.
1.3.3.5 Dispatching ESD modules
► Always store modules and components in conductive packaging (e.g. metallized plastic bags
or metal sleeves) and dispatch them in conductive packaging
► If the packaging is not conductive, place the modules in a conductive envelope before pack-
aging. Use conductive expanded rubber, ESD bags, domestic aluminum foil or paper, for
example. NEVER use plastic bags or film.
► If the module has integral batteries, ensure that the conductive packaging does not touch or
short circuit the battery terminals and, if necessary, first cover the terminals with insulating
tape or material.
1.3.4 Validity of document
This document is valid for the following machine types:
●
SIPLACE SX1/SX2 (up to and including serial no. Lxxxx)
●
SIPLACE SX1/SX2 V2 (serial no. Mxxxx)
●
SIPLACE SX1/SX2 V2 (from serial no. Nxxxx)
●
SIPLACE SX1/SX2 V3
1 Introduction
1.4 Staff qualifications and training
54 Assembly Instructions / Montageanleitung SIPLACE SX1/SX2 Nozzle Changer Pipettenwechsler 06/2020
The work described in this manual is divided into modules and is largely identical for all machine
types:
●
If the work required for specific machines differs from the standard procedure, this will be in-
dicated with reference to the machine number, series and delivery state.
●
Illustrations are only shown as examples. For example, the illustration of a specific machine
type or a machine with different paint finish does not imply that the information following the il-
lustration only applies to the shown machine type.
Please read the circuit diagram folder for any electrical checks.
●
Detailed circuit diagrams folder for SIPLACE SX1/SX2/DX1/DX2 (up to Kxxxx)
[DE+EN:00196475-xx]
●
Detailed circuit diagrams folder for SIPLACE SX1/SX2 V2 (from Lxxxx) [DE+EN:00196979-xx]
●
Detailed circuit diagrams folder for SIPLACE SX1/SX2 V2 (from Nxxxx) [DE+EN:00197899-xx]
●
Detailed circuit diagrams folder for SIPLACE SX1/SX2V3 (fromRxxxx) [DEEN:00198680‑xx]
1.3.5 Release history
Document
SIPLACE SX1/SX2 V1, V2 and V3
Nozzle changer
Assembly instructions
Edition Amendments
07/2012 Initial release
06/2020 Amendments and supplements:
●
SIPLACE SX1/SX2 V3 supplemented
●
Document completely revised and re-edited
1.4 Staff qualifications and training
Qualified or adequately trained personnel means that these people are familiar with the setting up,
operation and maintenance of the machine and the add-on devices and are suitably qualified, e.g.:
●
Have been trained, instructed or authorized to switch on and off, isolate, earth and identify
electrical circuits and system components in accordance with normal safety standards.
●
Have been trained or instructed in the upkeep and use of appropriate safety equipment in
accordance with normal safety standards.
1.5 Abbreviations
Abbreviations Description
CO Component
COT Changeover table
COT-i Changeover table insert
C&P Collect&Place
CPP Collect&Pick&Place head
CPx Collective term for CPP, CP20, CP12 and/or CP6
ESD Electrostatic sensitive device
P&P Pick&Place
NC Nozzle changer
WPC Waffle pack changer
2 Brief description
2.1 Product description
Assembly Instructions / Montageanleitung SIPLACE SX1/SX2 Nozzle Changer Pipettenwechsler 06/2020 55
2 Brief description
In the following section you will find basic information about nozzle changers on the SIPLACE SX1/
SX2 V1, V2 and V3 machines.
2.1 Product description
The second nozzle changer row extends the machine by two nozzle changers. This extends it to
eight nozzle magazines, which significantly increases the flexibility.
General notes
●
The reject bin is used for components larger than 6 x 6 mm and for nozzles.
●
The reject bin for the second row is not used.
●
Only one nozzle changer is contained in the SIPLACE CPx nozzle changer packages.
●
If you want to full configure the row, you will always need another additional nozzle changer
SIPLACE CPx (row 1 / position 1 and 2).
●
When using a second row of nozzle changers, you need to fit the "extension row 2 NC
SX1/2" [03085718‑xx] from the relevant packages for positions 3 and 4.
This extension can be ordered separately.
●
Pay attention to the height setting!
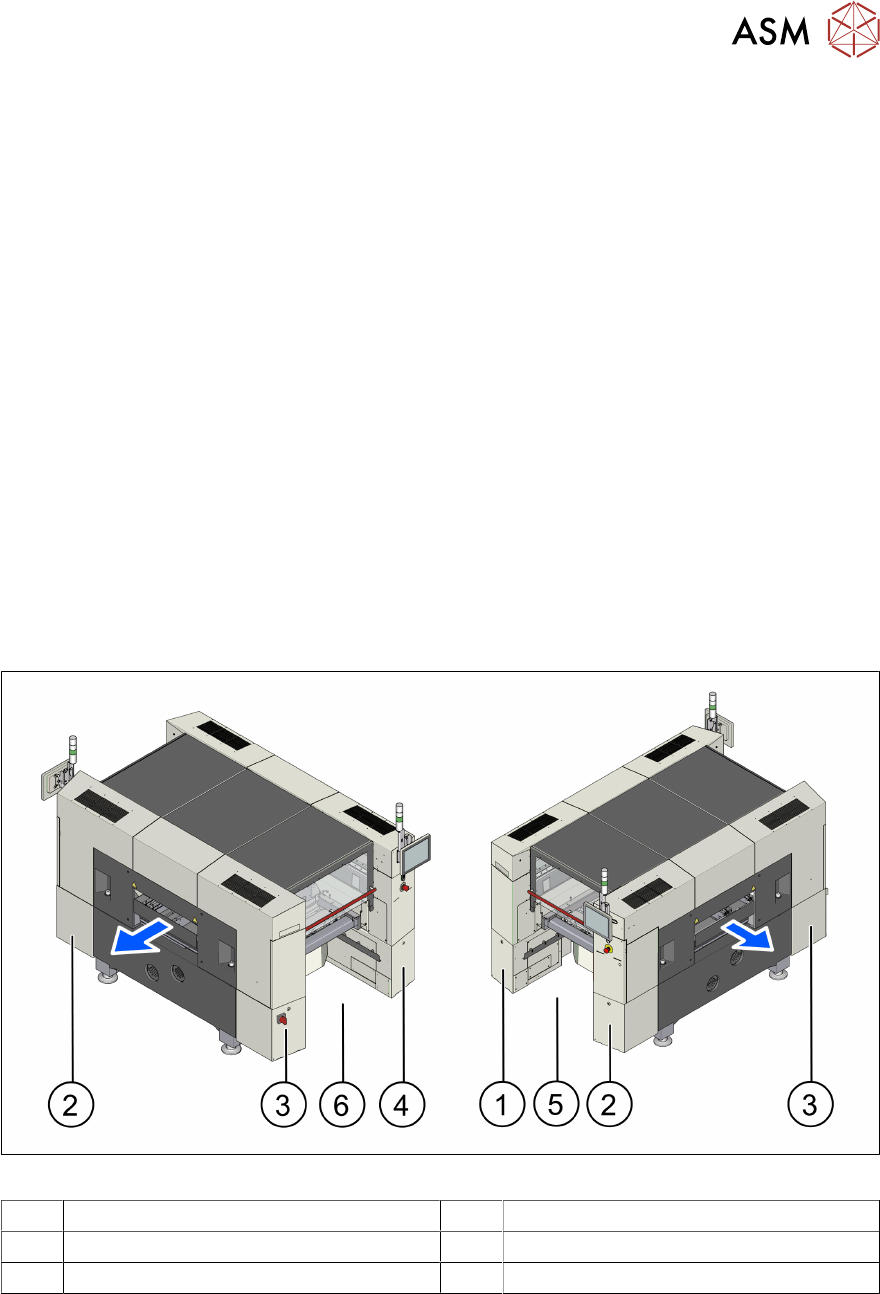
2.1.1 SX1/SX2 V2/V3 overview
Fig.6: Overview (using example of SIPLACE SX V3)
1 Sector 1 (pneumatic unit) 2 Sector 2
3 Sector 3 (power supply) 4 Sector 4
5 Location 1 6 Location 2