00196578-03_AI_Pipettenwechsler_SX12_DE_EN.pdf - 第55页
2 Brief description 2.1 Product description Assembly Instructions / Montageanleitung SIPLACE SX1/SX2 Nozzle Changer Pipettenwechsler 06/2020 55 2 Brief description In the following section you will find basic information…
1 Introduction
1.4 Staff qualifications and training
54 Assembly Instructions / Montageanleitung SIPLACE SX1/SX2 Nozzle Changer Pipettenwechsler 06/2020
The work described in this manual is divided into modules and is largely identical for all machine
types:
●
If the work required for specific machines differs from the standard procedure, this will be in-
dicated with reference to the machine number, series and delivery state.
●
Illustrations are only shown as examples. For example, the illustration of a specific machine
type or a machine with different paint finish does not imply that the information following the il-
lustration only applies to the shown machine type.
Please read the circuit diagram folder for any electrical checks.
●
Detailed circuit diagrams folder for SIPLACE SX1/SX2/DX1/DX2 (up to Kxxxx)
[DE+EN:00196475-xx]
●
Detailed circuit diagrams folder for SIPLACE SX1/SX2 V2 (from Lxxxx) [DE+EN:00196979-xx]
●
Detailed circuit diagrams folder for SIPLACE SX1/SX2 V2 (from Nxxxx) [DE+EN:00197899-xx]
●
Detailed circuit diagrams folder for SIPLACE SX1/SX2V3 (fromRxxxx) [DEEN:00198680‑xx]
1.3.5 Release history
Document
SIPLACE SX1/SX2 V1, V2 and V3
Nozzle changer
Assembly instructions
Edition Amendments
07/2012 Initial release
06/2020 Amendments and supplements:
●
SIPLACE SX1/SX2 V3 supplemented
●
Document completely revised and re-edited
1.4 Staff qualifications and training
Qualified or adequately trained personnel means that these people are familiar with the setting up,
operation and maintenance of the machine and the add-on devices and are suitably qualified, e.g.:
●
Have been trained, instructed or authorized to switch on and off, isolate, earth and identify
electrical circuits and system components in accordance with normal safety standards.
●
Have been trained or instructed in the upkeep and use of appropriate safety equipment in
accordance with normal safety standards.
1.5 Abbreviations
Abbreviations Description
CO Component
COT Changeover table
COT-i Changeover table insert
C&P Collect&Place
CPP Collect&Pick&Place head
CPx Collective term for CPP, CP20, CP12 and/or CP6
ESD Electrostatic sensitive device
P&P Pick&Place
NC Nozzle changer
WPC Waffle pack changer
2 Brief description
2.1 Product description
Assembly Instructions / Montageanleitung SIPLACE SX1/SX2 Nozzle Changer Pipettenwechsler 06/2020 55
2 Brief description
In the following section you will find basic information about nozzle changers on the SIPLACE SX1/
SX2 V1, V2 and V3 machines.
2.1 Product description
The second nozzle changer row extends the machine by two nozzle changers. This extends it to
eight nozzle magazines, which significantly increases the flexibility.
General notes
●
The reject bin is used for components larger than 6 x 6 mm and for nozzles.
●
The reject bin for the second row is not used.
●
Only one nozzle changer is contained in the SIPLACE CPx nozzle changer packages.
●
If you want to full configure the row, you will always need another additional nozzle changer
SIPLACE CPx (row 1 / position 1 and 2).
●
When using a second row of nozzle changers, you need to fit the "extension row 2 NC
SX1/2" [03085718‑xx] from the relevant packages for positions 3 and 4.
This extension can be ordered separately.
●
Pay attention to the height setting!
2.1.1 SX1/SX2 V2/V3 overview
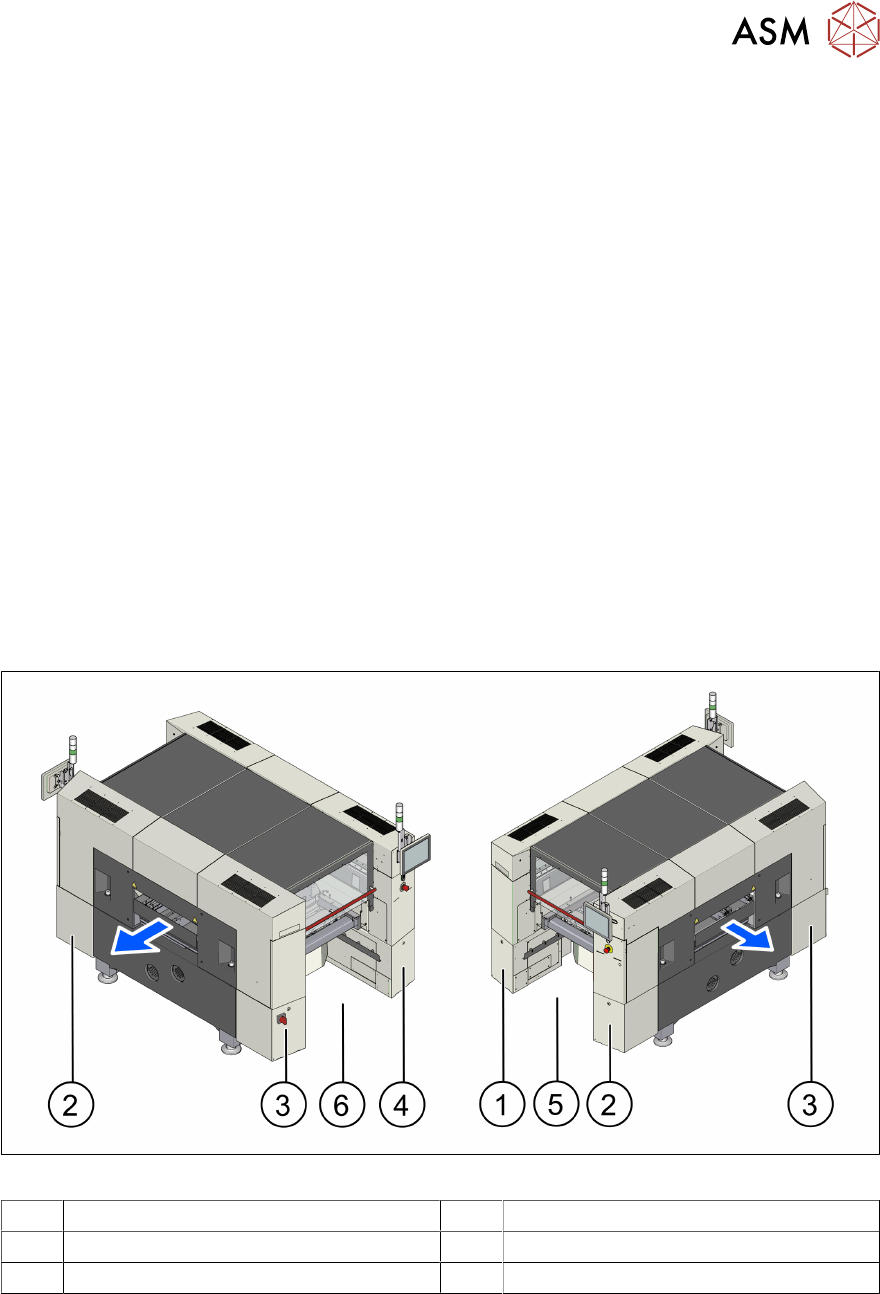
Fig.6: Overview (using example of SIPLACE SX V3)
1 Sector 1 (pneumatic unit) 2 Sector 2
3 Sector 3 (power supply) 4 Sector 4
5 Location 1 6 Location 2

2 Brief description
2.1 Product description
56 Assembly Instructions / Montageanleitung SIPLACE SX1/SX2 Nozzle Changer Pipettenwechsler 06/2020
2.1.1.1 SX1/SX2 V2 from machine no. Nxxxx
The following modules are new from machine number Nxxxx upwards:
●
Power supply unit (including 110V option)
●
Station computer
●
I/O module
●
MGCU
For details, read the relevant chapters in this manual.
2.1.1.2 Serial Number of Module
Fig.7: Serial number
The serial number of your placement
machine can be found on the typeplate (1).