00197082-03_AI_MTC2_at-Loc2_X-Series-S_DE_EN.pdf - 第38页
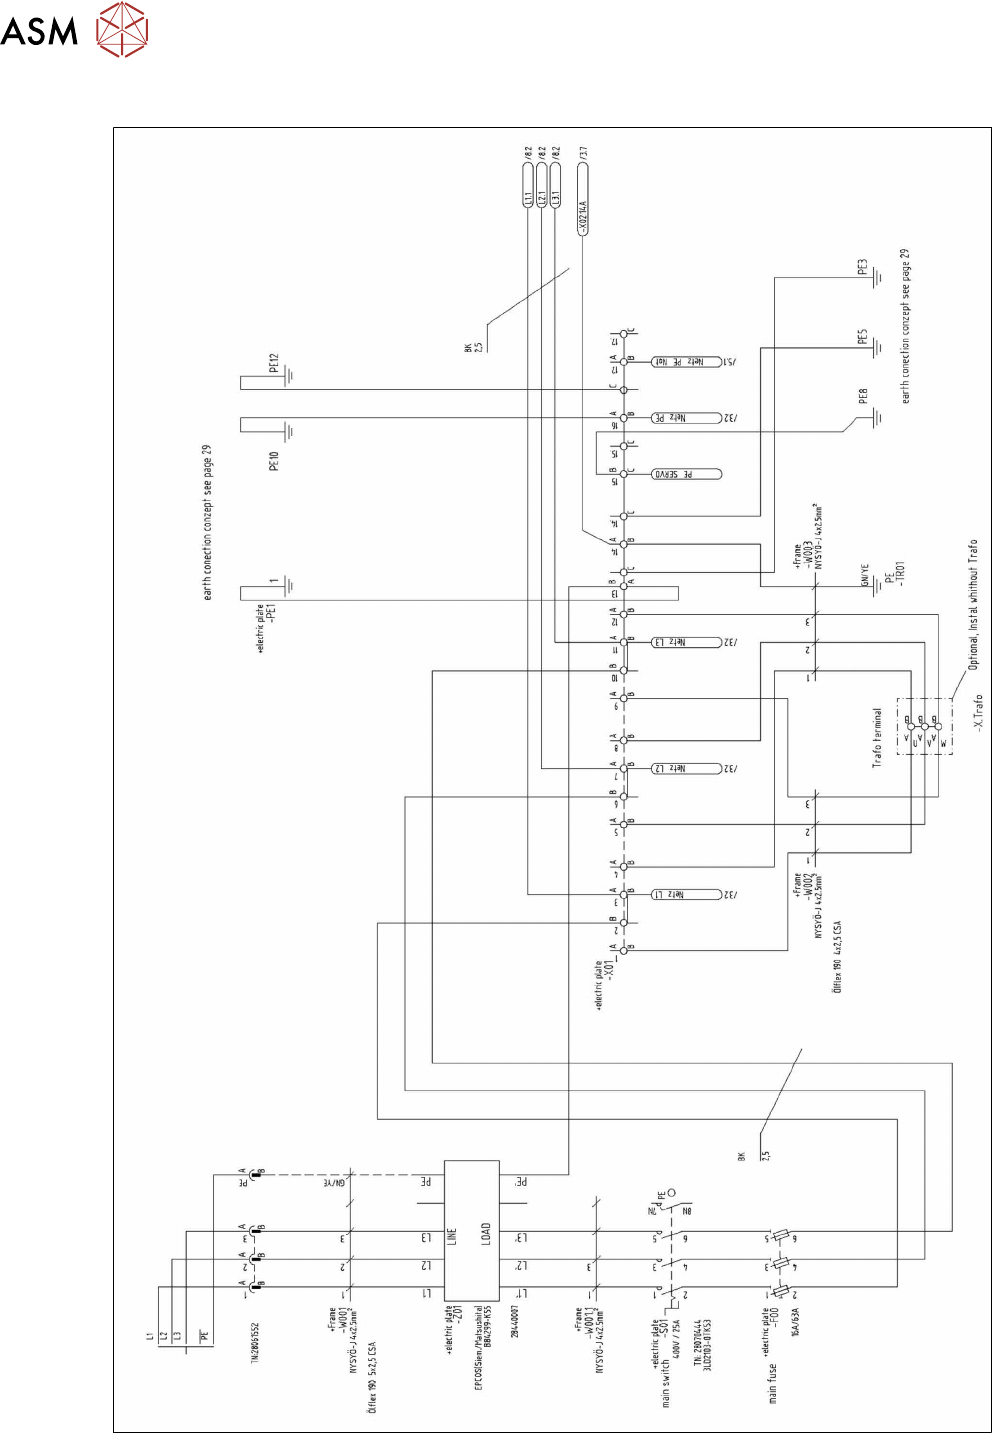
4 Anhang 4.2 Stromlaufpläne 38 Assembly Instructions / Montageanleitung SIPLACE X-Series S MTC2 at Location 2 MTC2 an Stellplatz 2 05/2019 4.2.1 Stromlaufplan MTC2 Abb.31: Stromlaufplan MTC
4 Anhang
4.2 Stromlaufpläne
Assembly Instructions / Montageanleitung SIPLACE X-Series S MTC2 at Location 2 MTC2 an Stellplatz 2 05/2019 37
1
1
3
2
Abb.29: Montagehilfe
1. Befestigung
2. Montagehilfe
3. Öse
► Montieren Sie die Montagehilfe(2) an
die vorgesehenen Befestigungen(1)
am BE-Einzug.
► Befestigen Sie die Hebevorrichtung an
der Öse(3) der Montagehilfe(2).
HINWEIS!
Je nach Stellplatz kann der BE-Einzug
an verschiedenen Positionen in die
Maschine eingebaut werden. Markie-
ren Sie die Position an der sich der
BE-Einzug befindet, damit dieser wie-
der an die ursprüngliche Position mon-
tiert werden kann.
.
1
1
1
1
2
1
Abb.30: Befestigungsschrauben
► Entfernen Sie die Befestigungsschrau-
ben(1) des BE-Einzugs.
► Heben Sie den kompletten BE‑Einzug
aus der Maschine heraus, und legen
Sie ihn auf eine geeignete Unterlage
(vier Holzklötze etc.).
► Achten Sie dabei darauf, dass Sie die
Ventile, Anschlusskabel, Schläuche,
etc. nicht beschädigen.
Einbau
► Montieren Sie die Montagehilfe auf den neuen BE-Einzug und heben ihn mit der Hebevorrich-
tung in die Maschine.
► Stellen Sie komplette Verkabelung wieder her. Verwenden Sie ggf. als zusätzliches Hilfsmittel
die Wirkschaltplanmappe.
► Bringen Sie den BE-Einzug in die endgültige Position (an die vorher markierte Einbau-Posi-
tion).
Achten Sie darauf, dass Sie die Kabel und Schläuche nicht beschädigen.
► Der weitere Einbau erfolgt in umgekehrter Reihenfolge.
4.2 Stromlaufpläne
Weitere Informationen finden Sie in der Wirkschaltplanmappe:
●
Wirkschaltplanmappe SIPLACE X-Serie S (bis Gxxxx) [DE+EN:00197021‑xx]
●
Wirkschaltplanmappe SIPLACE X-Serie S (ab Hxxxx) [DE+EN:00197920‑xx]
4 Anhang
4.2 Stromlaufpläne
38 Assembly Instructions / Montageanleitung SIPLACE X-Series S MTC2 at Location 2 MTC2 an Stellplatz 2 05/2019
4.2.1 Stromlaufplan MTC2
Abb.31: Stromlaufplan MTC

39Assembly Instructions / Montageanleitung SIPLACE X-Series S MTC2 at Location 2 MTC2 an Stellplatz 2 05/2019
Contents:
Contents:
1 Introduction.. 41
1.1 Safety instructions.. 41
1.1.1 Conventions for the use of safety instructions and symbols.. 41
1.1.2 Safety instructions for working with strong magnetic fields.. 42
1.1.3 Safety instructions for the power supply (without SMPS).. 42
1.1.4 Safety instructions for the power supply (with SMPS).. 43
1.1.5 Safety instructions for the compressed air supply.. 45
1.1.6 Safety instructions for work on the cutting device.. 45
1.1.7 Safety instructions for the gantry.. 45
1.1.8 Safety instructions on hazardous materials.. 45
1.1.9 Classification of the optical systems.. 46
1.1.9.1 Classification of the whole machine.. 46
1.1.9.2 Laser classification.. 46
1.1.9.3 Classification of the camera systems.. 46
1.2 Preparatory work..... 46
1.3 Other instructions.. 49
1.3.1 Environmentally-friendly disposal of materials and components.. 49
1.3.2 Use of original accessories and spare parts.. 49
1.3.3 ESD guidelines.. 50
1.3.3.1 What does ESD mean?.. 50
1.3.3.2 Important measures to protect against static charging.. 50
1.3.3.3 Handling ESD modules.. 50
1.3.3.4 Measurements and modifications to ESD modules.. 50
1.3.3.5 Dispatching ESD modules.. 51
1.3.4 Release History.. 51
1.4 Staff qualifications and training.. 51
1.5 Abbreviations.. 51
2 Brief Description.. 53
2.1 Product Description.. 53
2.1.1 Overview of the Modules.. 53
2.2 Requirements.. 53
2.3 Restrictions.. 54
2.4 Scope of Delivery.. 54
2.4.1 Overview of Parts.. 57
2.5 Tools and Equipment Required.. 57
2.6 Required Working Time.. 58
3 Installation.. 59
3.1 Preparatory Steps.. 59
3.2 Assembling the MTC2 Frame.. 60
3.3 Converting the Cover Guide.. 62
3.4 MTC Connections.. 64
3.5 Using the MTC with a SIPLACE CPP.. 65
3.6 Final Work:.. 66