FLX500-maintenance.pdf - 第25页
2 … Periodic Maintenance Annual Maintenance —21— Figure 1 1—Black Air Filter Housing gasket. (Filter and Housing are removed.) 8. Repeat for the lower filter . 9. Release the Emergency-stop button. Gantry Lubrication T…

Data I/O
FLX500 Chptr 2
—20—
Annual Maintenance
• Checking Air Filters
• Gantry Lubrication
• Annual Performance Verification
Checking Air Filters
The PNP Head uses two air filters. Visually
check the filters for dirt each year (filters are not
white by several shades and possibly have visi-
ble debris). If necessary, or if performance is
affected (dropping devices), remove the filters
from the PNP Head to inspect them. (Mainte-
nance interval may be adjusted depending on
your findings.)
Tools Required:
• Standard screwdriver
• tweezers
To remove the air filters:
1. End the job if one is running. For help end-
ing a job, tap the [?] for on-screen Help.
2. Push the Emergency-stop button. (This
allows moving the gantry by hand.)
3. Open the cover and move the PNP Head
closer to you for access to its far side.
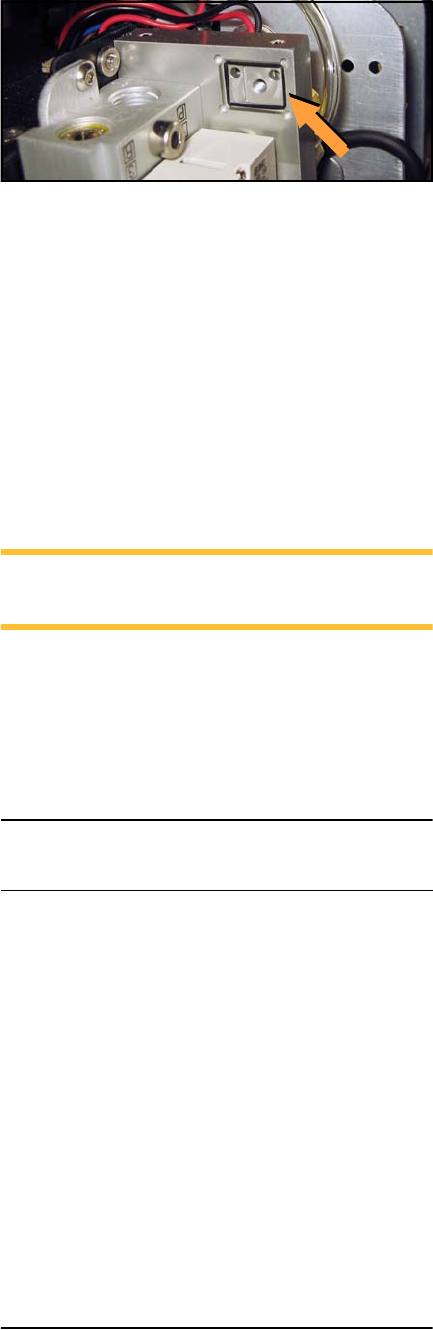
4. Locate the two clear, square plastic housings
that hold the filters. Unscrew the screw
securing the upper filter.
5. Remove the housing, being careful not to
disrupt its gasket.
6. Pull the white strip filter from the housing
with tweezers. If it is more than slightly
dirty, replace it with a new filter or contact
Data I/O.
7. Carefully replace the filter housing without
disrupting the gasket, and reinstall the
screw.
2 … Periodic Maintenance Annual Maintenance
—21—
Figure 11—Black Air Filter Housing gasket. (Filter
and Housing are removed.)
8. Repeat for the lower filter.
9. Release the Emergency-stop button.
Gantry Lubrication
The FLX500 has two Ball Rail Systems in the gan-
try. The larger rail defines the X-axis (left-right)
and the smaller rail, which is on the PNP Arm,
defines the Y-axis (front-back).
NOTE: Maintenance intervals may be
adjusted depending on the amount of use.
Oil Specification
The OEM (Original Equipment Manufacturer)
recommends mineral oil CLP (DIN 51517) or
HLP (DIN 51524) with a viscosity of ISO VG100
in accordance with DIN 51519.
Tools Required:
• Lubricating oil (above)
• Clean cloth
• Syringe oil tube (optional)
Lubricate the Small Rail as Follows:
1. End the job if one is running. For help end-
ing a job, tap the question mark button [?]
for on-screen Help.
2. Push the Emergency-stop button. This
allows moving the gantry by hand.
3. Wipe any dust or dirt off the rail.
Data I/O Part Number
Lubricating oil, Guide rail 560-0002-001
Data I/O
FLX500 Chptr 2
—22—
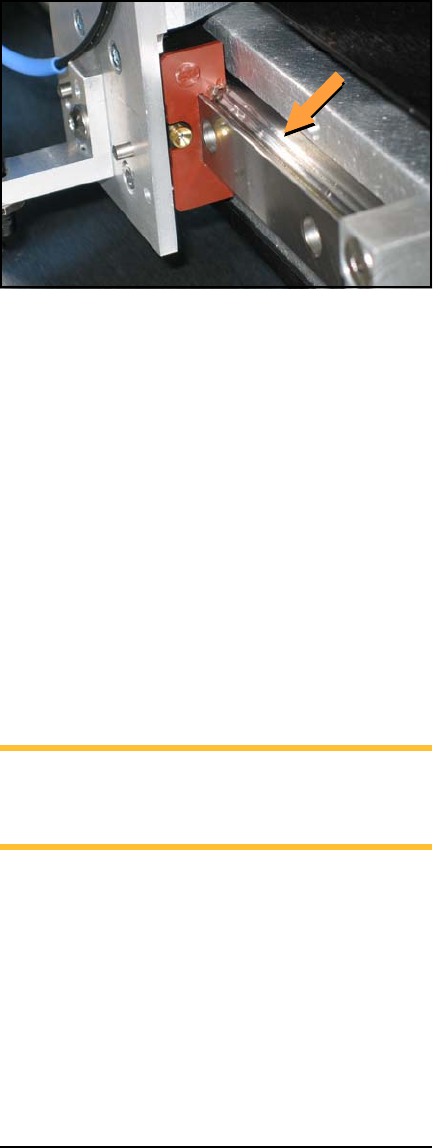
4. Using the supplied tube with a needle end,
apply the lube to the two holes on the bot-
tom side of the carriage.
5. Since the holes on the top side are not acces-
sible, apply the lube generously to the upper
V-groove with a soft, lint-free cloth. See Fig-
ure 12.
Figure 12—Apply lube to the V-groove on the Y-axis
rail
6. Move the PNP Head assembly along the rail.
Wipe off excess oil.
7. Repeat as needed.
8. Release the Emergency-stop button.
Lubricate the Large Rail as Follows:
1. End the job if one is running. For help end-
ing a job, tap the question mark button [?]
for on-screen Help.
2. Push the Emergency-stop button. This
allows moving the gantry by hand.
3. Wipe any dust or dirt off the rail.
NOTE: There is one carriage on the large rail
with a plate on each end of the carriage. Each
plate contains two lubrication holes.
4. Using the supplied tube with a needle end,
apply the lube to the two holes in the plate at
one end of the carriage. See Figure 13. Apply
0.33 cm
3
(.33 milliliters) (.011 oz.) per plate,
with half (0.17cm
3
) applied to each lubrica-
tion hole.